Support
Vending Machine Quick Start Guide
Difficulty
Steps
7
Time Required
02:00:00 - 03:00:00
Introduction
As your machine arrives, please use the video & written guides below to complete the initial setup. We strongly recommend finishing the setup before moving the machine to its final location, in case any issues need to be addressed.
This guide covers everything you need to get your machine running, including uploading your products to the online dashboard, binding them to the correct cargo lanes, downloading the product information to the machine, and testing that the Nayax payment system and vending functions are working properly.
Again, we recommend completing all setup steps and testing the machine before relocating to the location. On moving day, all you’ll need to do is position the machine, wait a few hours before plugging it in, connect it to Wi-Fi, and you’ll be ready to start selling.
Need a little extra help getting started? 🤝
We’re happy answer any questions you may have!
👉 BOOK A SETUP CALL 📅✨
Tools
Computer
Scissors
Prybar & Screwdriver
Pallet Jack (Recommended)
SIM Card (Recommended)
Parts
Step 0
Nayax Account Setup

Around the time your machine shipped, you should have received an email from Nayax (similar to the example photo) inviting you to set up your online account. This step is required for your credit card terminal to function.
It is very important that you complete this setup right away because Nayax can be slow—sometimes up to 2 weeks—to activate new accounts. The onboarding process may take some time as well.
The signup link in the email also expires within 7 days. If you find the email and the link has expired, please let us know immediately and we will have Nayax send you a new activation link.
Another important note regarding your Nayax setup: Nayax offers two payment modes. For vending machines, the recommended option is pre-selection, where the customer selects a product first and then taps their card to pay. Please contact Nayax Support and ask them to set your machine to pre-selection.
Also, Nayax’s default pre-authorization hold is often set to $50, which can cause customer issues. Ask Nayax to reduce the pre-auth hold to just above your most expensive product (typically around $10).
Step 1
Online Dashboard Product Setting
This is the first step you can begin even before your machine arrives. You’ll need to decide which products you plan to sell and create their listings in the online dashboard. This preparatory step is important for a smooth setup, and even if your final product selection changes based on the needs of your location, we recommend doing some market research and practicing with the dashboard in advance. Please note that you cannot bind products to your machine until it has been powered on and connected to the internet at least once.
Step 1.1
Product Spreadsheet
This is the first step you can begin even before your machine arrives. You’ll need to decide which products you plan to sell and create their listings in the online dashboard. This preparatory step is important for a smooth setup, and even if your final product selection changes based on the needs of your location, we recommend doing some market research and practicing with the dashboard in advance. Please note that you cannot bind products to your machine until it has been powered on and connected to the internet at least once.
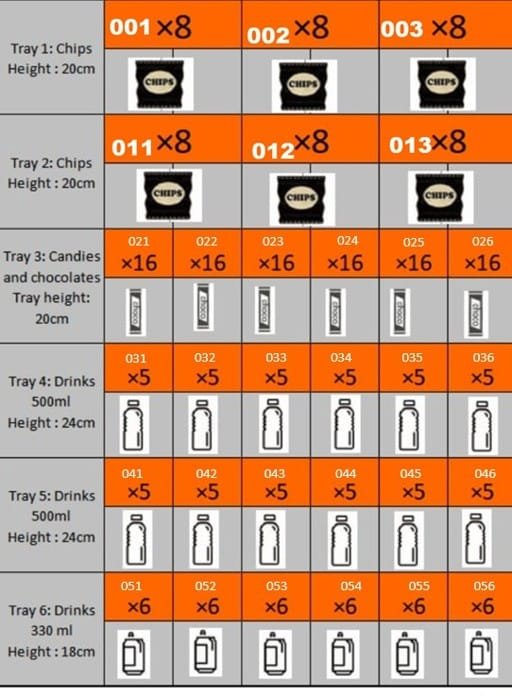
Please review the sample product sheet and fill it out based on the items you plan to sell. You can conduct market research by checking popular products in local stores and other vending machines, and by seeing what’s available at bulk retailers such as Walmart, Sam’s Club, or Costco. This will help you choose items that are both cost-effective and likely to sell well.
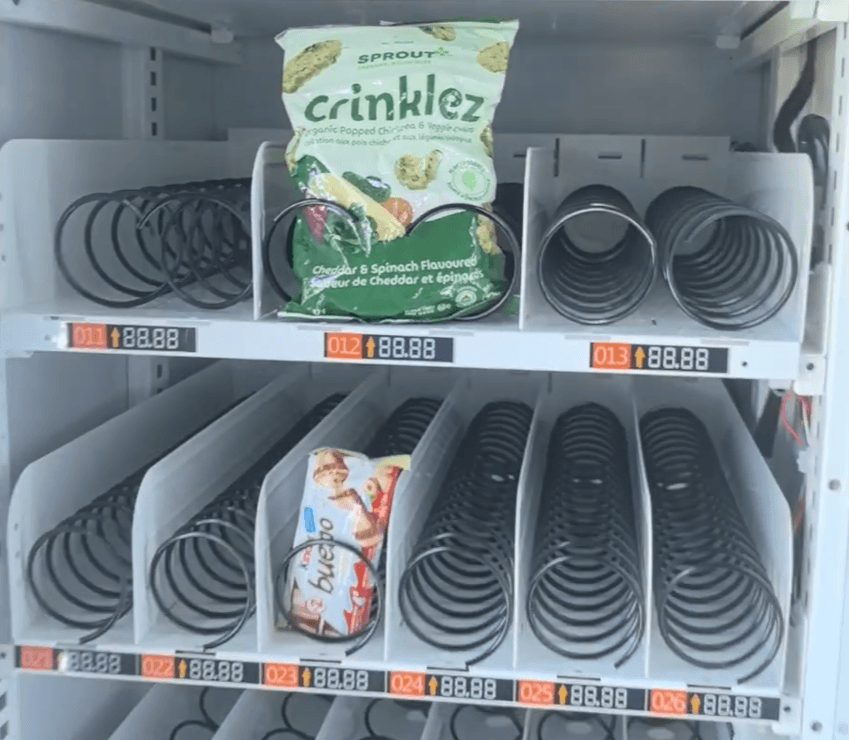
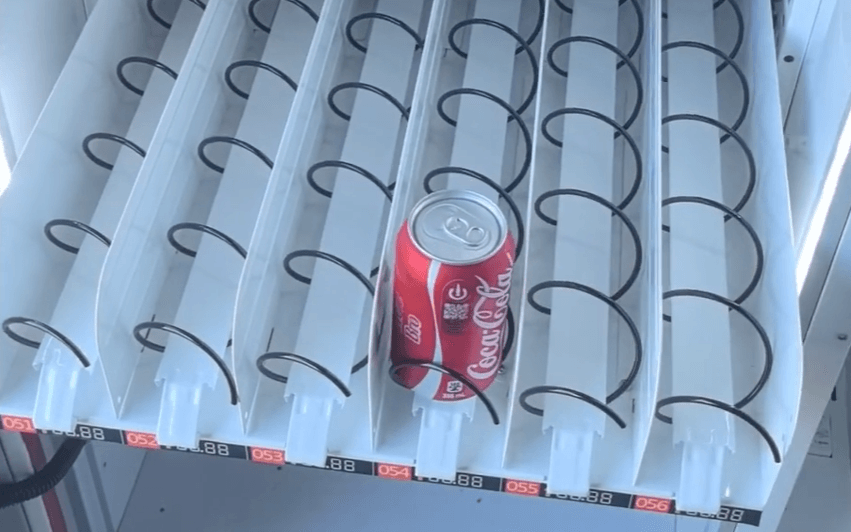
The photo shows our standard slot configuration: there are two rows of snacks for a total of six slots for chip or snack bags, one row for six slots of candy bars, two rows for standard 500 ml (16.9 fl oz) drinks totaling twelve slots, and one row for 12 fl oz (355 ml) drink cans with six slots.
Step 1.2
Upload Product Information
Your login information should have been shared with you in an e-mail. If you haven’t received it, please reach out to us!
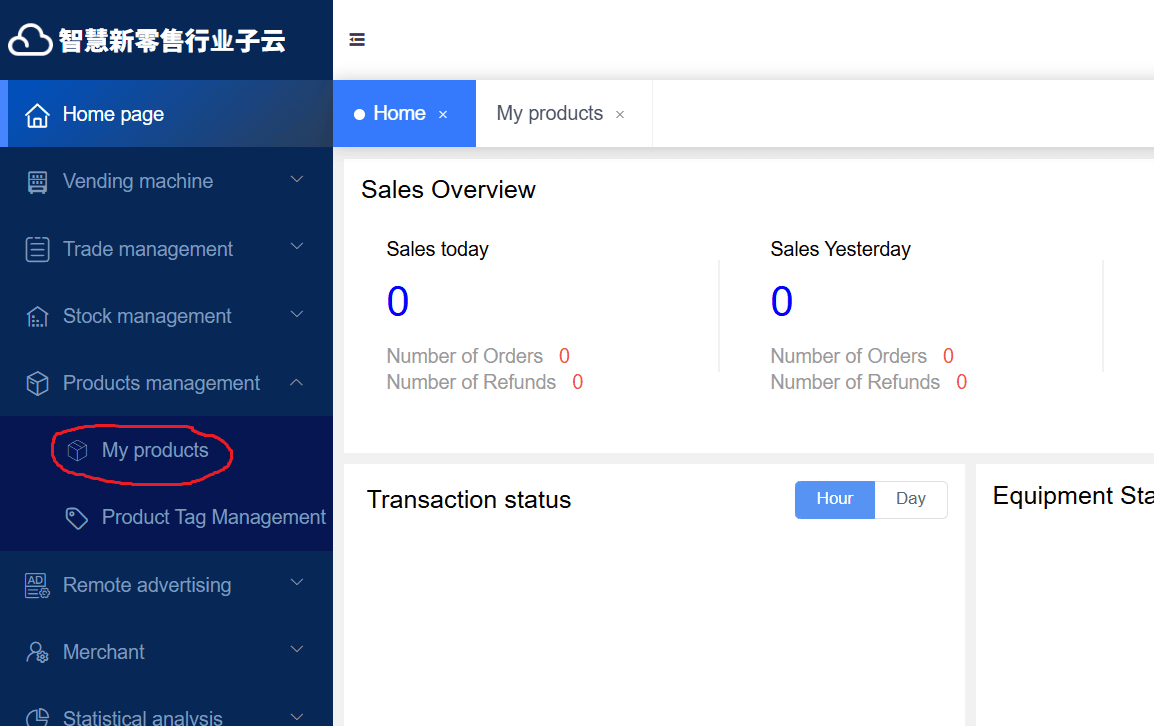
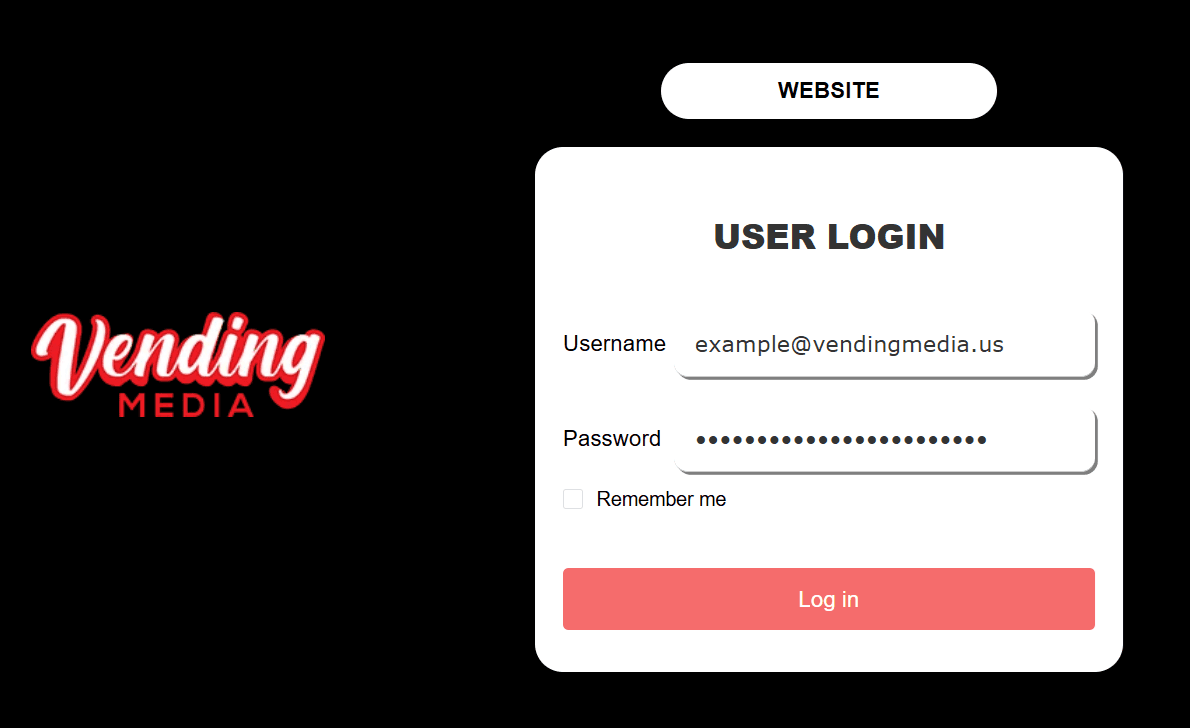
To add a product to your machine, start by logging in to the online dashboard using your provider username and password. After logging in, you’ll land on the main dashboard page. From there, navigate to the My Products section to begin adding your items.
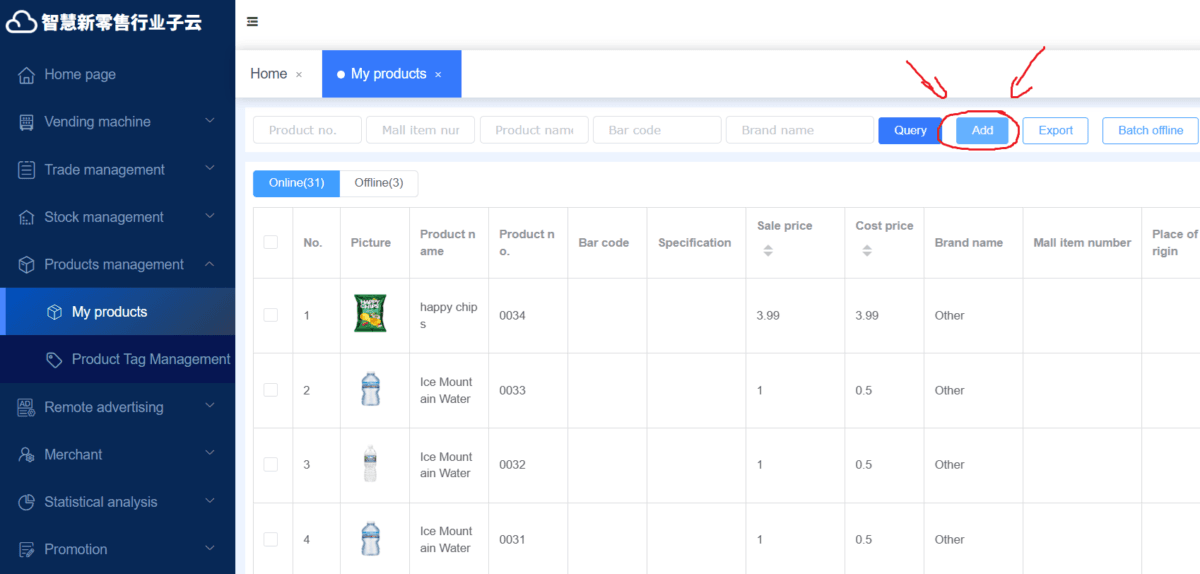
To add a new product, click Add and enter the product name, the unit price (the selling price), and the cost price (your purchase cost). You will also upload a thumbnail image. For best results on the machine display, we recommend using a JPG or PNG file at 560 × 800 pixels. You may use the same image for the detail picture—the photo customers see when they tap on a product for more information. You can upload additional images for the detail view if you’d like, but it isn’t necessary.
If you haven’t received your machine yet, this is the last step you can do for now! Please check back once you have received your machine.
Step 1.3
Bind/Link Products to the Vending Machine
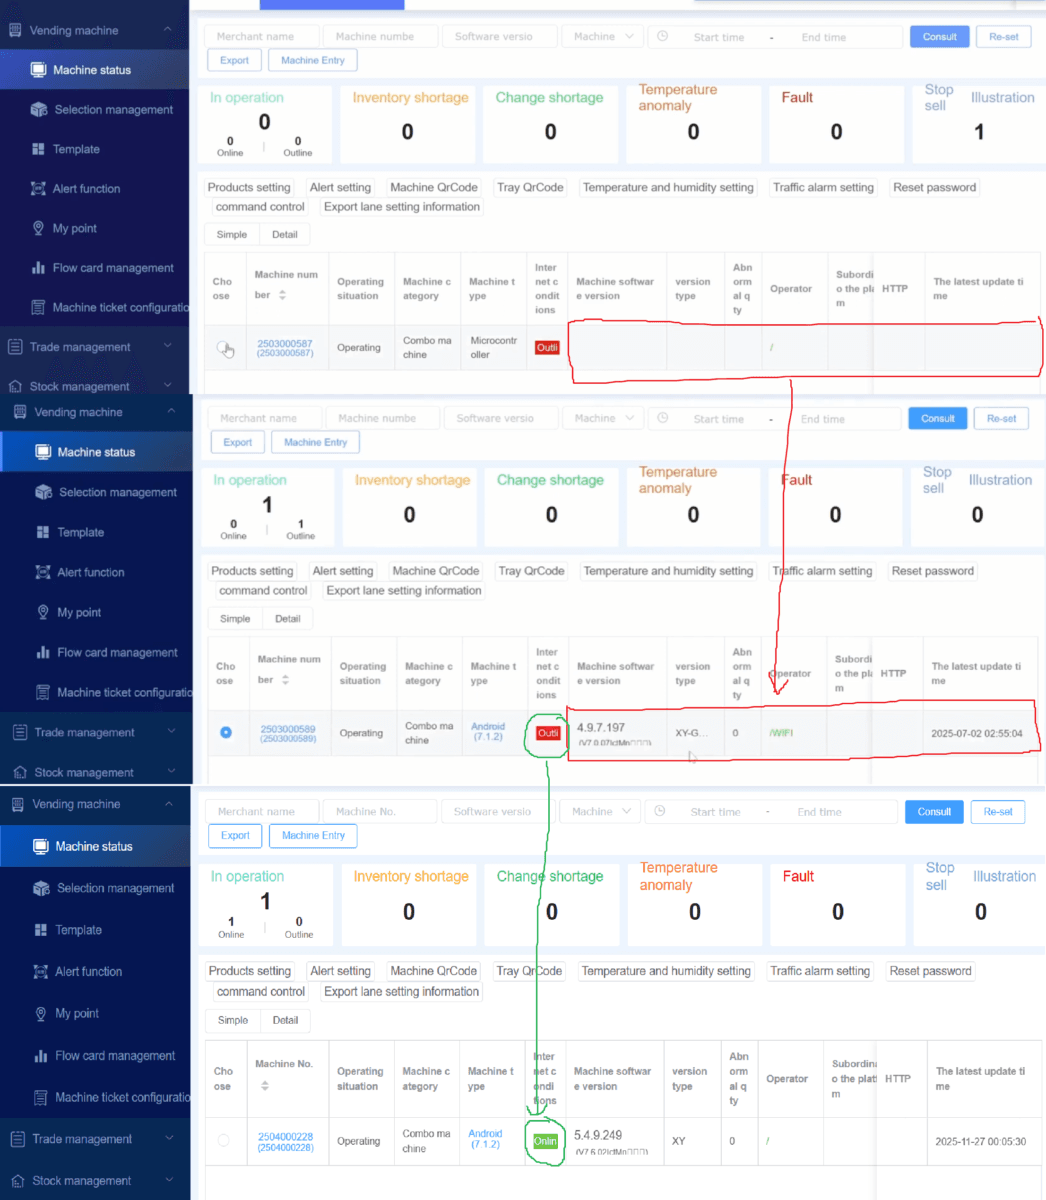
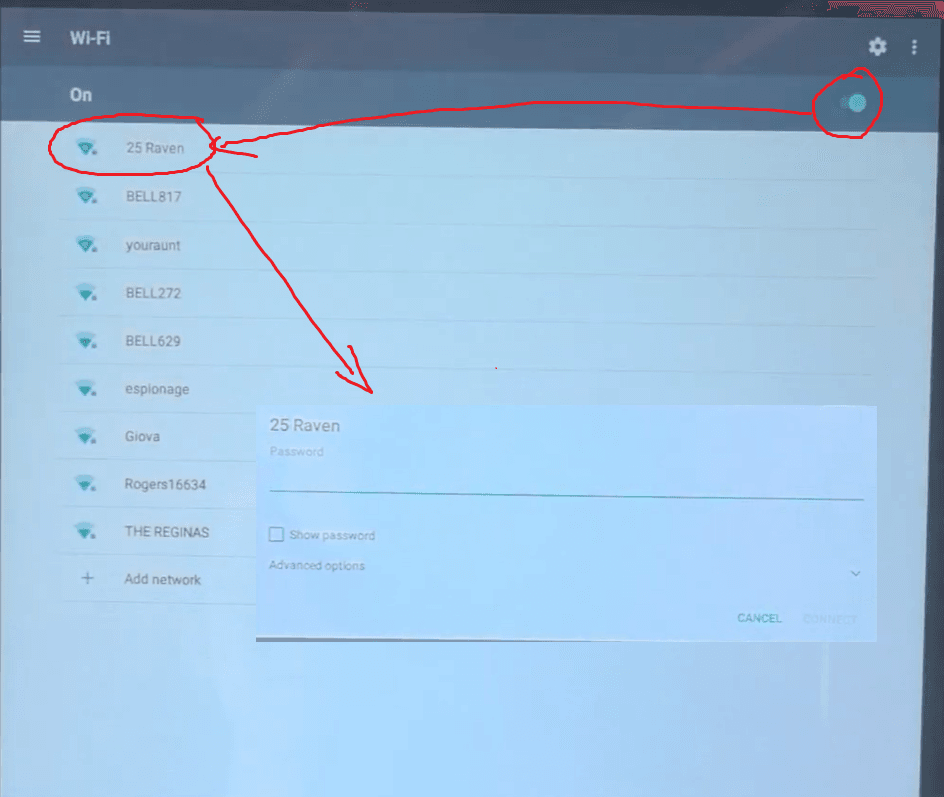
In the Vending Machine → Machine Status tab, you should see the machine’s software version and a Wi-Fi indicator (red box in the image on the left). If these appear, the machine has been online before and you can link the products you just created. If this section is blank, connect the machine to the internet first (see Step 4a), then return to bind your products.
When the machine is online, the red “Offline” label under Internet Conditions will change to a green “Online.” This is important as the machine must be connected to the internet to download products from our online dashboard.
If your location does not have Wi-Fi, you may need to use a Sim Card for connectivity (see Step 4).
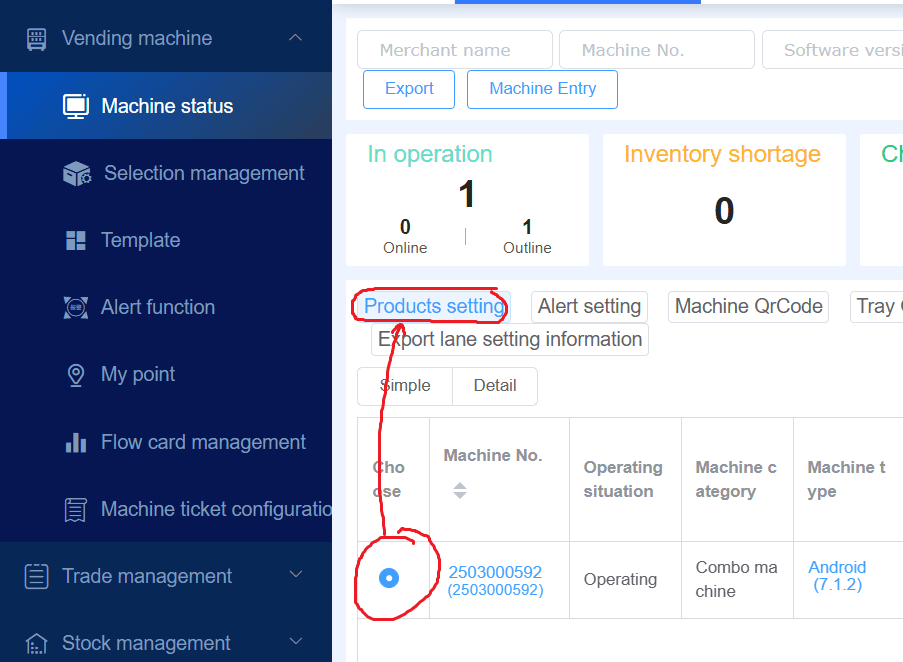
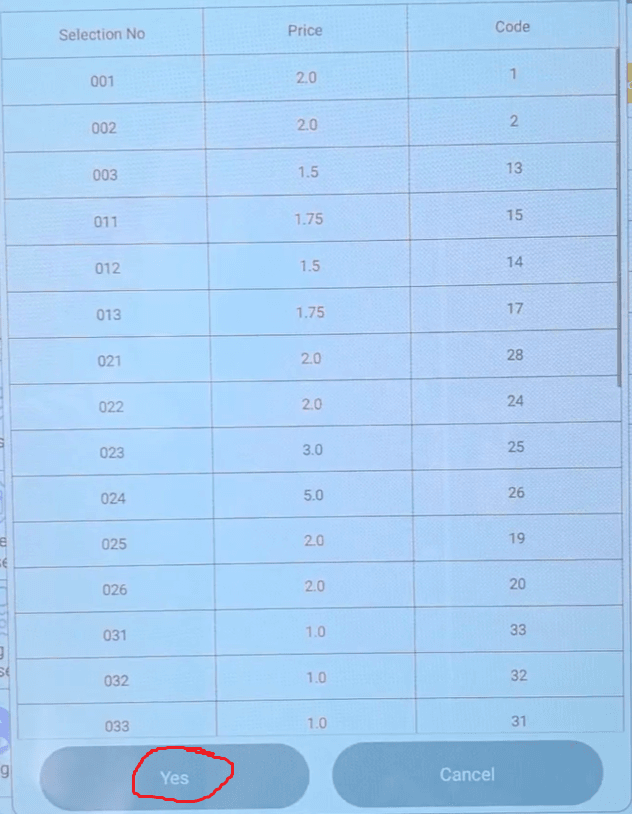
To bind products, start by clicking the circle under the Choose column—once selected, it will turn blue with a white dot in the center. Then, click Product Setting.
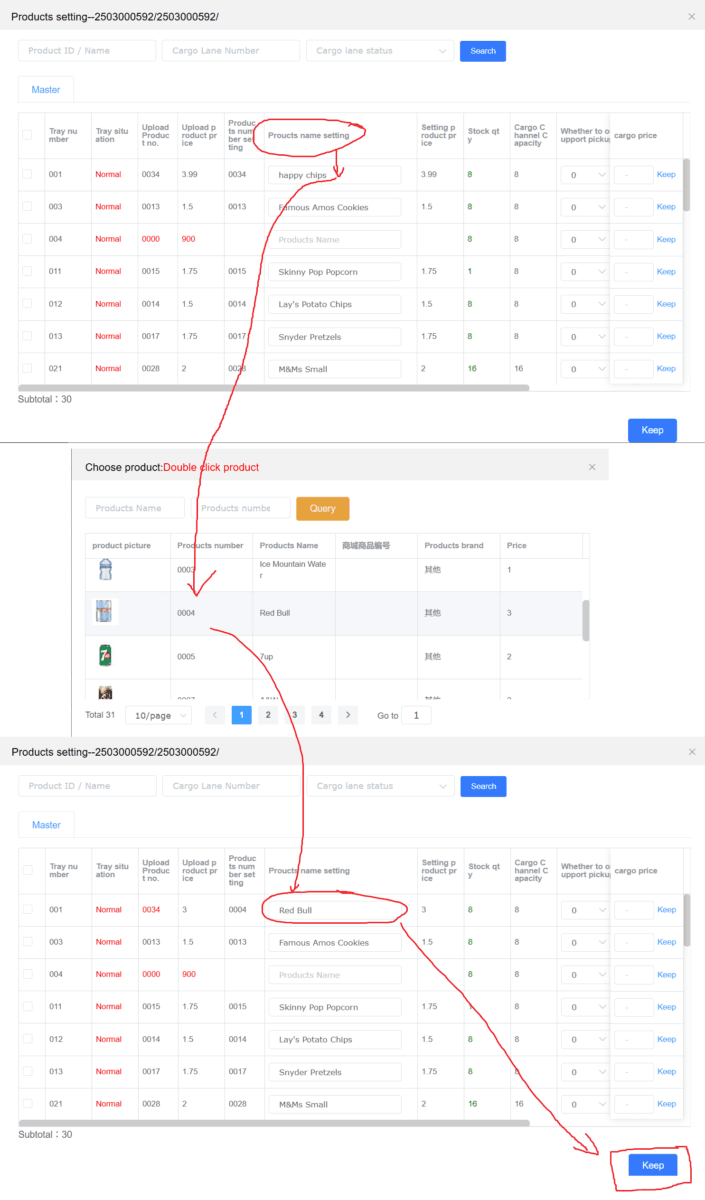
In the product setting screen, select the tray you want to configure by clicking its product name setting field; if nothing is set yet, it will appear blank.
Then, double-click the product you want to assign to that tray. (Refer to Section 1.1 for the tray number map.) Please note that the same product listing cannot be assigned to multiple trays. If you plan to sell the same item in several trays, create duplicate product listings equal to the number of trays needed.
After double-clicking your selection, the product name and details will update automatically—click Keep at the bottom right to save your changes.
This is the final step you need to do on the online dashboard.
Step 2
Machine Unboxing
⚠️ WARNING: This vending machine weighs roughly 700 lbs (318 kg). It is extremely heavy — use proper equipment and multiple people when moving it, and proceed with caution.
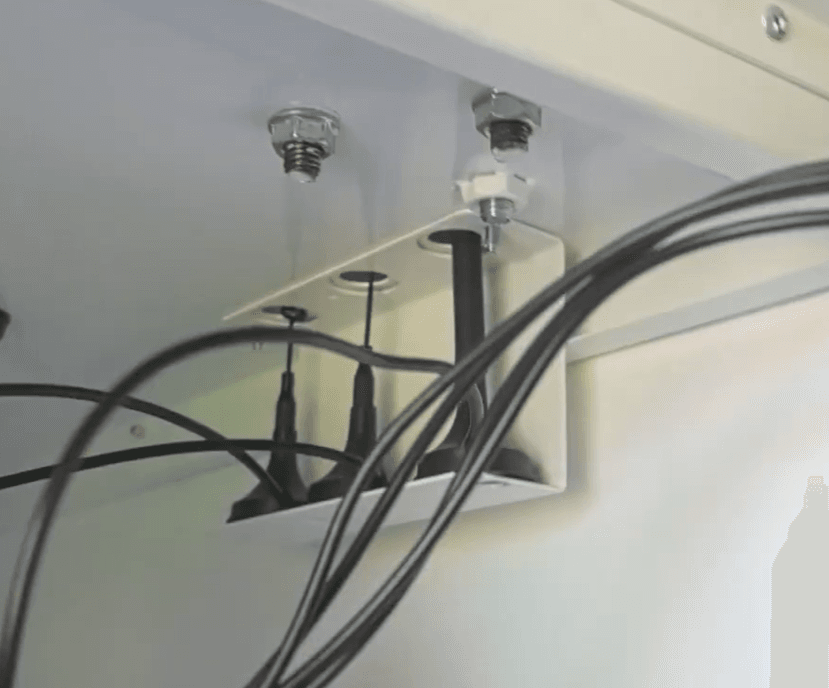
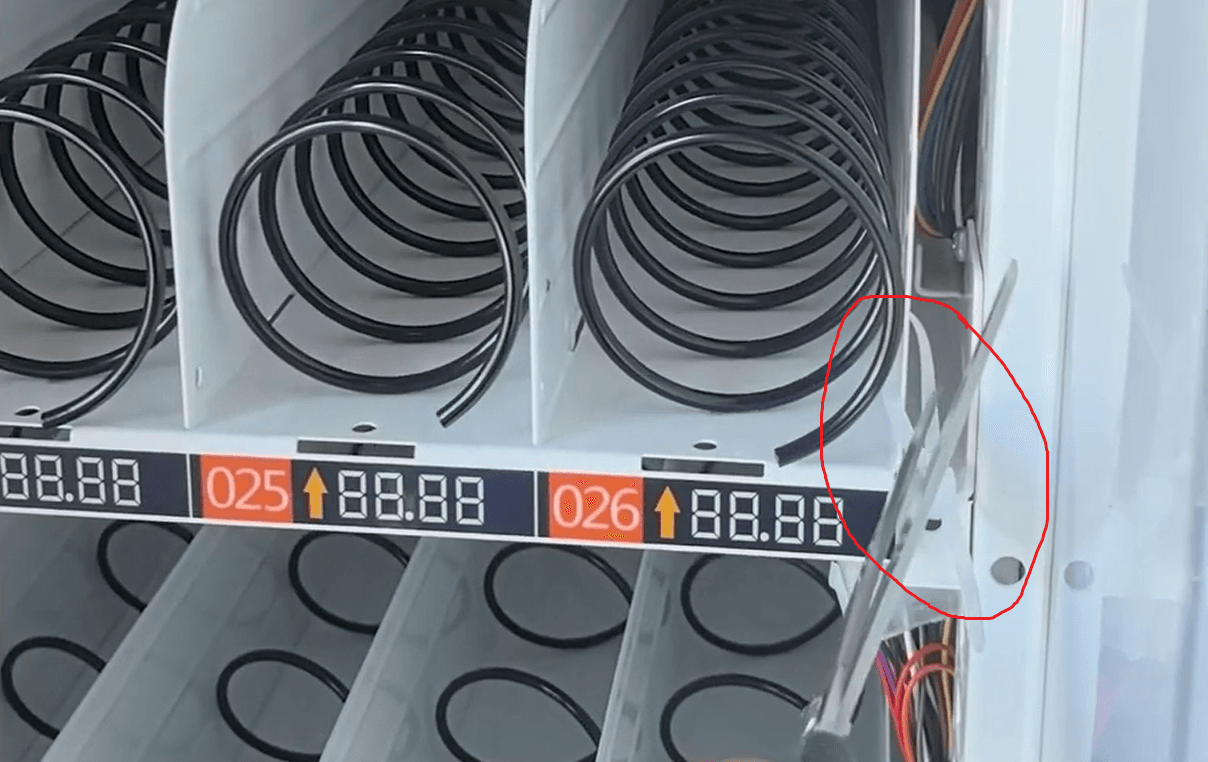
When your machine arrives, it will be secured on a pallet, so begin by unpacking it carefully and reviewing the placement warnings to ensure proper installation. Retrieve the keys from the back of the unit, then connect the power cord to any standard household outlet. Use the key to open the machine—insert it, turn to the right to unlock, then rotate the door knob counterclockwise several times until the door opens. Inside the machine, feed the three antennas through the designated cutouts on the top panel; this ensures proper connectivity for all machine functions. You’ll also notice an additional unused cutout for a backup antenna.
Step 2.1
Removing the Pallet
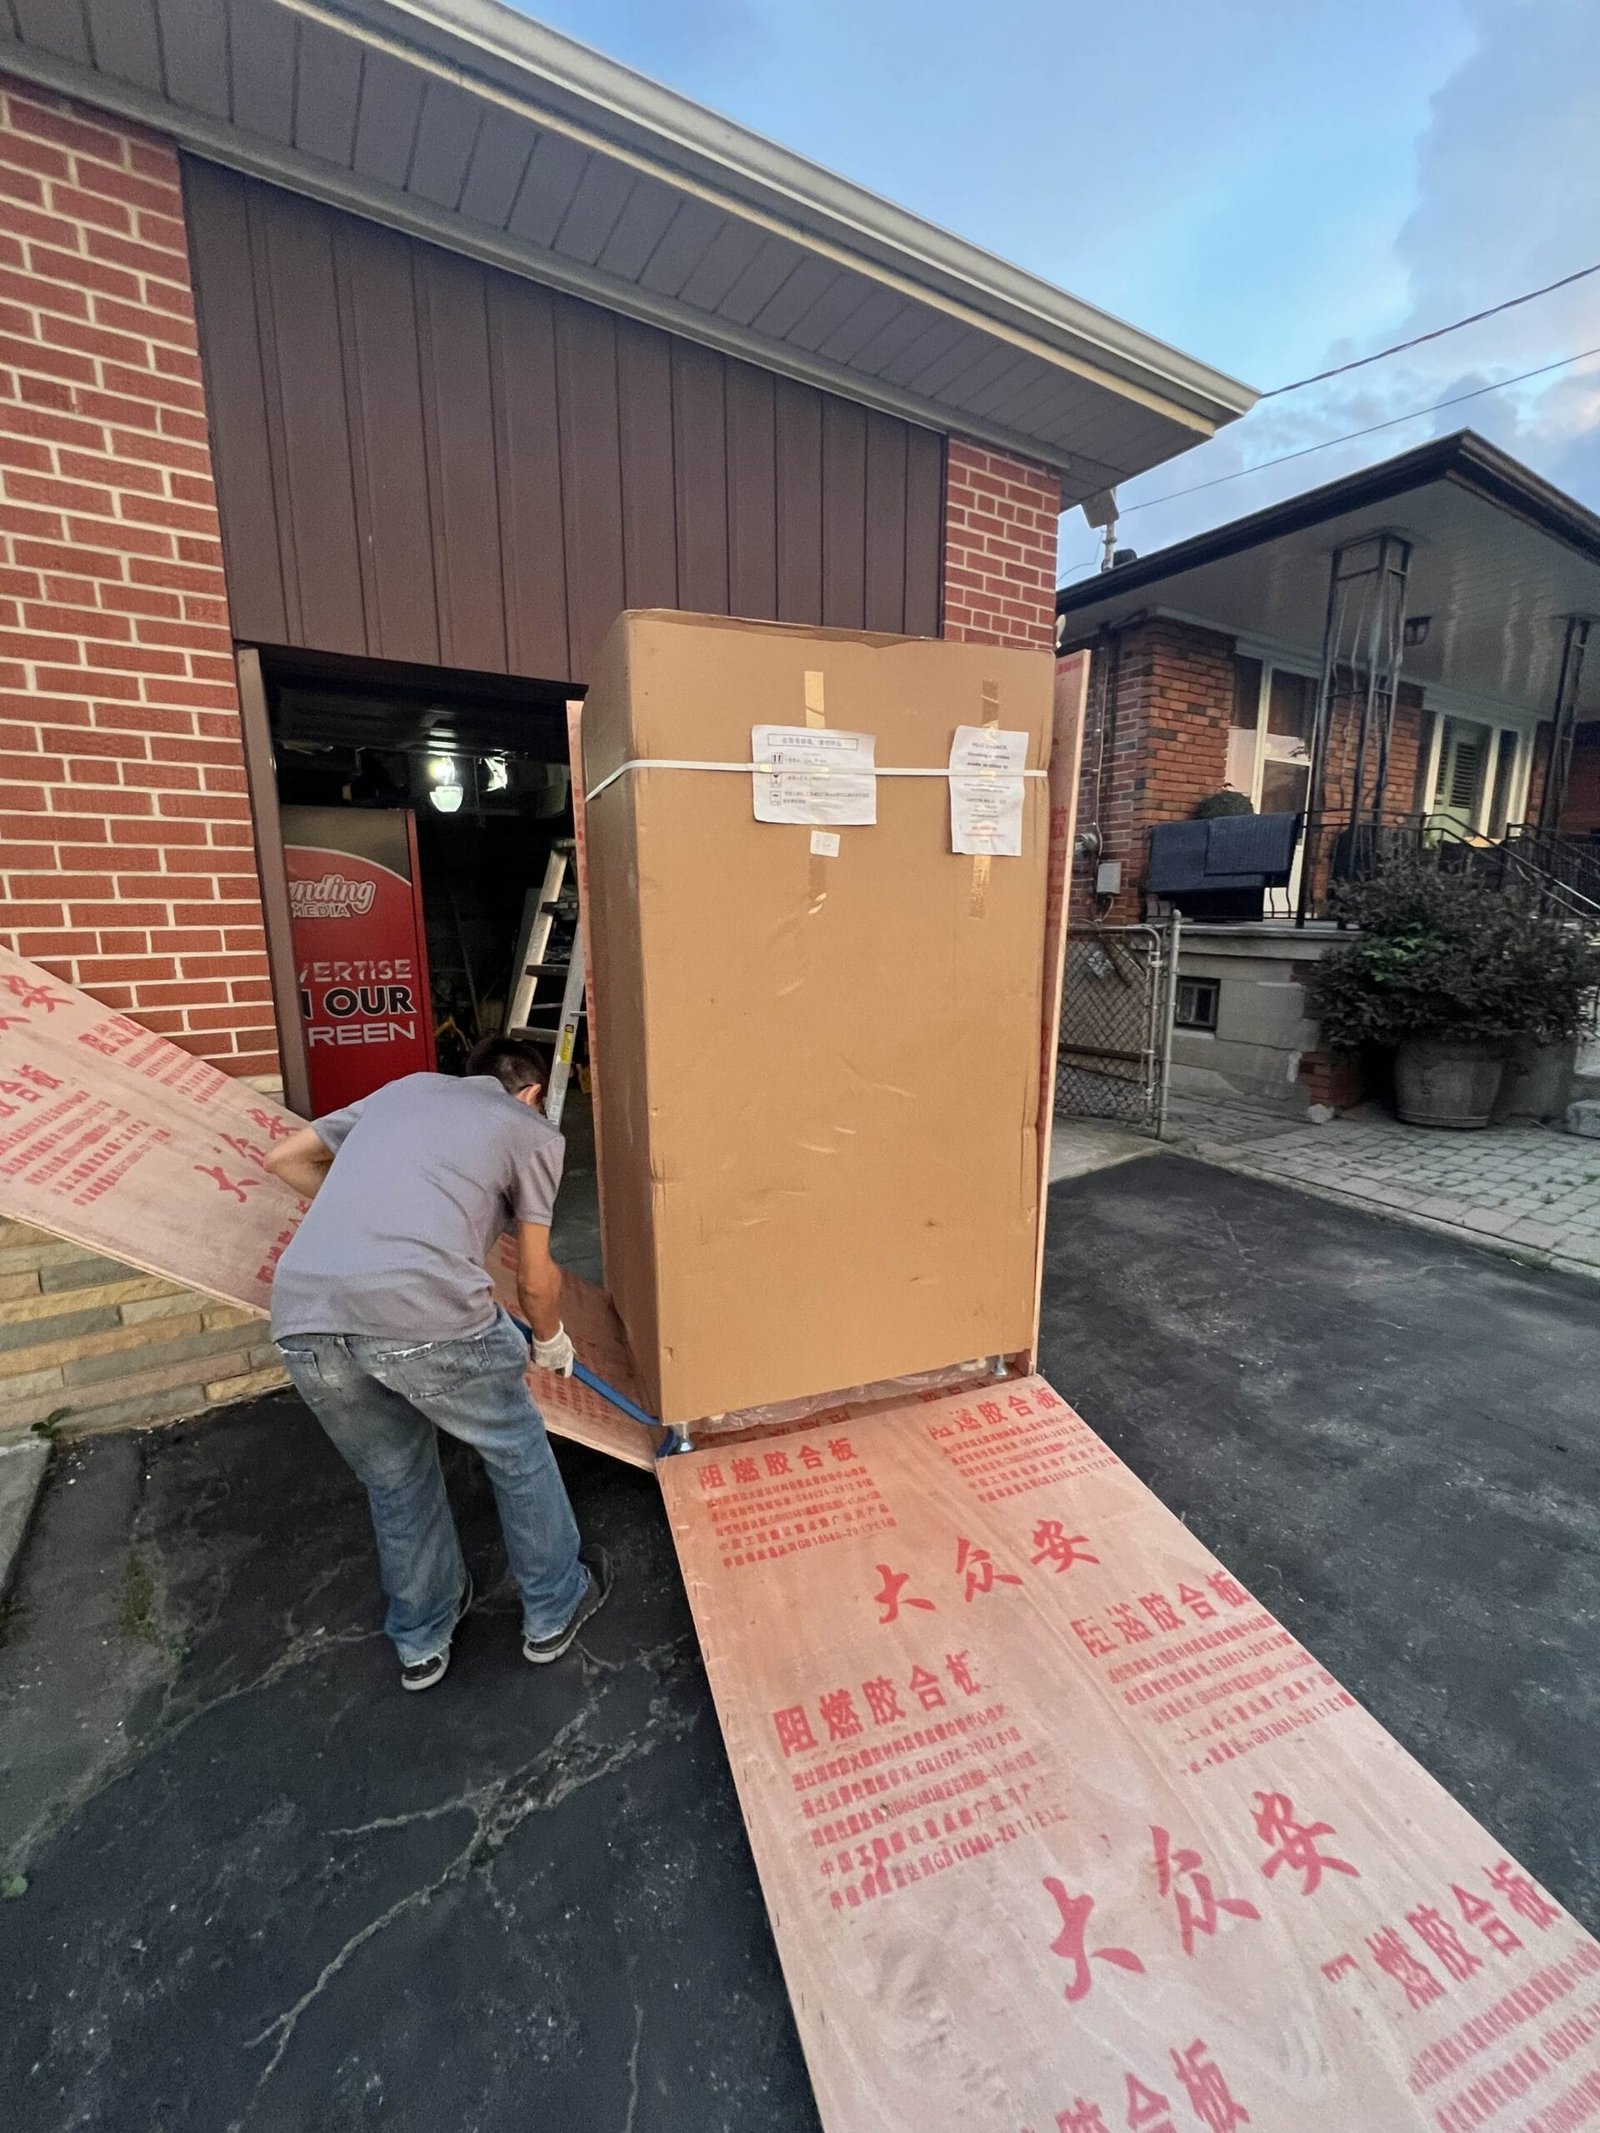
To remove the vending machine from its shipping crate or pallet, first cut away any straps, shrink wrap, or protective packaging around the machine. Carefully remove the top of the wooden frame or crate panels, then you will be able to pry open the sides as shown in the image. Once the machine is exposed, use a pallet jack or make sure the machine is sitting on its wheels and not on its legs (see the two videos below). Once the machine is on its wheels, have at least two people gently tilt and slide the machine forward until it is free from the pallet. Always keep the machine upright and avoid sudden movements to prevent damage.
Step 2.2
Remove the Keys & Plug in the Machine
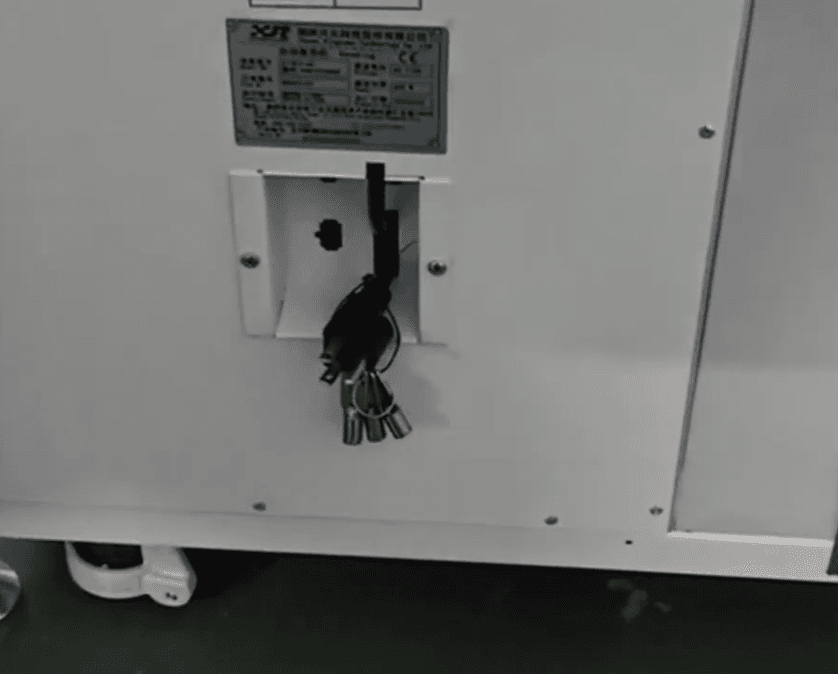
The keys are zip-tied to the power cord at the back of the machine. Carefully cut the zip tie with scissors and store the keys somewhere safe.
We strongly recommend keeping the spare keys in a separate location—several customers have accidentally locked their only keys inside the machine, which requires drilling out the lock and replacing it. Keeping keys in more than one place prevents this.
Next, take the power cord and plug it into any standard household outlet. If you must use an extension cord, use at least a 10-gauge cord for distances up to 100 ft. For shorter runs (25 ft or less), 10-gauge is still recommended, though 12-gauge may be acceptable. Avoid daisy-chaining multiple cords or leaving cords tightly coiled, as this can cause overheating. Using thin or low-quality extension cords may result in the machine not powering correctly.
Step 2.3
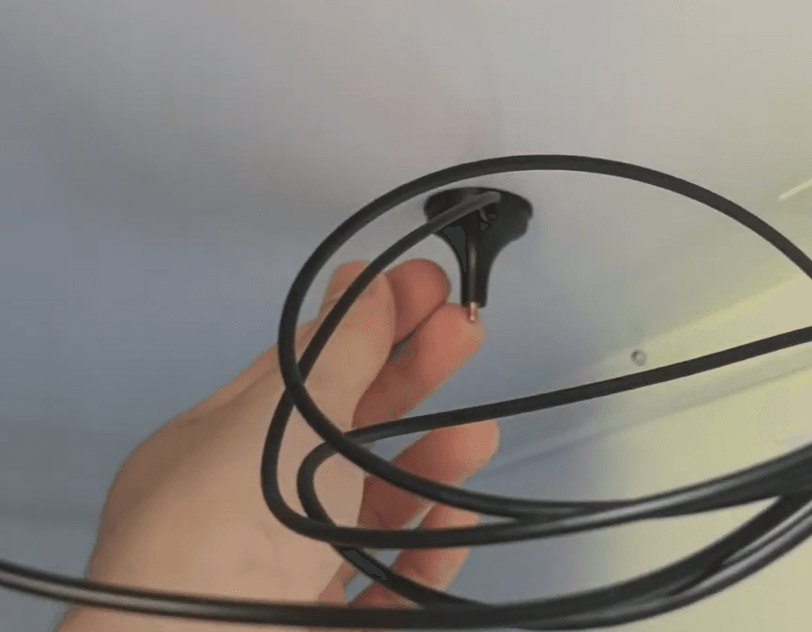
Open Machine and Set Up Antennas
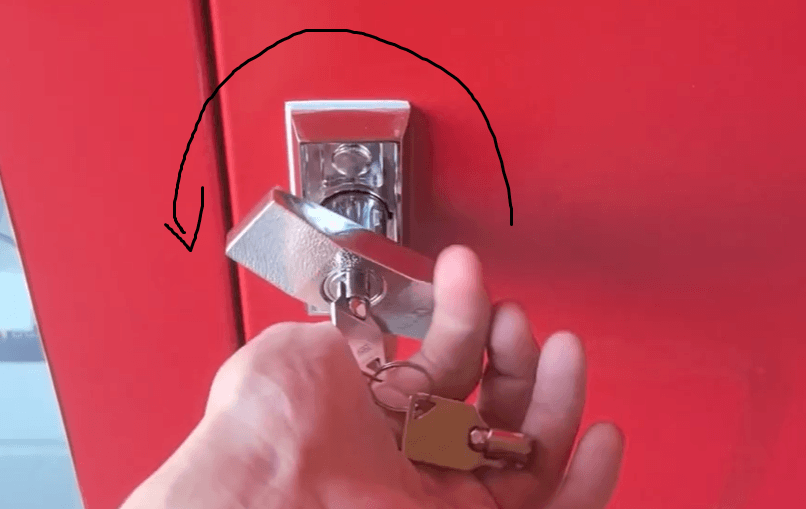
Use the key to open the machine by turning the lock counter-clockwise until the door releases.
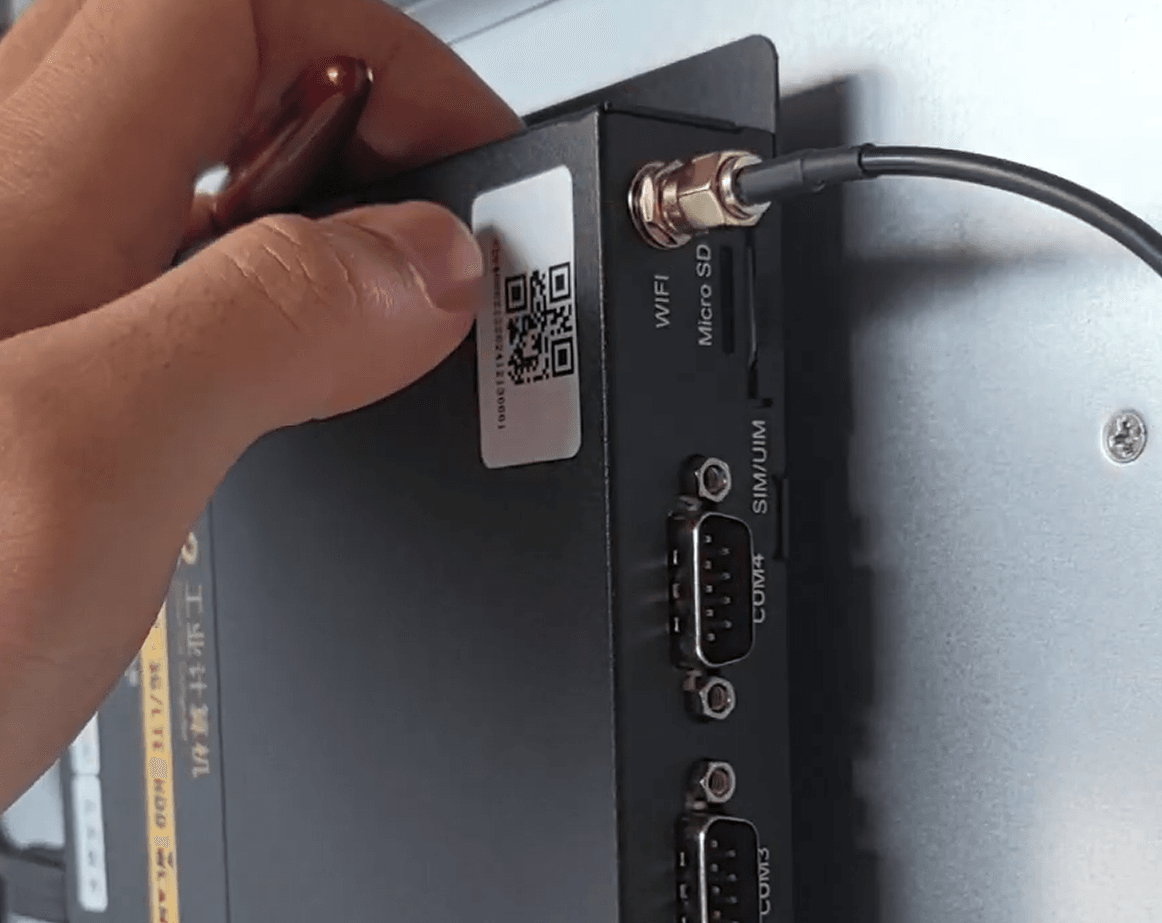
Inside, you will find three antennas. Feed each antenna through the cutouts on the top of the machine for proper connectivity—one is for the SIM card, one for Wi-Fi, and one for the Nayax terminal. There is also a spare backup antenna; please leave this unused and stored inside the machine.
Step 2.4
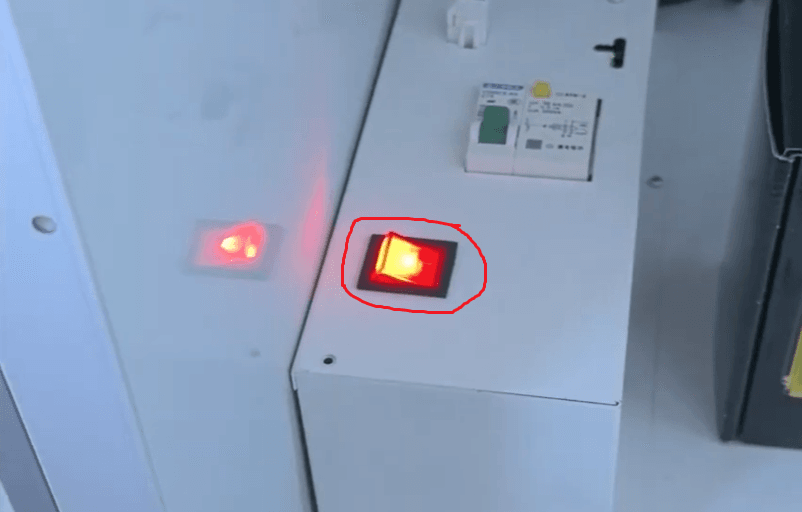
Turn On All Power Switches
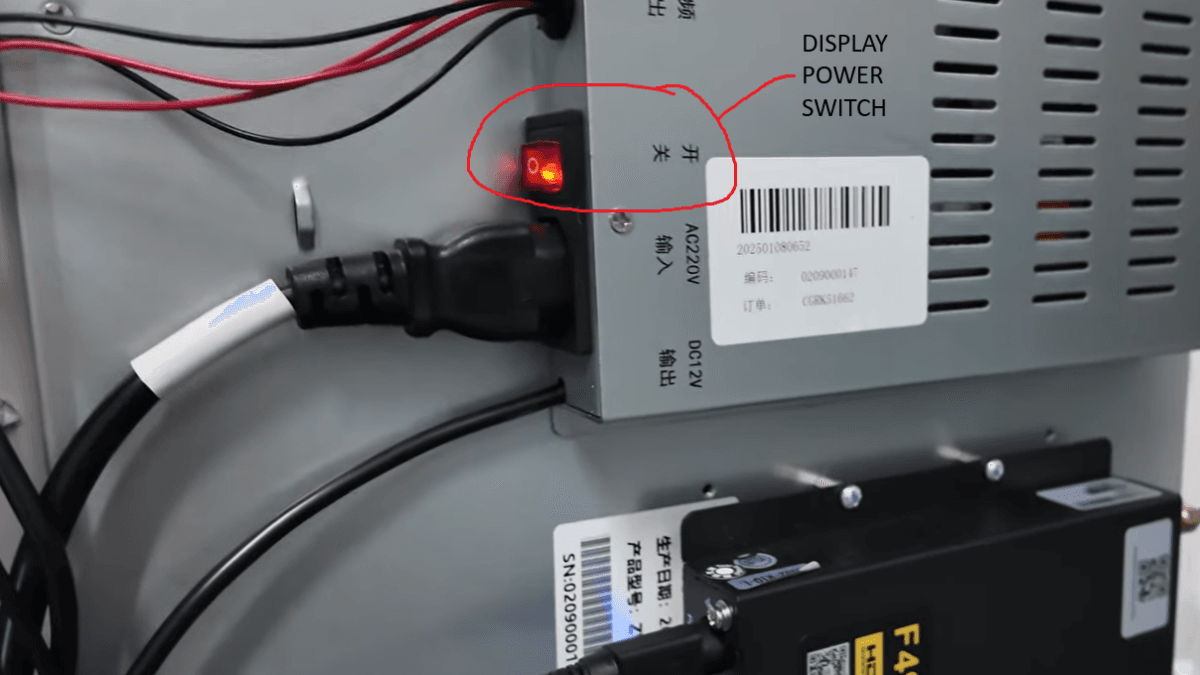
Your machine may not power on immediately. Check all power switches to ensure they are turned on: the main green power switch, the display power switch, and the compressor switch (next to the main switch). You can leave the compressor off before loading products, but turn it on when you want the machine to cool.
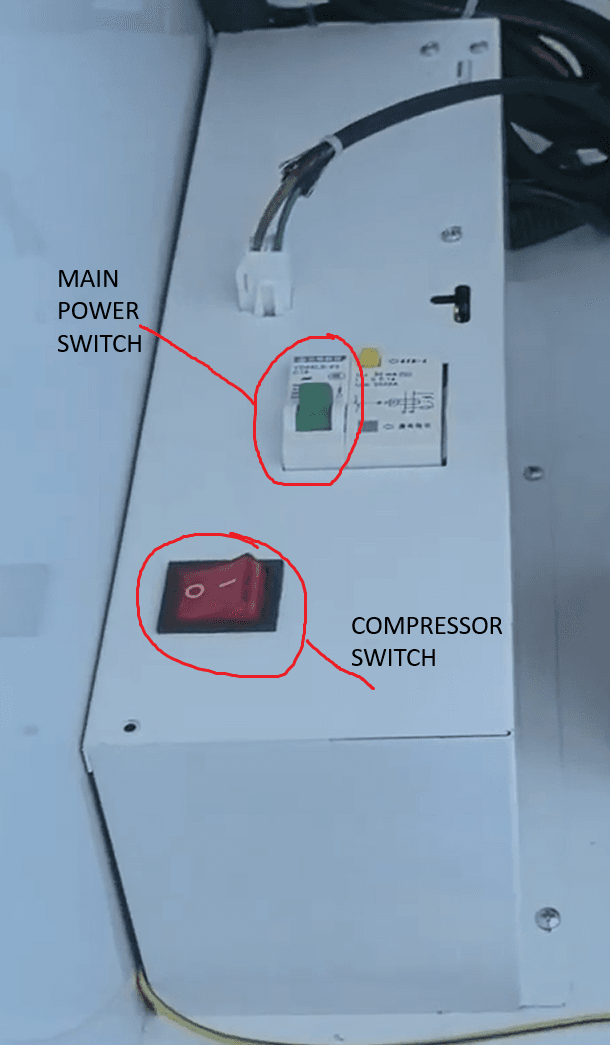
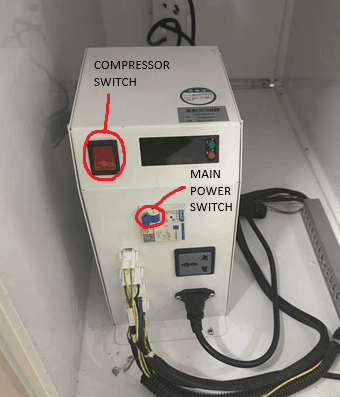
⚠️ Your machine may come with one of two power-supply configurations. Please refer to the photos to identify which version you have, including the compressor location and the power switch position.
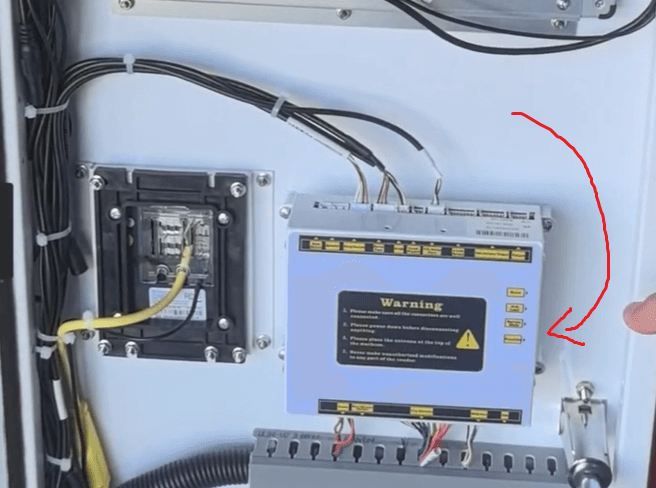
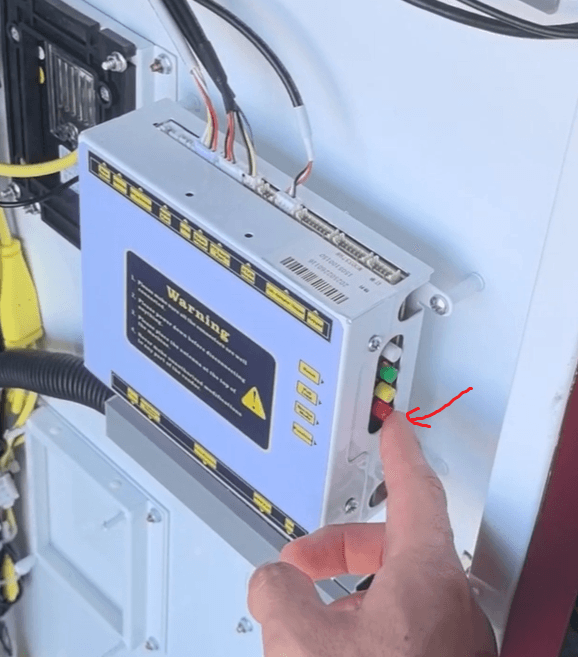
Step 3
Settings Menu
Next, to enter the settings screen of the machine, click the red button on the inside of the door panel on the right-hand side of the machine, behind the display screen. You’ll see white, green, and yellow buttons—press the red one to access the machine’s settings menu.
Step 4
SIM Card Setting
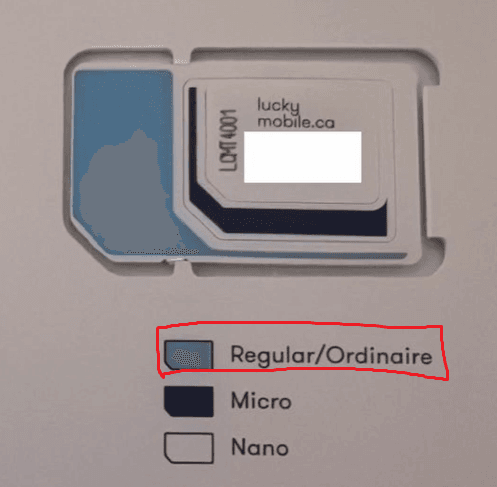
⚠️ The machine uses a regular-size SIM card (the largest size), so make sure you insert the correct type.
We recommend setting up a SIM card, as it is the most reliable way to ensure consistent connectivity for your machine.
After inserting the SIM card, you must restart the machine. If you don’t restart, the machine will not detect the SIM card and the network options will appear grayed out. Once the machine reboots, it should automatically configure the cellular network, just like a phone or tablet. This may require several restarts depending on signal strength and your mobile carrier.
Once the network is set up, the signal icons will appear in the top-right corner of the screen.
⚠️ Sometimes when purchasing a SIM card, you may be asked for your device’s IMEI number.
📱 To find your machines IMEI number:
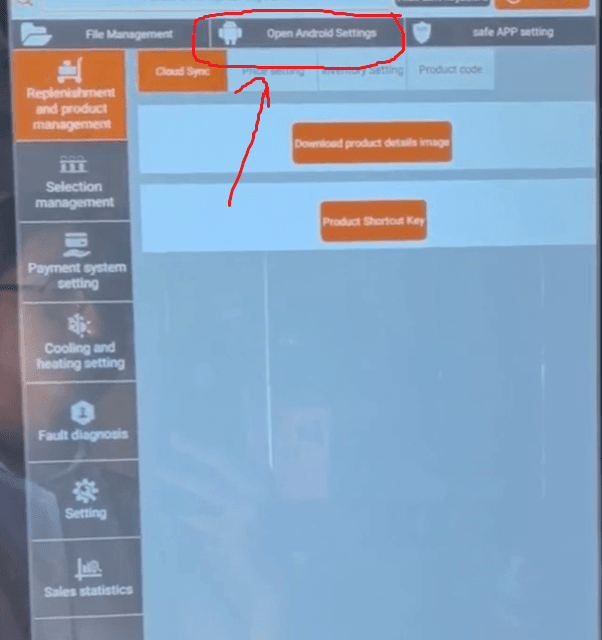
Go to the main settings screen, which you reach by tapping the red button
Click on “Open Android Settings”
Scroll down and tap About Tablet → Status → IMEI Information.
You should see your IMEI number (it’s a long number).
Step 4.1
Insert SIM Card
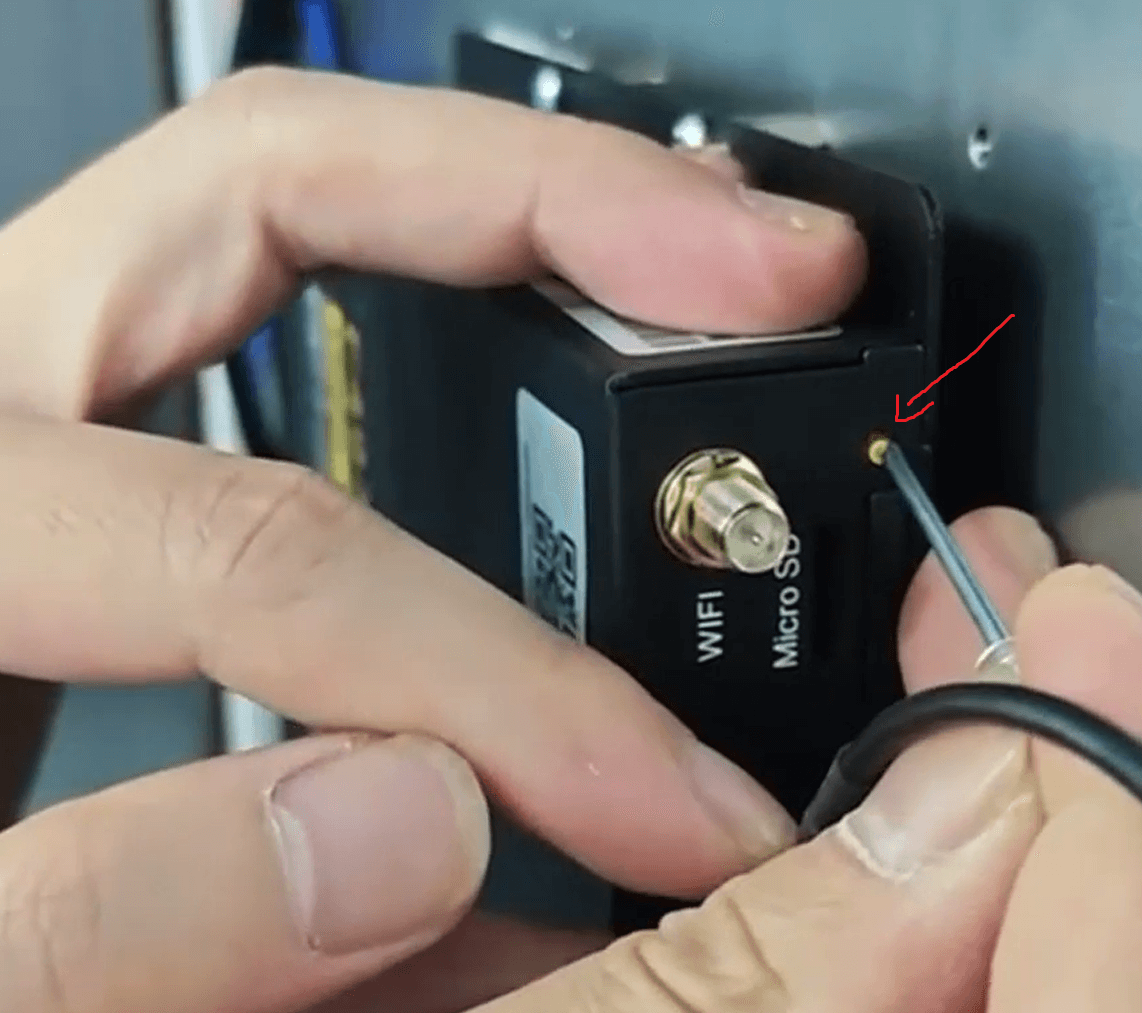
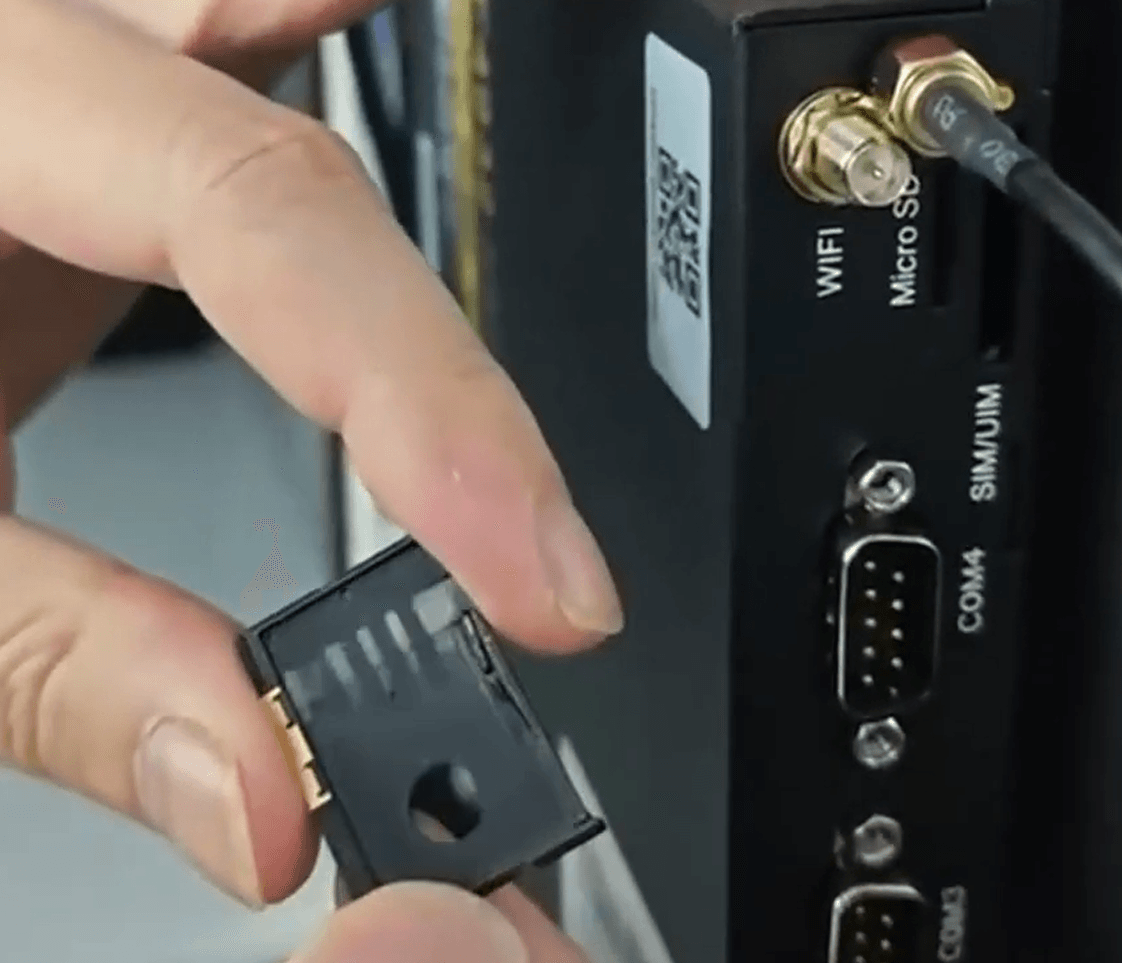
Make sure you are using a regular, full-size SIM card, which is larger than the SIM used in most phones. To insert the SIM card, press the yellow button on the black box located on the inside panel of the machine behind the screen. You may need to unscrew the Wi-Fi cable if it is in the way. Place the SIM card into the tray, push it back into the slot, and then reattach the Wi-Fi cable once you’re done.
Step 4.2
Restart the Machine & Automatic Network Connection
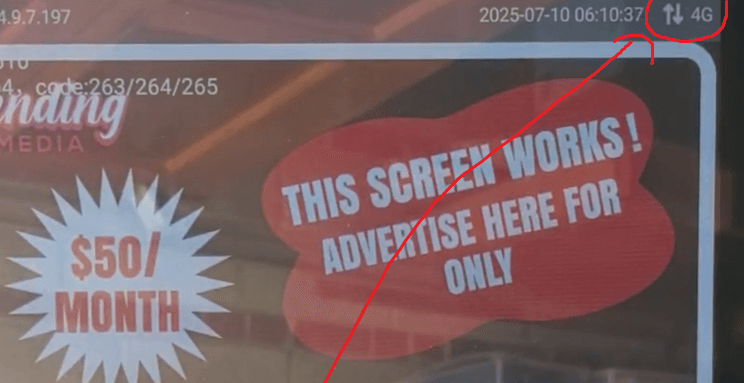
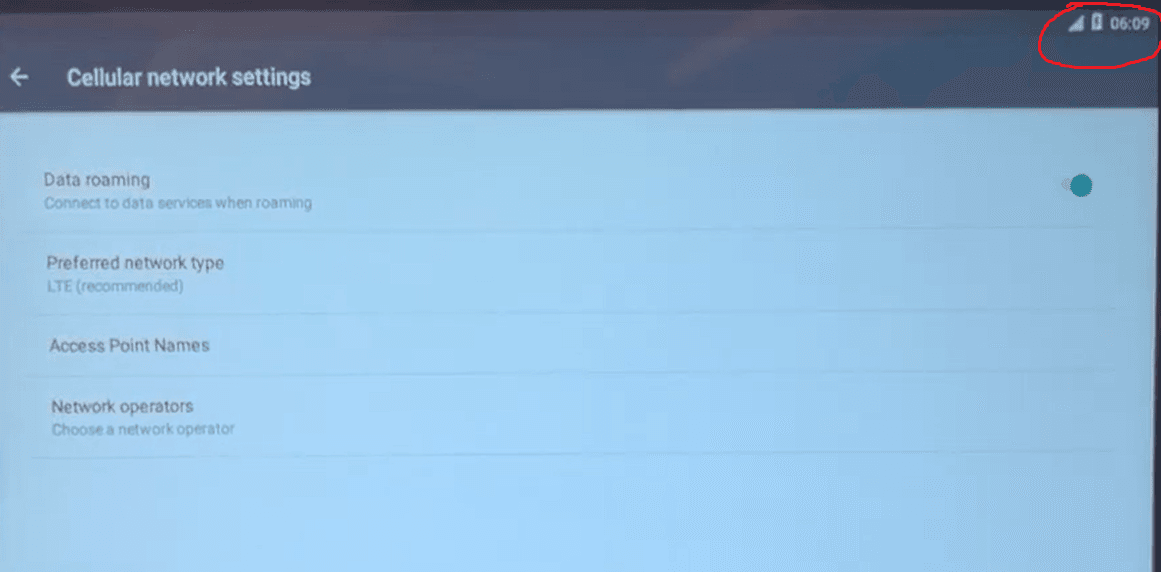
After inserting the SIM card, simply restart the machine. It should automatically detect the SIM and establish a cellular connection. If successful, you will see the 3G or 4G symbol appear in the top right corner shortly after the restart. Sometimes it may take a few minutes, so please be patient. In the Android settings menu, you will also see the cellular connection icon in the top right corner.
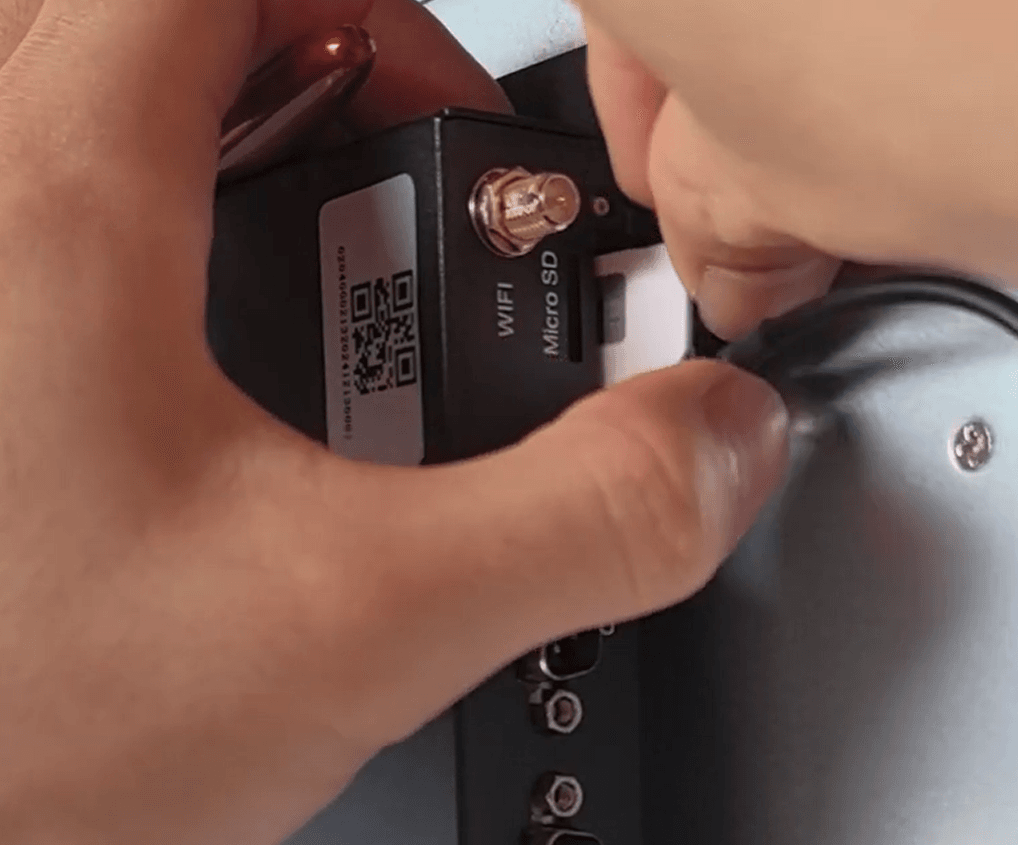
Step 4.3
Manually Search for a Network
If the SIM card does not set up automatically, first make sure the antennas were setup properly as shown in the image. You can also try to place the antennas directly on top of the roof of the machine.
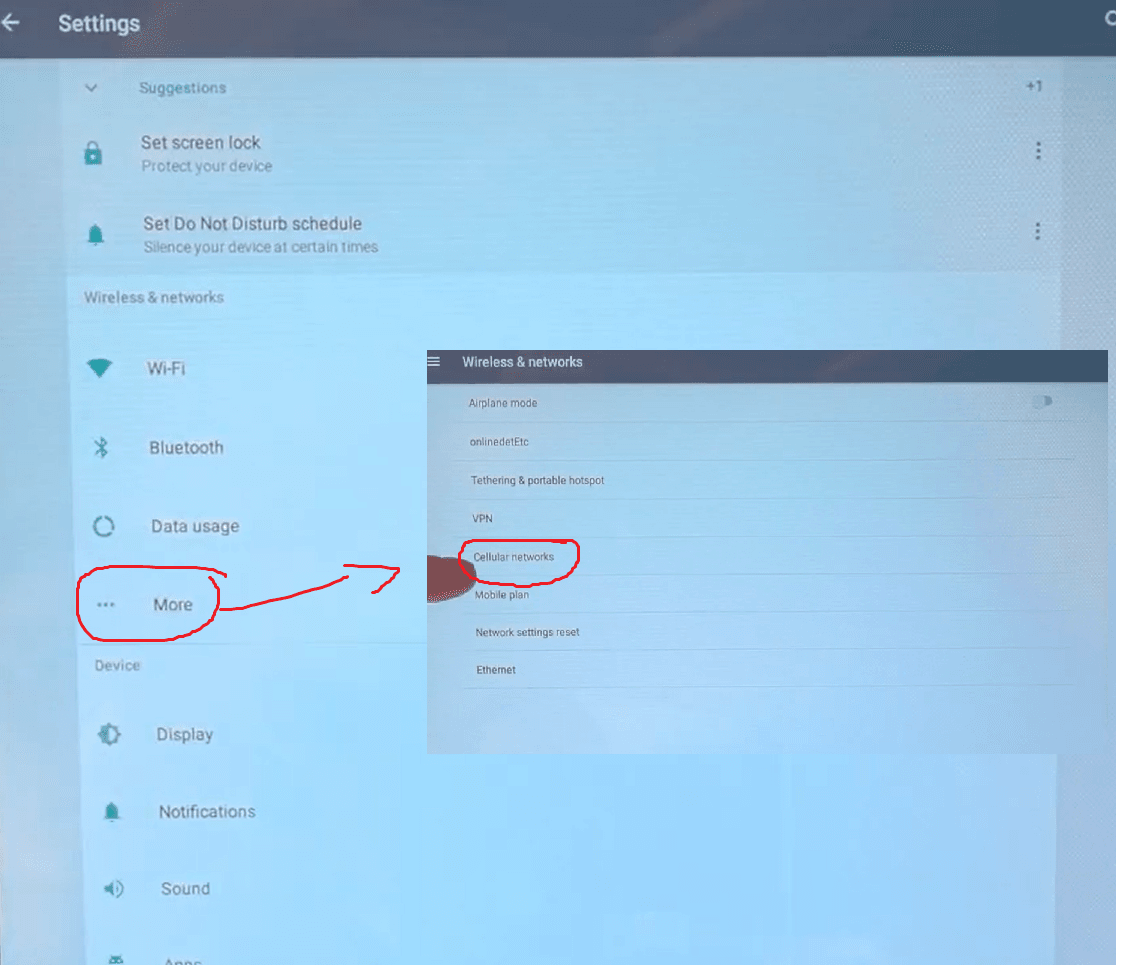
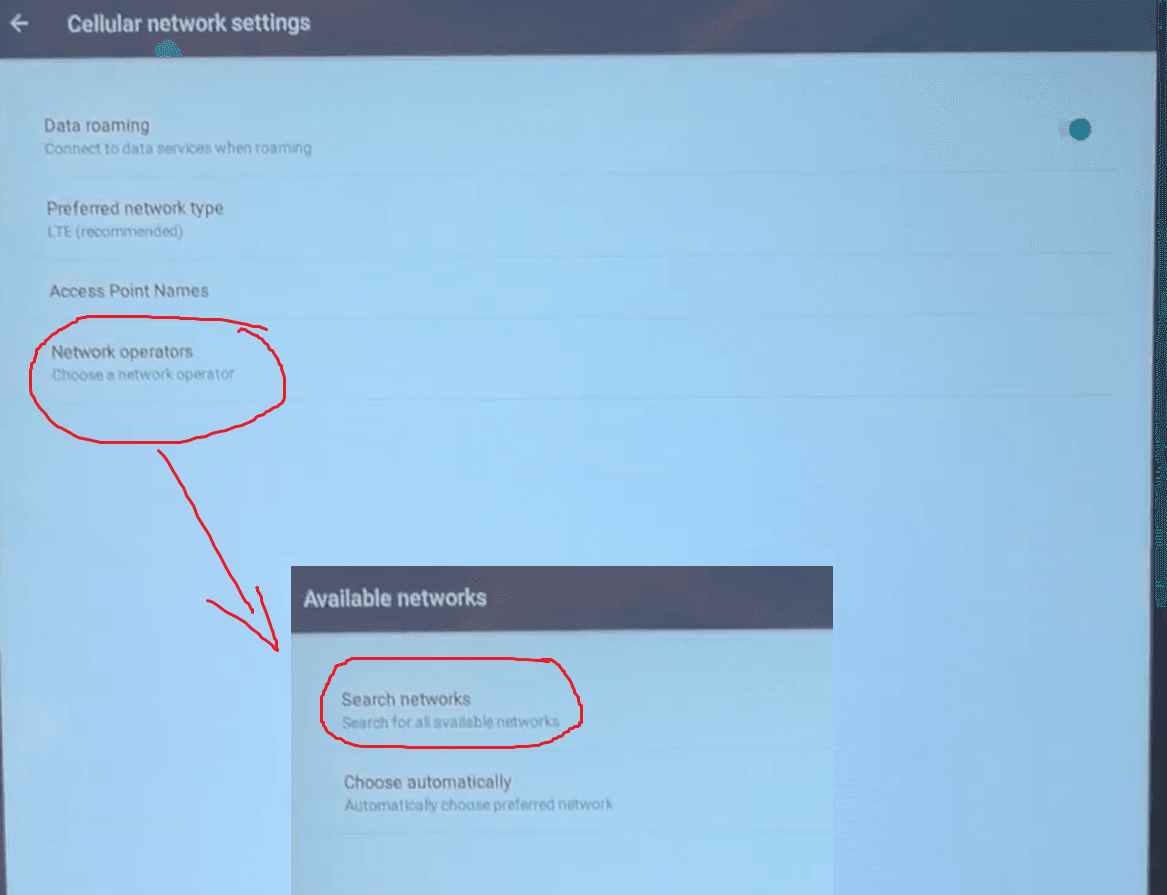
If that does not help, you’ll need to access the network settings. From the main settings screen, click Open Android Settings, then go to More and select Cellular Networks.
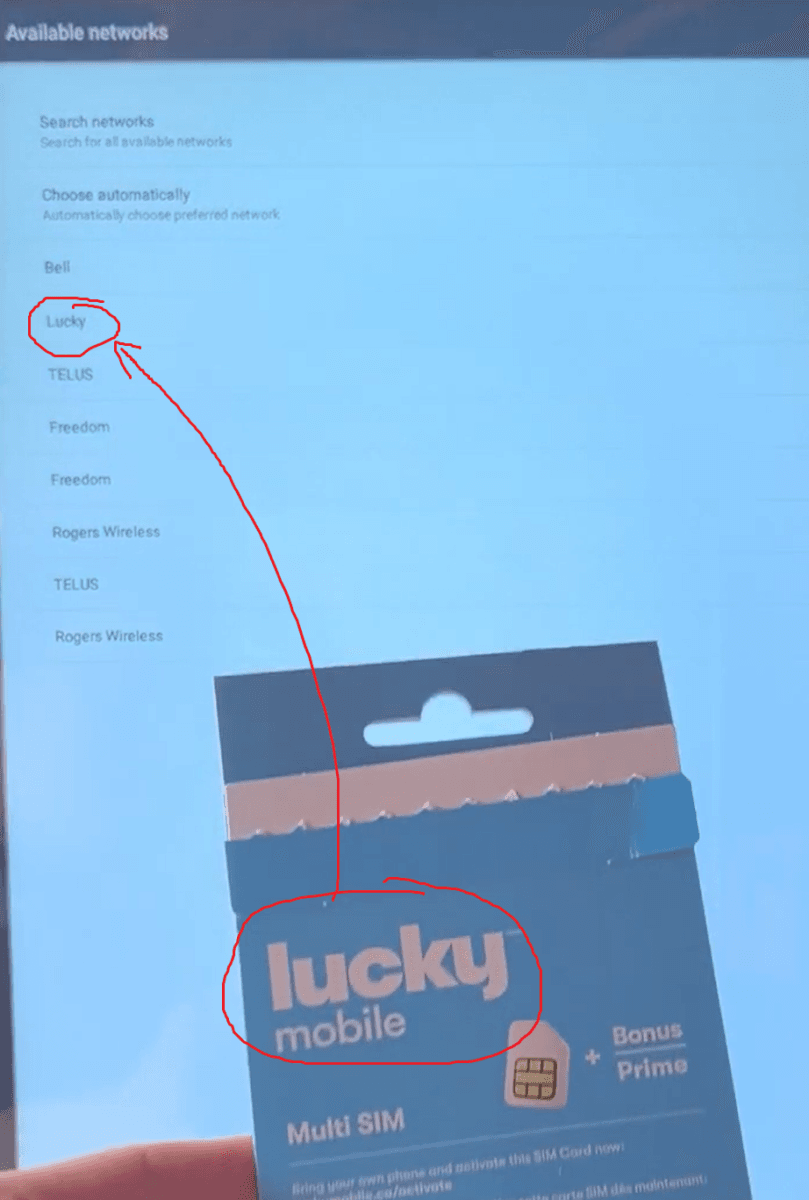
In the Cellular Network settings, click Network Operators, then select Search Networks. Choose the network that corresponds to the provider for your SIM card.
Please be patient as it can take a few minutes to establish a connection.
Step 4a
Wi-Fi Setting (Optional)
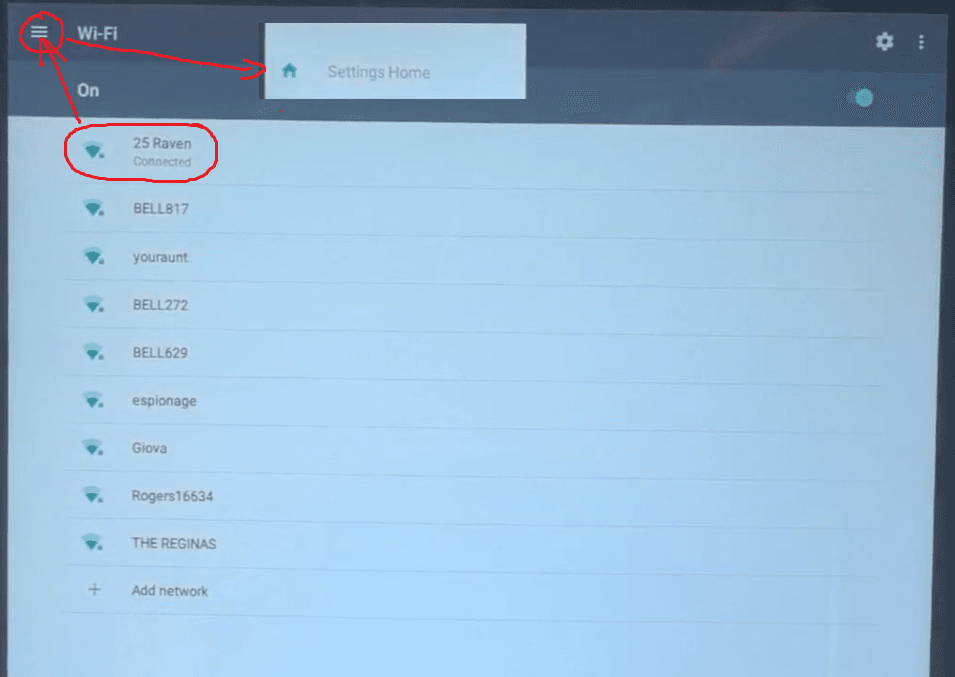
To connect to Wi-Fi, go to App Settings and then click Open Android Settings. In Android Settings, you’ll be able to connect to Wi-Fi, just like on any android mobile device. After connecting, click the three bars at the top left to return to the settings home, then use the back button to return to the main settings screen.
Finally, restart the machine to save any changes and ensure the Wi-Fi connection is applied.
⚠️ Not all locations will have accessible Wi-Fi, and some networks or firewalls may block the machine’s connection to our online dashboard.
Step 4a.1
Enter Android Wi-Fi Settings
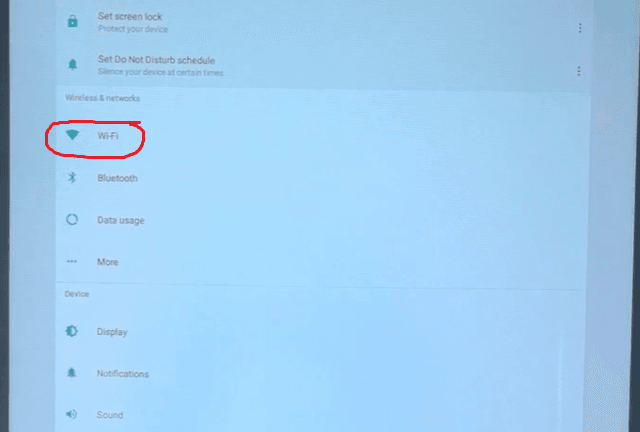
From the main settings screen, navigate to “Open Android Settings” and then click on Wi-Fi.
Step 4a.2
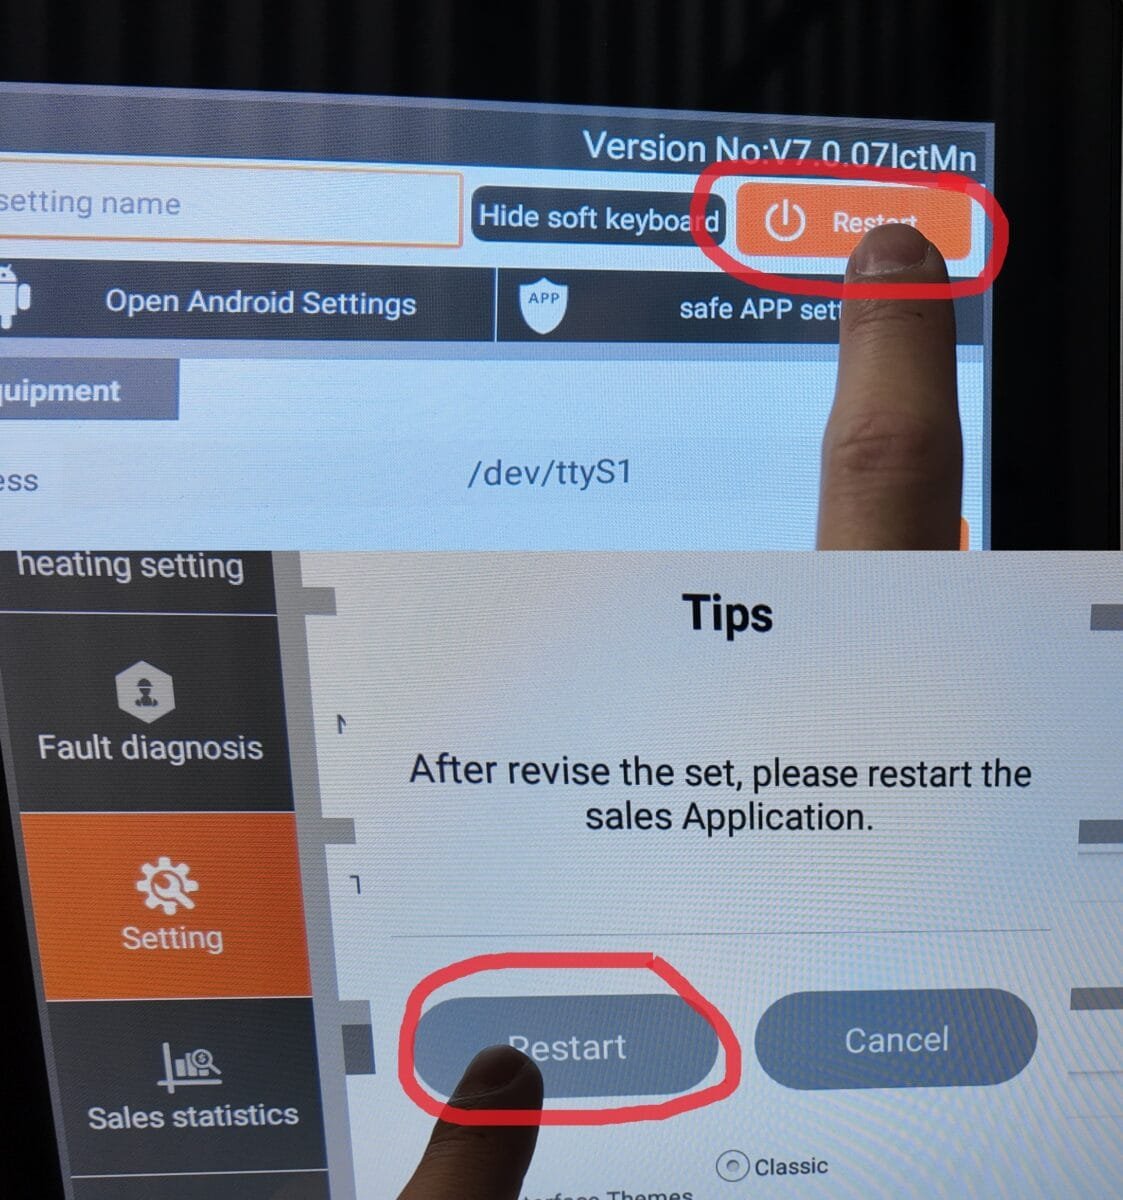
Connect to Wi-Fi and Restart Machine
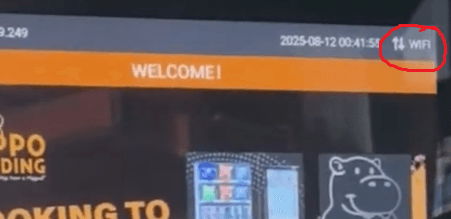
In the Wi-Fi settings, make sure Wi-Fi is turned on. Select the network you want to connect to, enter its password, and click Connect. Once it shows Connected, exit the settings by clicking the three bars at the top left, then select Settings Home. From the Android Settings home, click the back button at the top left to return to the machine settings. Finally, click Restart → Restart in the machine settings. Your machine should now be connected to Wi-Fi (you should see the WIFI symbol at the top right in the product screen).

Step 5
Downloading Product Details to Machine
⚠️ You may see an error if the machine is not connected to the internet, so make sure you are either connected via Wi-Fi or using a SIM card as shown earlier. If you encounter an error, try turning the Wi-Fi off and on again to refresh the connection.
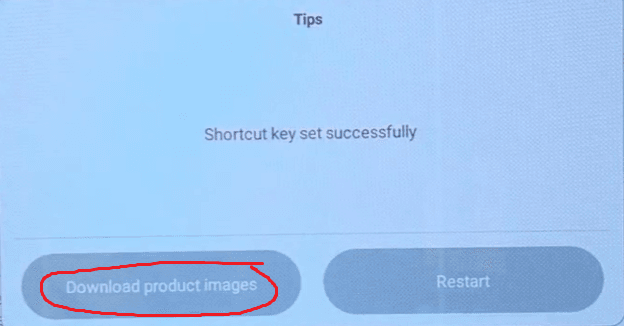
To download product information from the online dashboard, use the Product Shortcut Key. This may take a few minutes depending on your internet speed, so please be patient. Once the product information is downloaded, click Download Product Images and wait for all image files to copy.
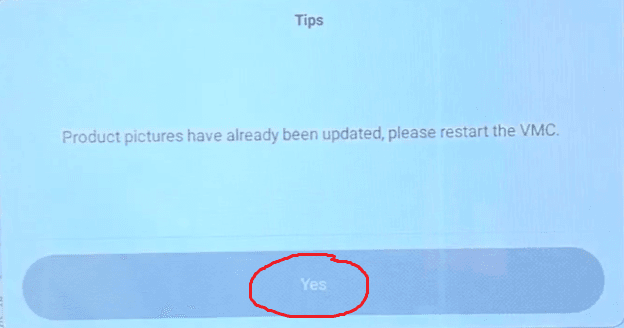
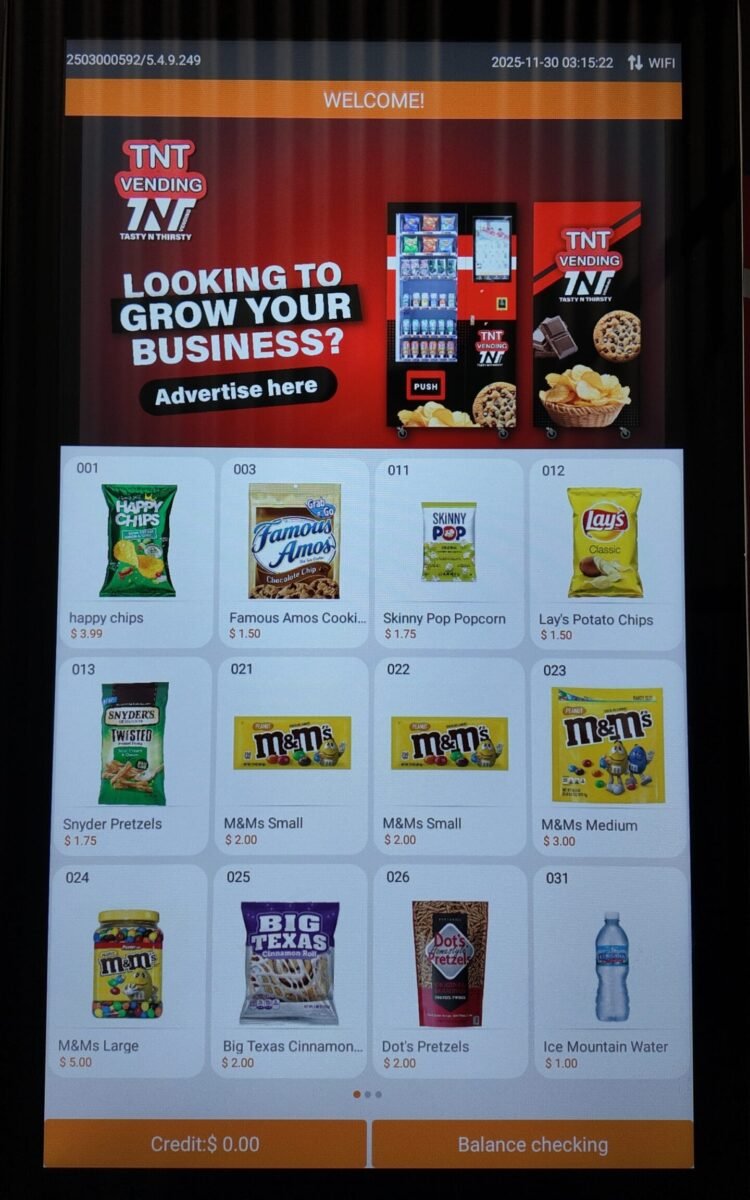
Once the download is complete, the machine will prompt you to Restart. Please restart to save the downloaded products. After restarting, the machine will return to the vending sales page, and you should now see all your updated products displayed on the screen.
Step 5.1
Product Shortcut Key
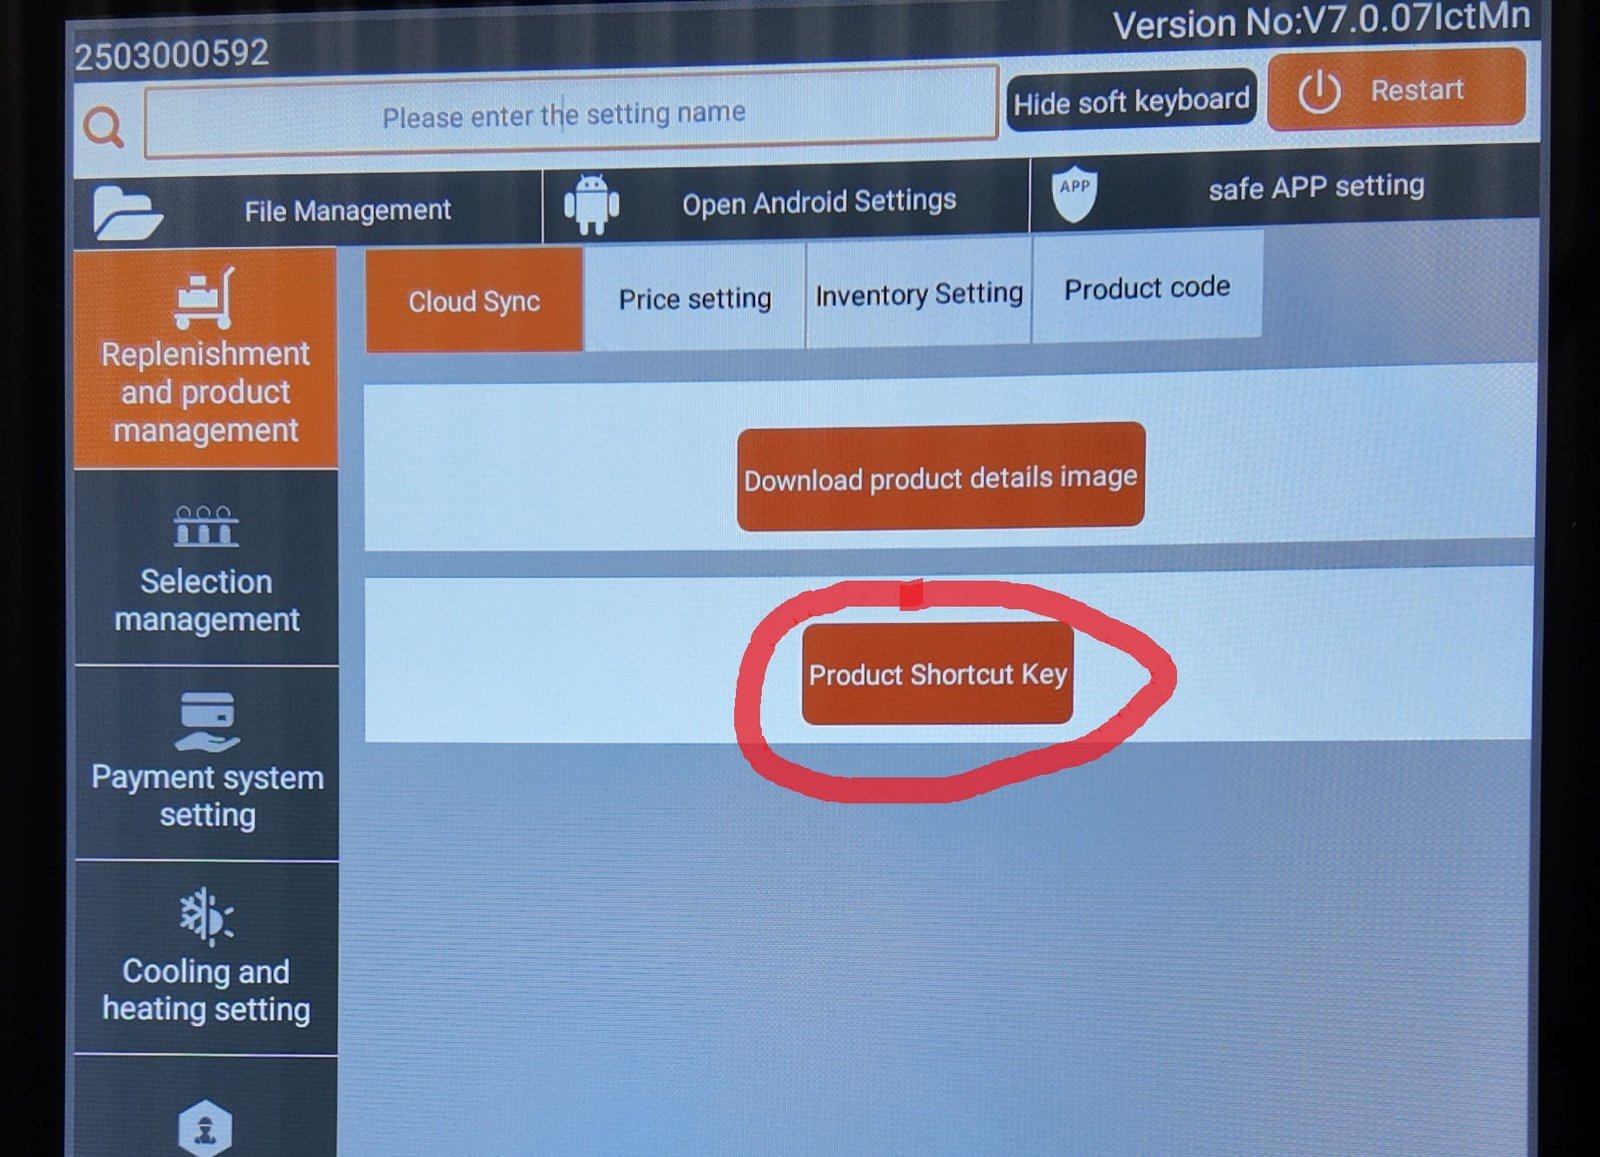
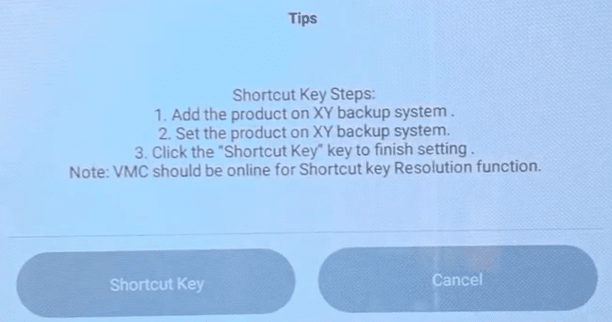

On the main settings screen, click the Product Shortcut Key and follow the on-screen prompts to download the product information and images.
Step 5.2
Restart Machine
After the product information is downloaded, follow the on-screen prompt to restart the machine. Once restarted, your products should appear automatically on the sales screen.
Step 6
Loading Products & Inventory Settings
When the machine arrives, remove all zip ties securing the product trays. Turn on the cooling unit using the switch at the bottom, then go to Cooling and Heating Settings and activate the cooling. Check the springs on each tray—if any are loose, align the notch and twist to lock them in place. Load products into the trays according to size: smaller cans in the bottom and taller cans/bottles middle trays, snacks and chocolate bars in the upper trays. Finally, make sure to set the quantity of each product in the inventory settings, then restart the machine to save your changes.
Step 6.1
Remove Zip Ties & Check for Loose Springs
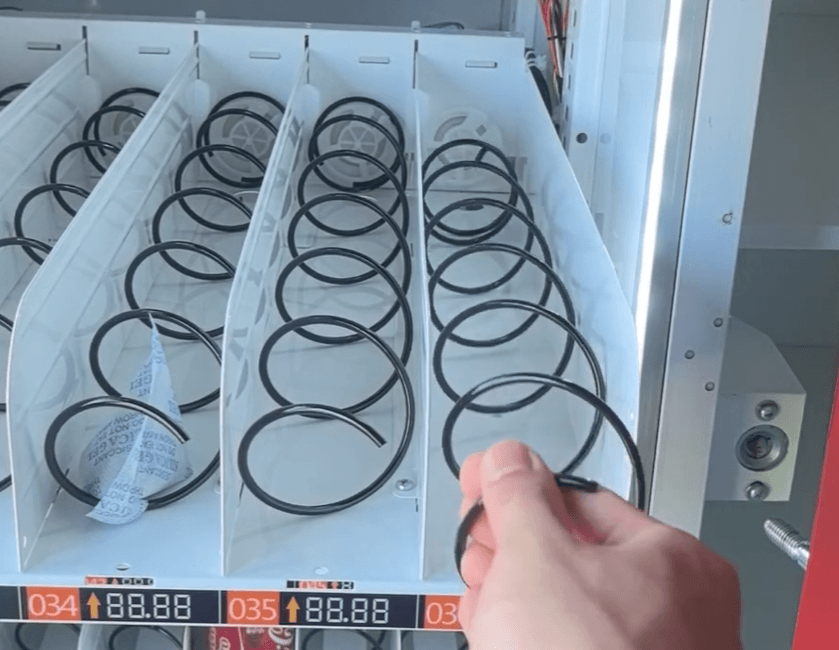
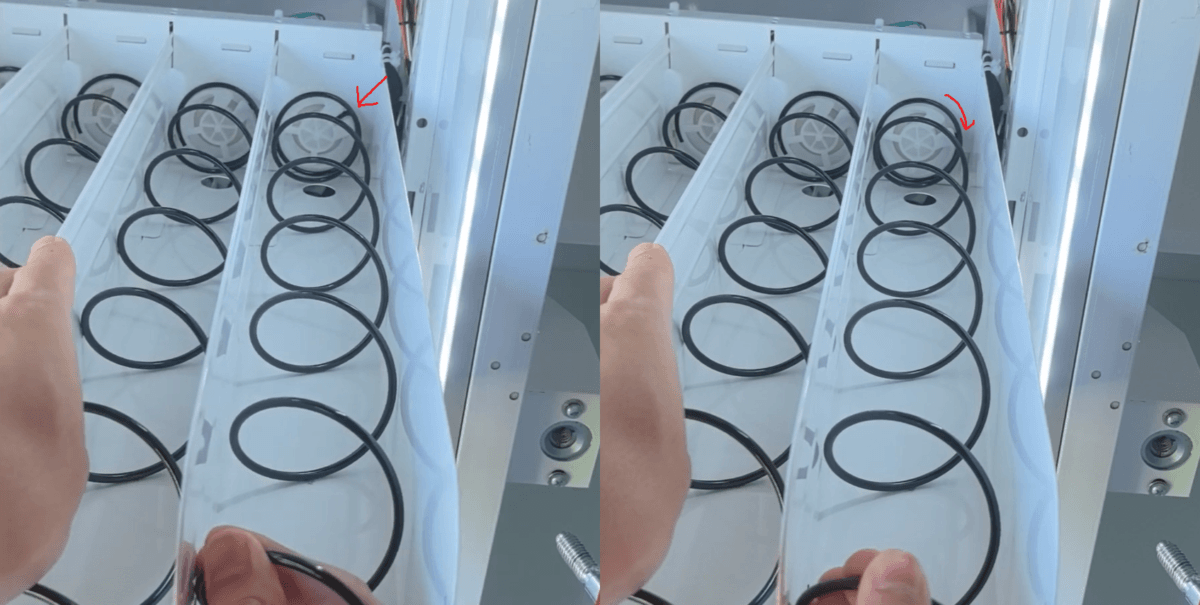
When your machine arrives, the product trays will be secured with zip ties, so make sure to cut and remove all of them. At the bottom of the machine is the cooling unit, which you need to turn on using the switch provided; there will be a light to indicate it is switched on. Occasionally, the springs in the trays may be loose during shipping. To fix this, align the notch on the spring with the plastic, hold the tray with one hand, push the spring in, and twist to lock it into place. Be sure to check all trays for loose springs before loading products.
Step 6.2
Load Products According to Online Setup and Spreadsheet
To load products, pull out the product trays. Some trays may require a slight lift while pulling them out—always pull on the tray, not the springs. Smaller canned drinks go in the bottom row, while taller cans and bottled drinks should be placed in trays four and five above; bottles are best placed upside down for stability. Tray three is ideal for candies and small chocolates, and the top two trays are designed for large bags of chips and other snacks.

Step 6.3
Double Check Cooling Settings
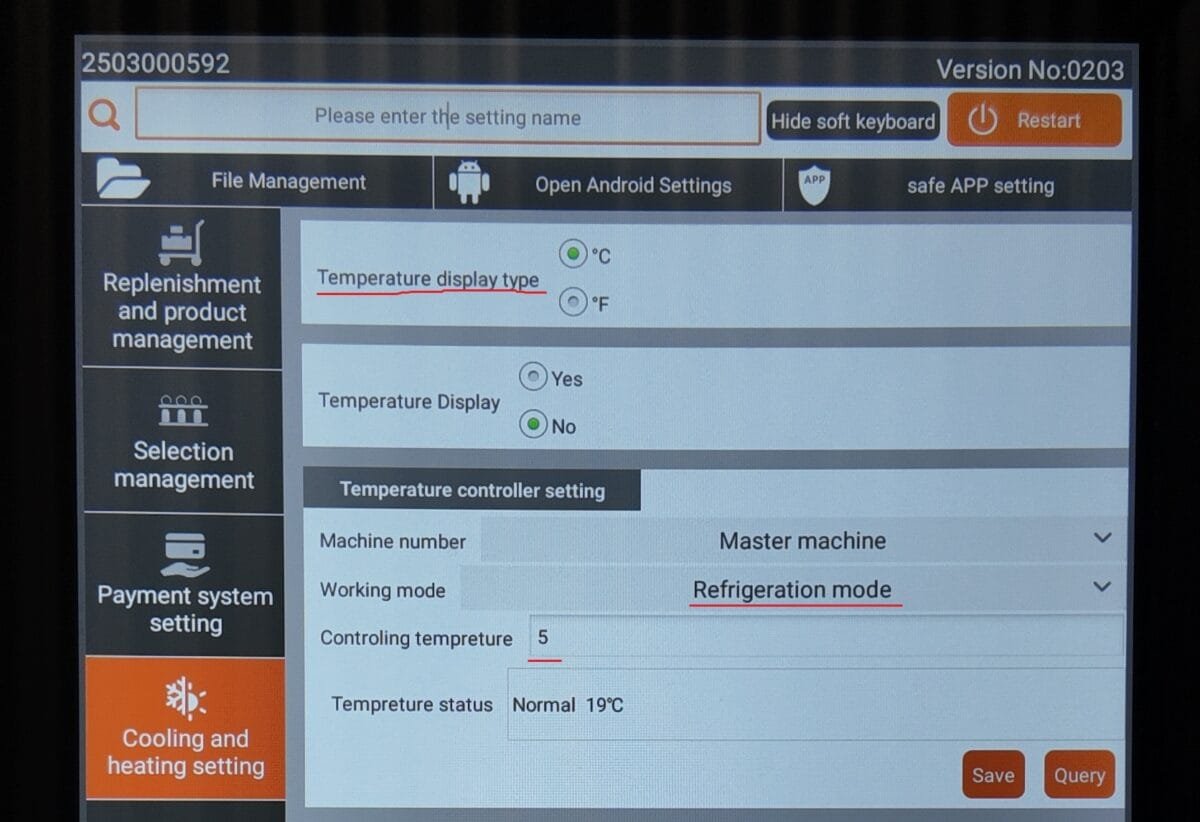
Double-check your cooling settings under the “Cooling and Heating” tab. Here you can change the temperature display type, ensure the unit is set to Refrigeration Mode, and adjust the desired cooling temperature. You can test different temperature levels to find what works best for your products and location.
Step 6.4
Set Product Inventory
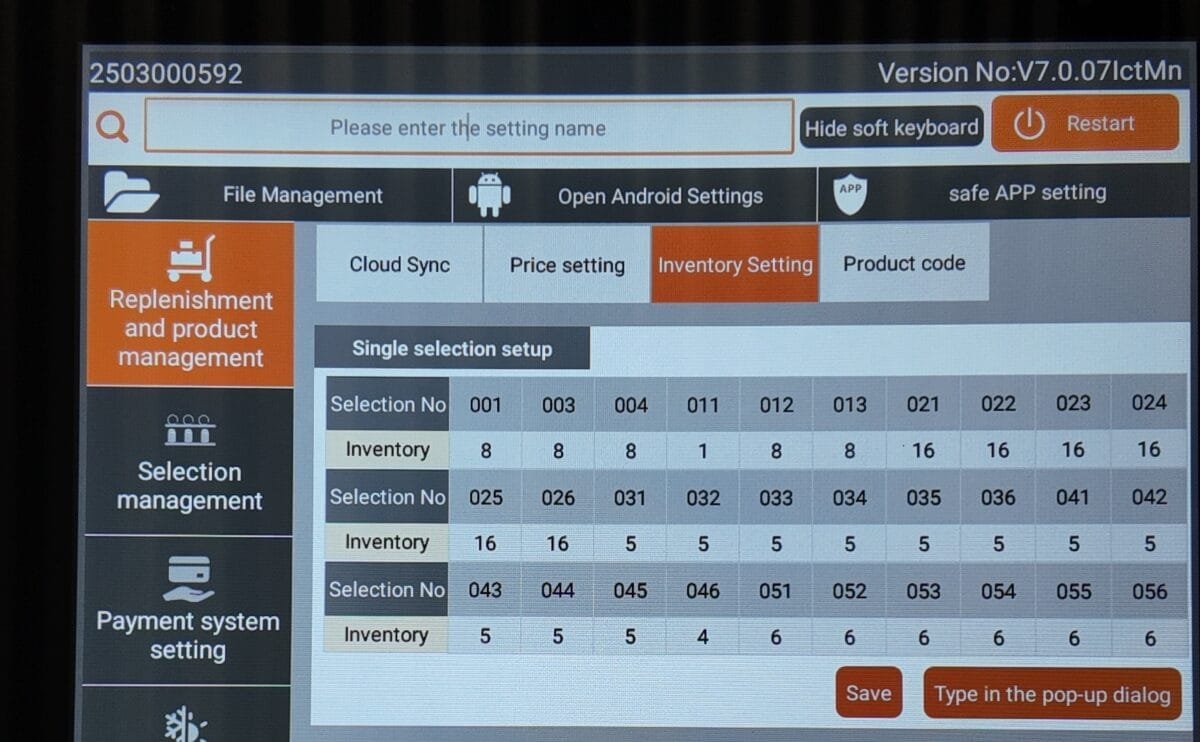
Once the machine is loaded, set the quantity of each product in the inventory settings, matching the numbers to the corresponding lanes on the machine. After entering all quantities, click save and then restart the machine to go back to the main product screen.
Step 7
Check Nayax Functionality
⚠️ BEFORE MOVING YOUR MACHINE TO ITS LOCATION
You MUST test the functionality of your Nayax payment system before placing the machine on-site.
You should have received an email (See Step 0) around the time your machine was shipped inviting you to create your Nayax account. Once your account is set up, the Nayax credit card terminal should automatically work when the machine arrives.
Testing the payment system before deployment ensures everything is working smoothly and prevents issues once the machine is live.
Step 7.1
Select a Product & Tap a Credit Card to Test the Nayax Reader
On the product screen, select any product you want to use for a test purchase.
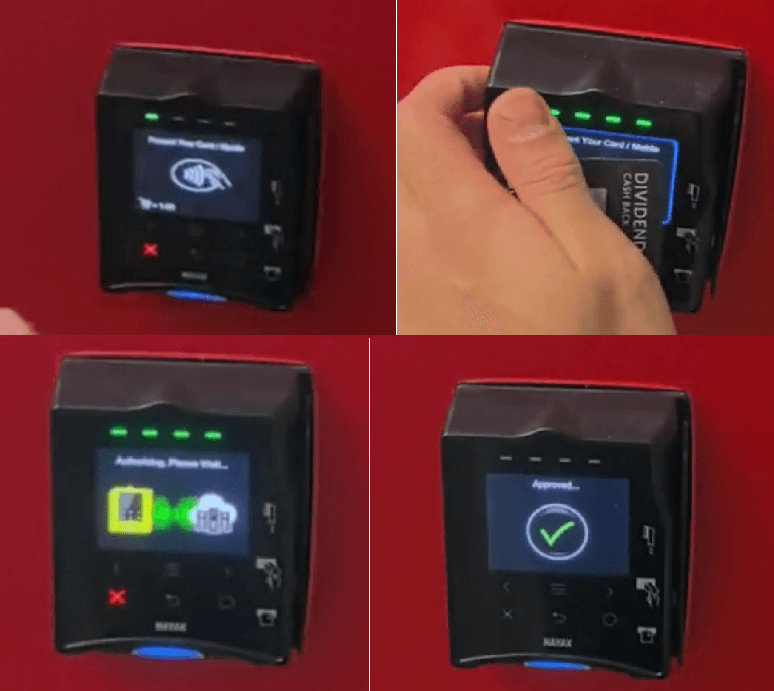
If your account is set up properly and the Nayax reader has a strong signal/connection, the credit card terminal will prompt you visually and audibly to tap your card for payment.
Test it using your credit card and make sure that transactions are properly authorized and approved.
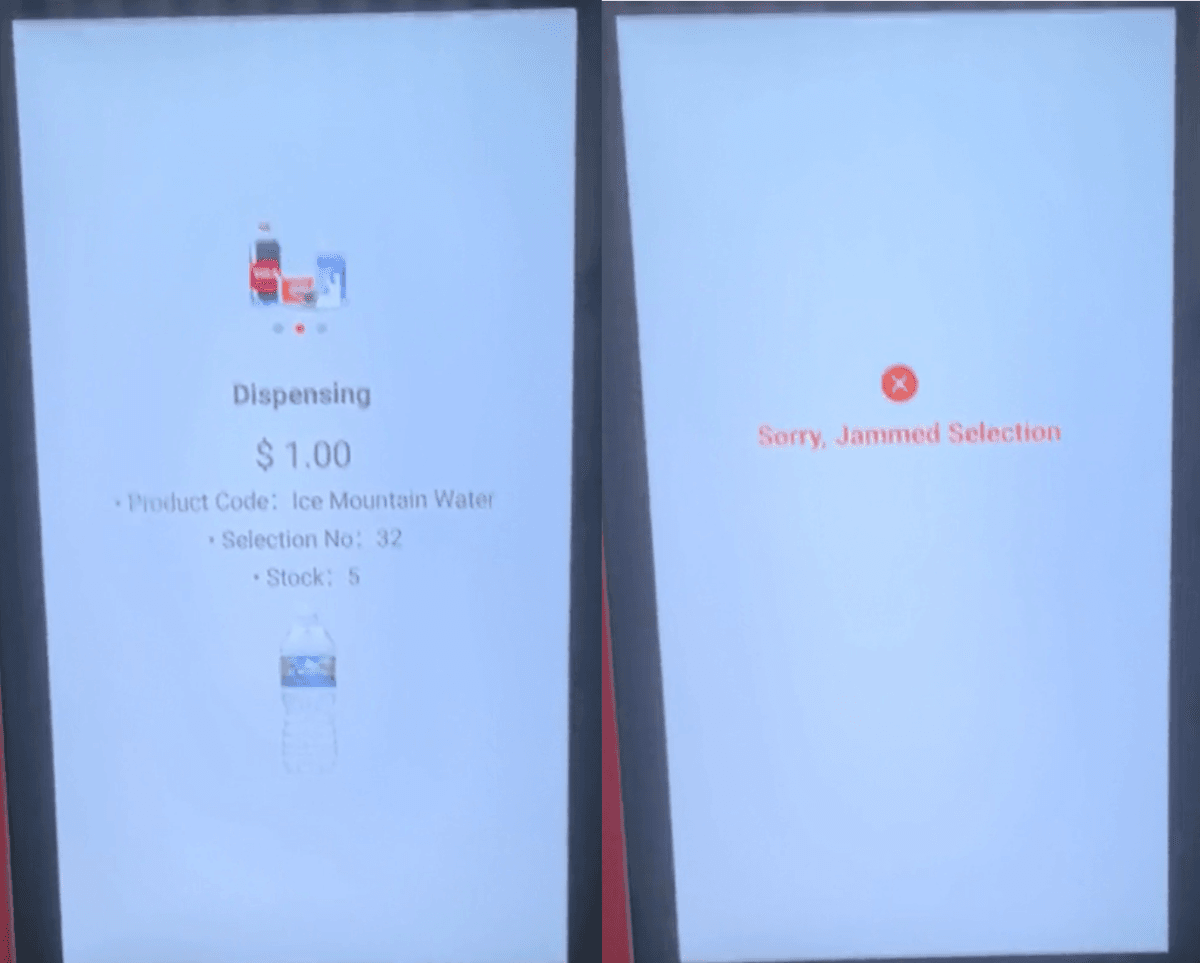
If there is no product loaded in the selected slot, the machine will cancel the sale since no item was detected to drop.
This is normal, but it’s better to test with a product loaded to ensure the sale and dispensing process works correctly.
To Clear the Jam, please follow this video:
Step 7.2
Contact Nayax to Resolve Issues
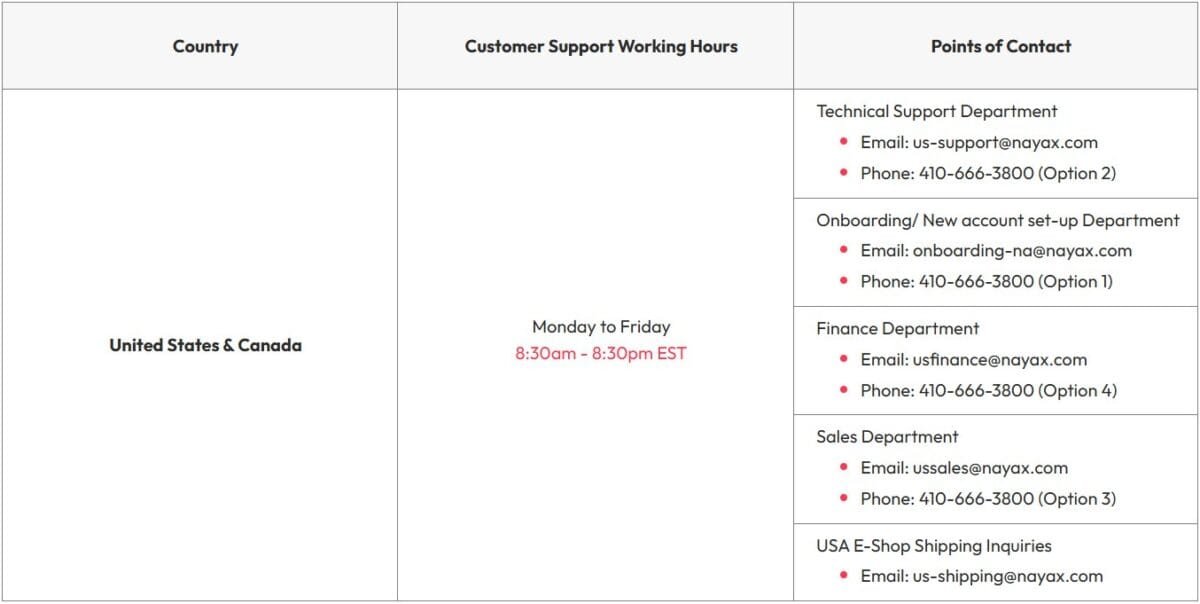
If you encounter any issues or error codes on your Nayax terminal, please contact Nayax tech support directly via phone, email, or by submitting a ticket on their website to resolve the problem.