Support
AI Cooler Quick Start Guide

Difficulty
Steps
7
Time Required
02:00:00 - 03:00:00
Introduction
As your AI Cooler arrives, please use the video & written guides below to complete the initial setup. We strongly recommend finishing the setup before moving the machine to its final location, in case any issues need to be addressed.
This guide covers everything you need to get your AI Cooler running, including creating products for AI image recognition, assigning them to the correct shelves, and testing that the Nayax payment system and vending functions are working properly.
Again, we recommend completing all setup steps and testing the AI Cooler before relocating to the location. On moving day, all you’ll need to do is position the machine, plug it in and you’ll be ready to start selling.
Need a little extra help getting started? 🤝
We’re happy answer any questions you may have!
👉 BOOK A SETUP CALL 📅✨
Tools
Computer
Camera
Hammer & Crowbar
Screwdriver
Pallet Jack (Recommended)
Step 0
Nayax Account Setup
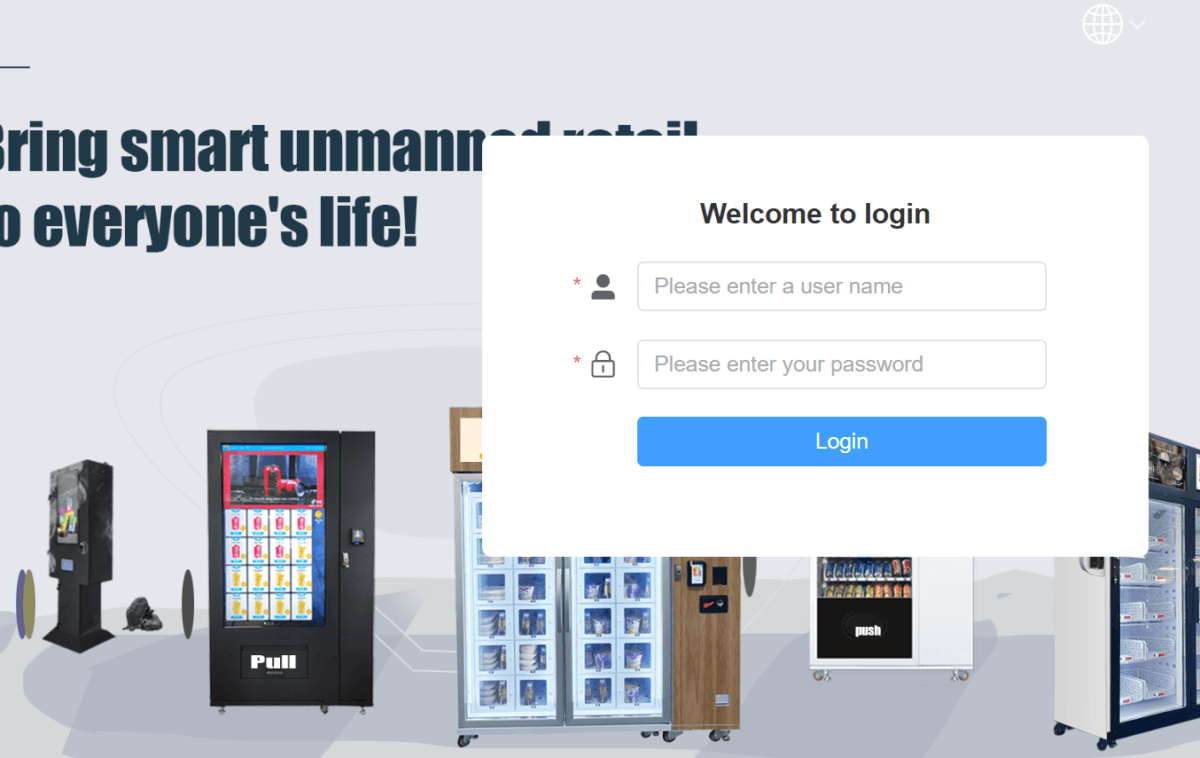
Around the time your machine shipped, you should have received an email from Nayax (similar to the example photo) inviting you to set up your online account. This step is required for your credit card terminal to function.
It is very important that you complete this setup right away because Nayax can be slow—sometimes up to 2 weeks—to activate new accounts. The onboarding process may take some time as well.
The signup link in the email also expires within 7 days. If you find the email and the link has expired, please let us know immediately and we will have Nayax send you a new activation link.

Recommended Nayax Setting for AI Coolers (Very Important)
- The machine places a small initial pre-authorization (for example, $10) when the customer taps their card.
- As the customer removes products, Nayax uses incremental authorization to adjust the hold if needed.
- When the door closes and the final purchase amount is confirmed, Nayax releases the temporary hold and settles the transaction at the exact final amount (whether it’s $12, $35, or $50).
Step 1
Online Dashboard Login & Manuals
This is the first step you can begin even before your AI Cooler arrives. This walkthrough will help you understand the available resources in your google drive and how to access the online dashboard for your machine.
Step 1.1
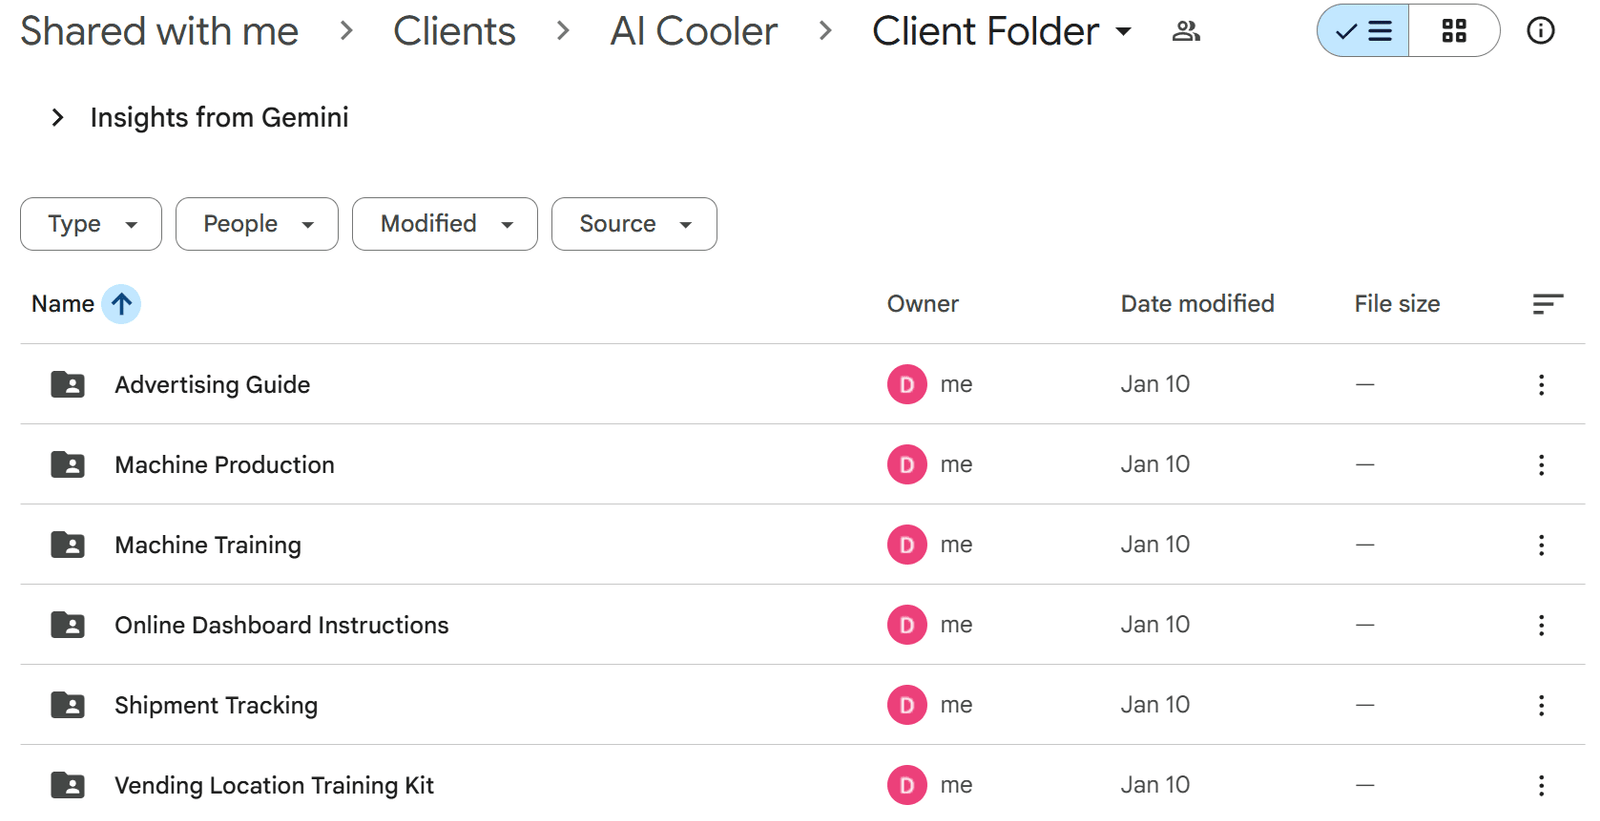
Review the Shared Google Drive Folder
Before starting the physical setup, you should have received access to a Google Drive folder containing important resources for operating your AI Cooler. This folder includes:
If you do not have access to your personal google drive, please reach out to us. It is important that you review the information in this folder as it will help you successfully start your vending business.
Advertising Guide
Information on how to find advertisers and guidelines on what effective advertisements should look like.Machine Production
Photos and videos documenting your machine during the factory build process.- Online Dashboard Instructions
Your login to access the online dashboard. - Machine Training
General operating information and common issues you may encounter while running your AI Cooler. Shipment Tracking
Details on how to track your machine while it is being shipped to you.Vending Location
Guidance on securing a vending location, including typical contract language used for vending agreements.
Step 1.2
Access Your Login Information
Your login information should have been shared with you in an e-mail and is also located in your google drive. If you haven’t received it, please reach out to us!
The AI Cooler uses two platforms:
Desktop platform (PC browser)
Mobile platform (phone browser)
Each platform has slightly different features, so best practice is to log into both to access full functionality.
Step 1.3
Log In and Confirm Machine Status
Log in using your username and password on both the mobile and desktop platforms.
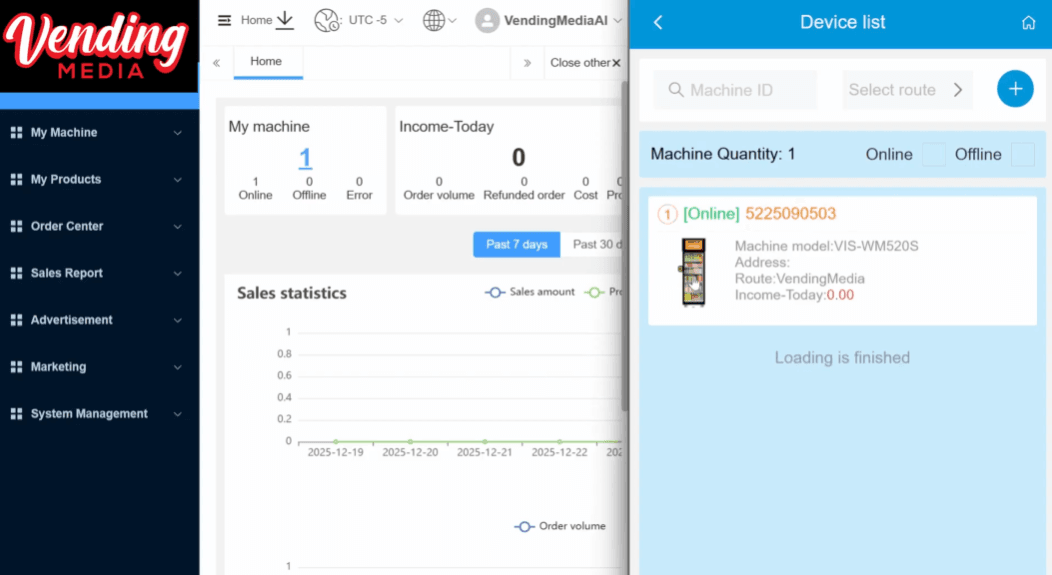
On the mobile platform, go to Machine Management to view the machines assigned to your account.
Verify that the number of machines listed matches the number you ordered.
If the count does not match your order, please contact us before proceeding.If the machines have not been unboxed or connected to the internet yet, they will appear offline.
Once powered on and connected, they will appear online.
On the desktop platform, navigate to Machine Settings to view the same machine information and confirm assignment.
Step 2
Machine Unboxing
⚠️ WARNING: This AI cooler weighs roughly 300 lbs (136 kg). It is extremely heavy — use proper equipment and multiple people when moving it, and proceed with caution.
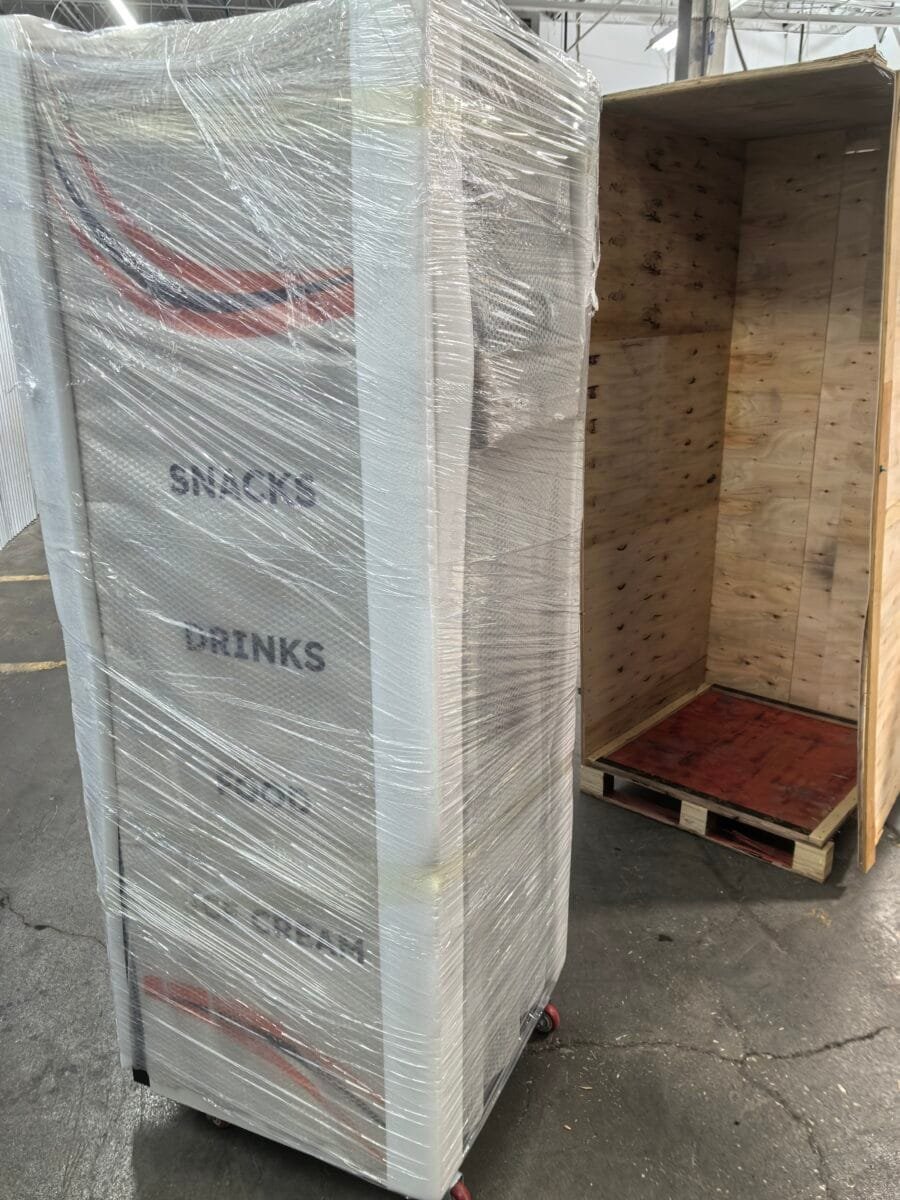
When your AI Cooler arrives, carefully open the wooden pallet using a crowbar and hammer, and always work with at least two people due to the machine’s weight. Retract the adjustable legs by lifting each corner slightly and turning the legs counterclockwise until the wheels rest on the ground, allowing the machine to be rolled off the pallet and moved into position. Once unpacked, locate the power cord at the back of the machine and plug it into a standard North American household outlet. If an extension cord is needed, use only 12-gauge or 10-gauge cords to ensure safe and reliable operation.
Step 2.1
Removing the Pallet
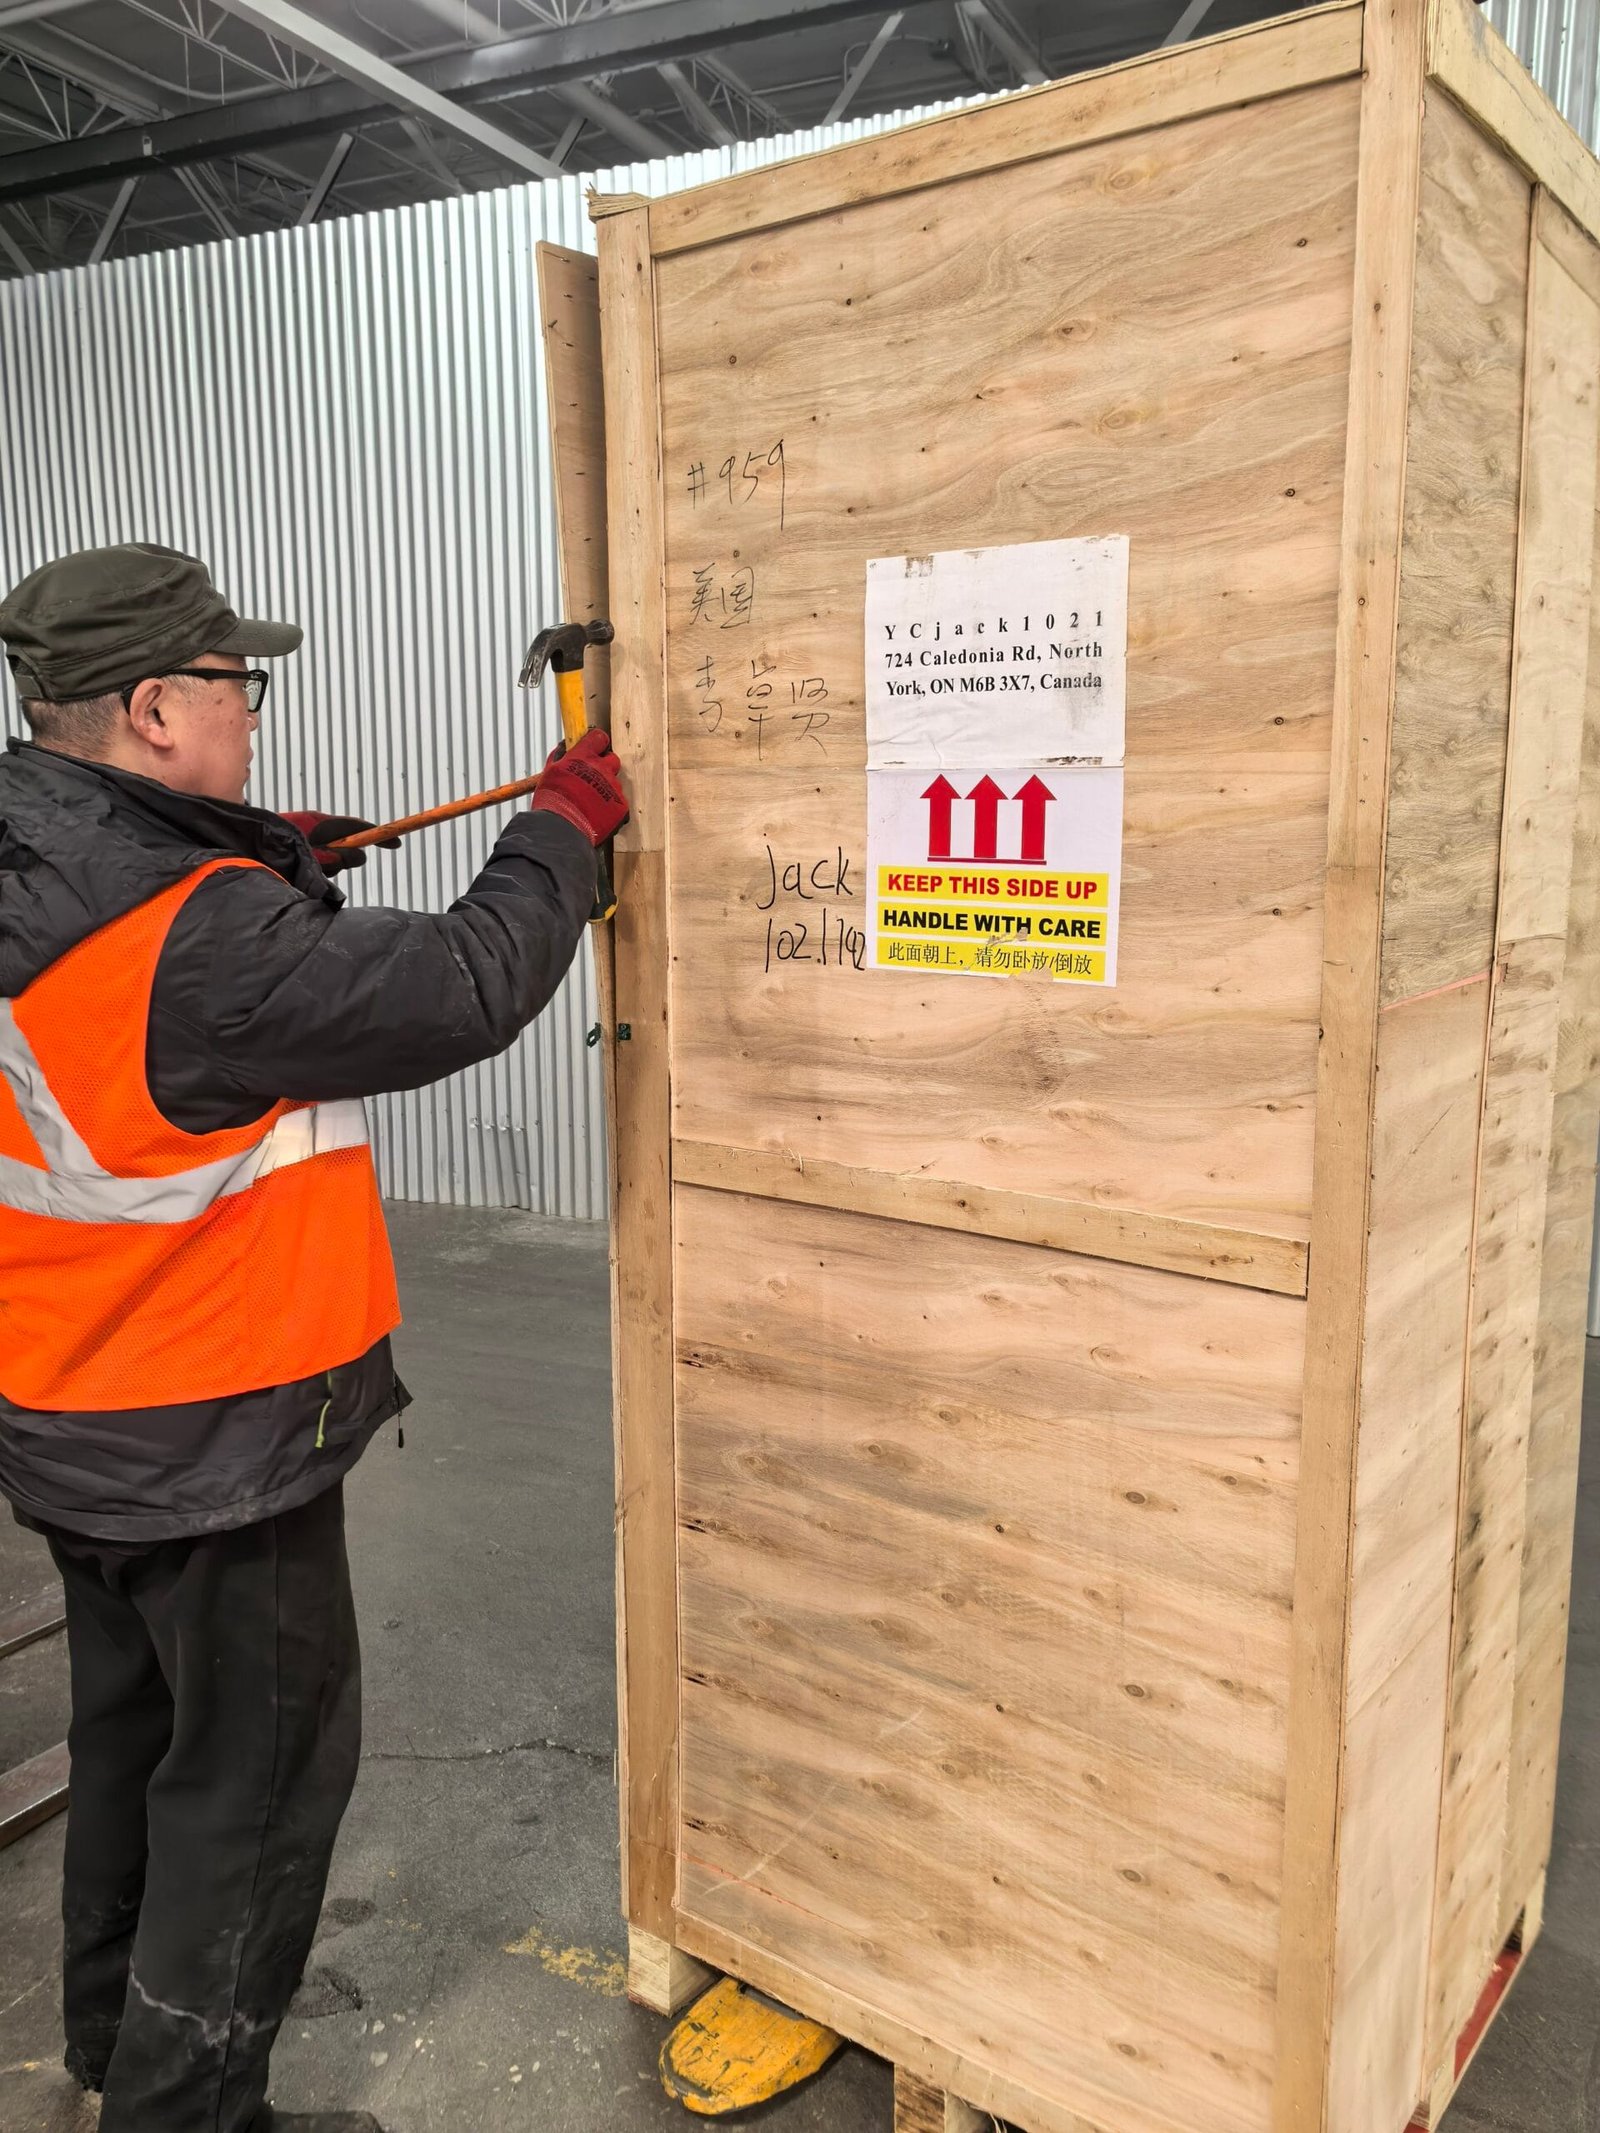

When your AI Cooler arrives, it will be secured to a wooden pallet.
Use a crowbar and hammer to open the pallet.
The pallet may be stapled or screwed together, so proceed carefully to avoid injury.
Due to the machine’s weight (approximately 300 lb / 136 kg), at least two people are required for unpacking and moving.
Step 2.2
Adjusting the Bottom Legs & Wheelsrk)

The AI Cooler has adjustable legs at the bottom that are used to lift or lower the machine.
The legs can be turned by hand.
If the leg is bearing weight, slightly lift that corner of the machine before turning.
Turn counterclockwise to raise (retract) the leg into the machine.
Turn clockwise to lower the leg toward the ground.
Understanding how the legs work is important before removing the machine from the pallet.
Step 2.3
Remove the Machine from the Pallet
To safely move the AI Cooler off the wooden pallet and onto its wheels:
With one person stabilizing the machine, slightly lift one corner.
While the corner is lifted, retract the leg by turning it counterclockwise.
Repeat this process for each corner until the wheels are fully touching the ground.
Once the machine is on its wheels, carefully roll it off the pallet and move it into position.
Important: The machine weighs approximately 300 lb. Always use at least two people when removing it from the pallet.
Step 2.4
Connect Power
After unpacking and positioning the machine:
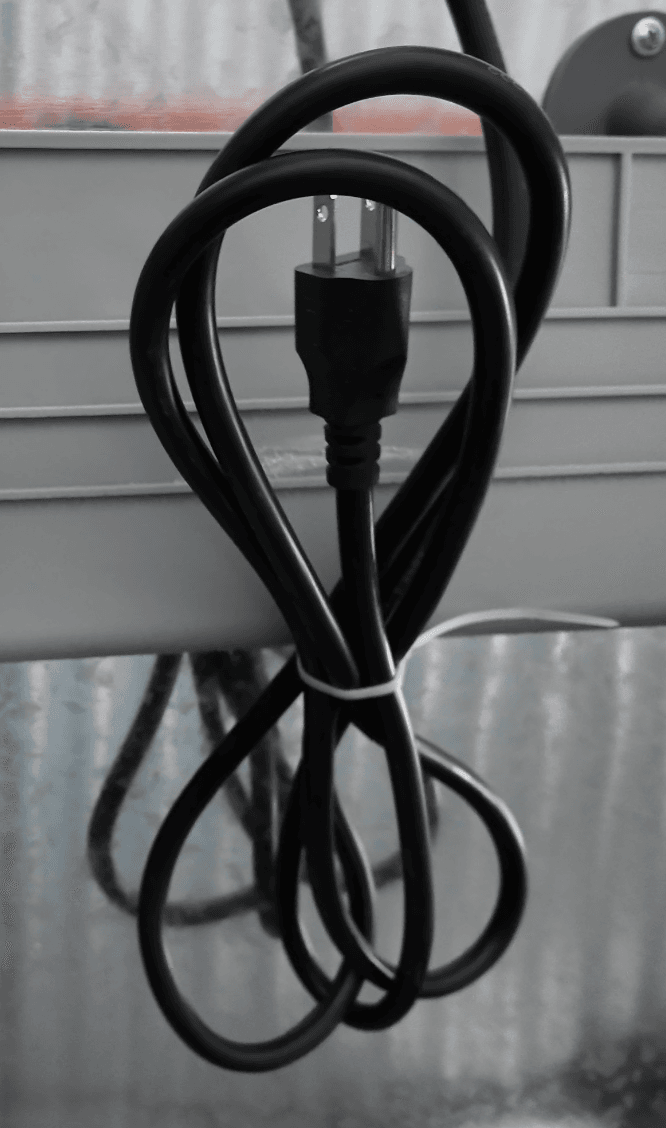
Go to the back of the AI Cooler and locate the power cord.
Plug it into a standard North American household outlet.
If an extension cord is required:
Use 12-gauge or 10-gauge extension cords only.
Do not use 14-gauge or smaller extension cords, as they are not suitable for the machine’s power requirements.

⚠️ Take a note of this warning on the back of the machine. Do not place the cooler close to a fire source.
If the cooler does not turn on immediately after plugging it in, this is most likely due to the internal power breaker being in the OFF position. This is normal and not a cause for concern. Proceed to the next step, where we explain how to open the machine and access the internal power breaker and SIM card slot.
Step 3
SIM Card Setting
⚠️ The machine uses a nano-size SIM card (same as most phones), so make sure you insert the correct type.
To connect your AI Cooler to the internet, first obtain a SIM card using the machine’s IMEI number found in the system settings. Power off and unplug the machine before opening the top panel to access the internal SIM card slot. Insert a nano SIM card using a SIM eject pin, then securely close the machine and restore power. Once restarted, confirm that the cellular indicator lights turn green, signaling a successful connection. After the machine is online, use the dashboard to verify connectivity and remotely unlock the door for product loading or maintenance.
For your AI Cooler setting up a SIM card is required as the transactions need to be processed by our servers in real time.
When purchasing the SIM card, the carrier may ask for the IMEI number of the machine.
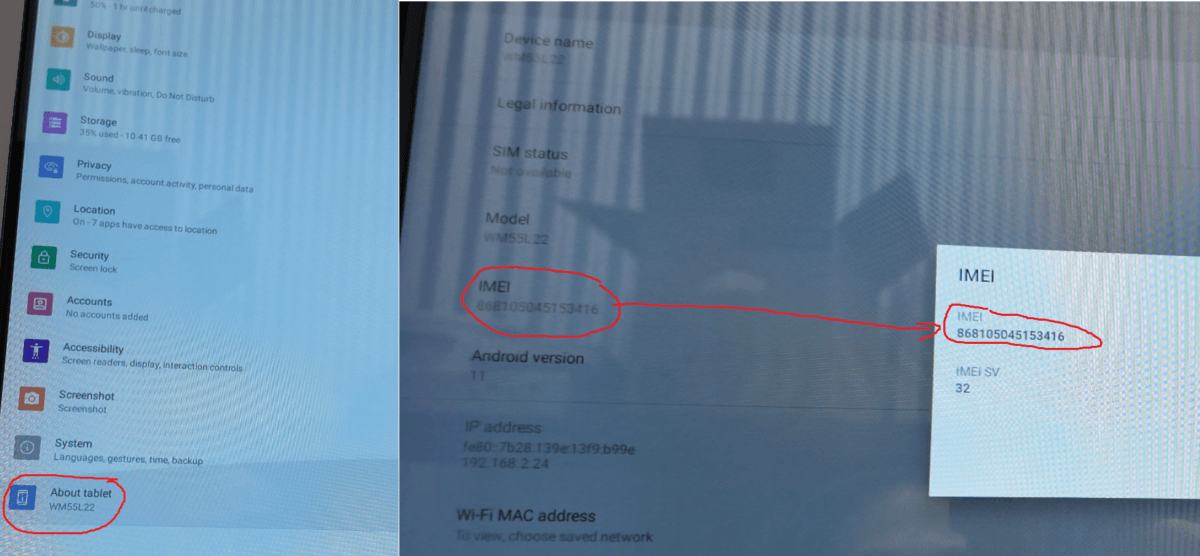
To find the IMEI:
On the machine’s home screen, scroll up and open Settings.
Scroll down and select About Tablet.
Locate and record the IMEI number shown on this screen.
Provide this IMEI number to your carrier to activate the SIM card.
Step 3.1
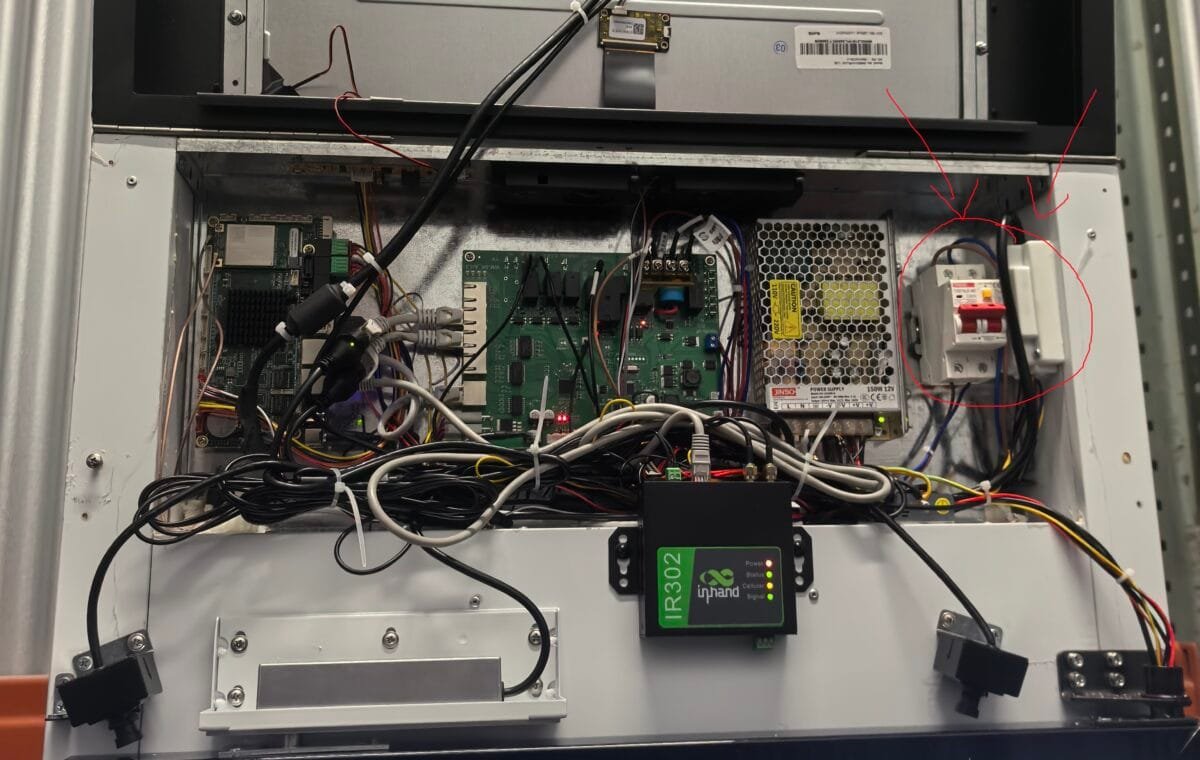
Power Off and Access the Internal Compartment
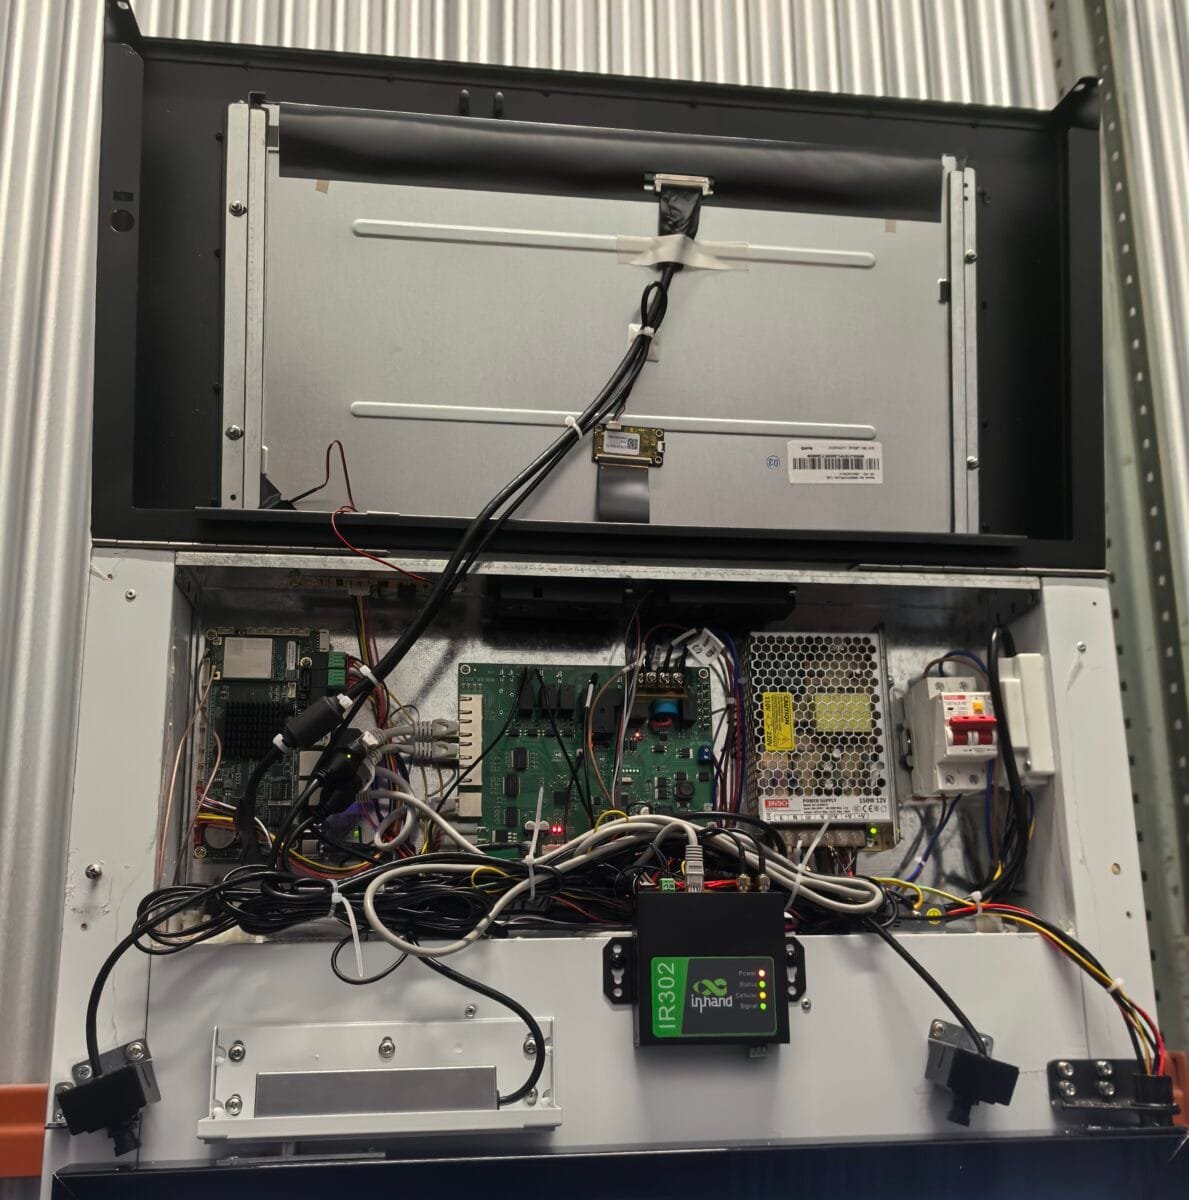
Before opening the machine:
Unplug the machine from power.
Never work inside the machine while it is powered on, as this may damage internal electronics.
To access the SIM card slot:
Locate the two screws securing the top panel (one on the left, one on the right at the bottom of the panel).
Remove both screws.
Using two hands, carefully lift the entire top panel upward.
Ensure the panel is securely held open before letting go.
You now have access to the internal components.
Safety Note: Avoid touching internal electronics, especially the power supply and main breaker, while working inside the machine.
Step 3.2
Insert the SIM Card and Confirm Cellular Connection
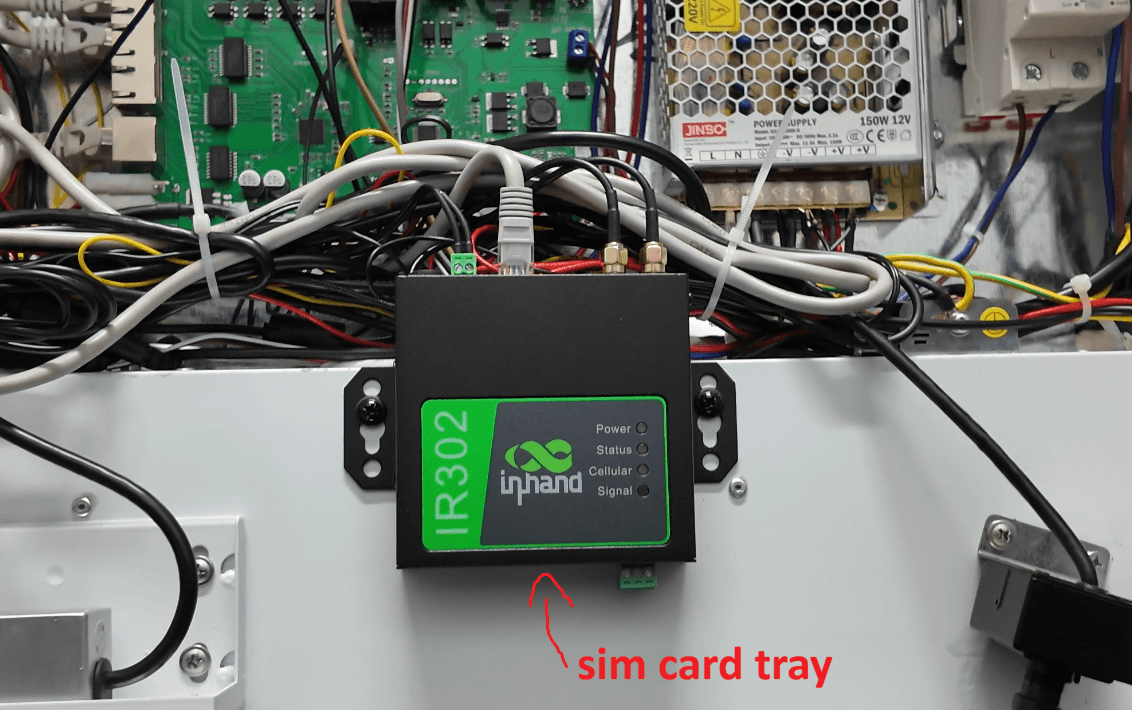
The SIM card slot is located near the bottom of the internal compartment on the underside of the router labelled “IR302”.
Locate the SIM card tray and the small pin hole next to it.
Using a standard SIM eject pin (the same type used for smartphones), press into the pin hole to release the tray.
Remove the tray and insert your nano SIM card, ensuring it is seated correctly.
Carefully slide the tray back into the slot until it fits snugly.
Plug the machine back into power.
Once powered on:
The machine will restart and display the Android startup screen.
The status light should turn green, indicating normal operation.
The cellular indicator light will begin blinking, which means the machine is searching for a cellular signal.
When the cellular and signal lights turn solid green, the connection is successful.
⚠️ If the screen shows a blank display after startup:
- Swipe up on the display and tap the Smart Fridge app to launch it manually.
Step 3.3
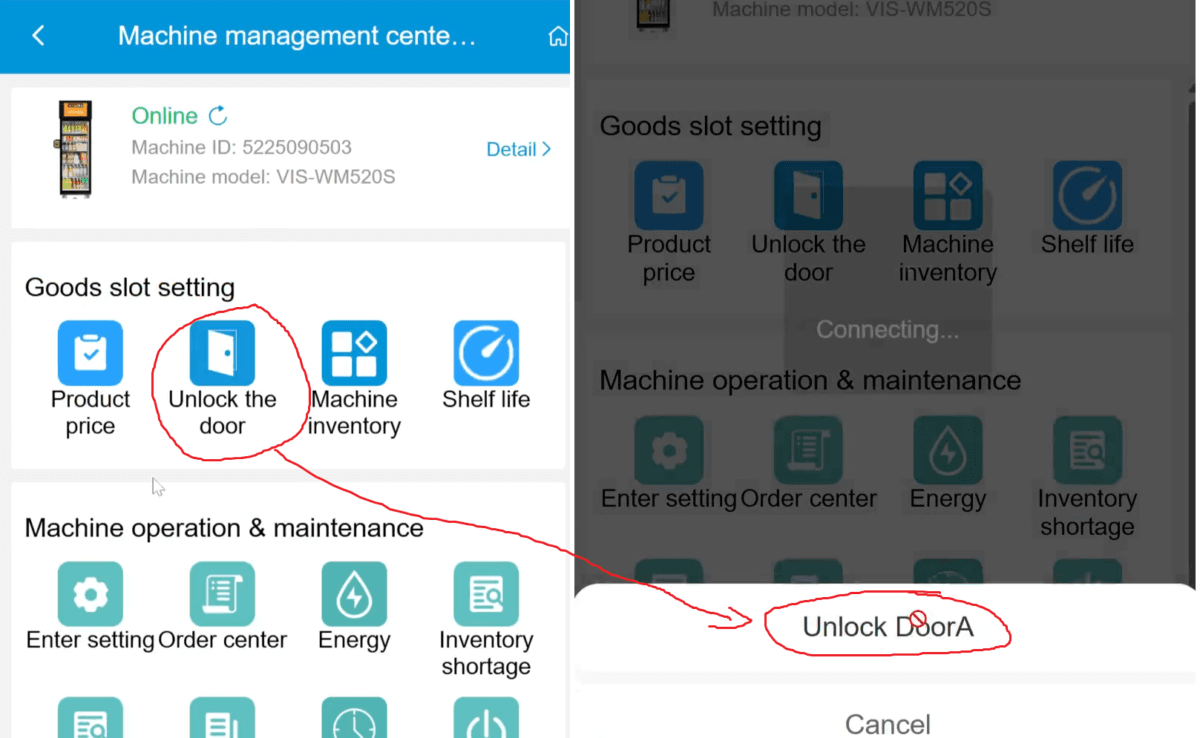
Verify Online Status and Unlock the Door
Once connected to the internet:
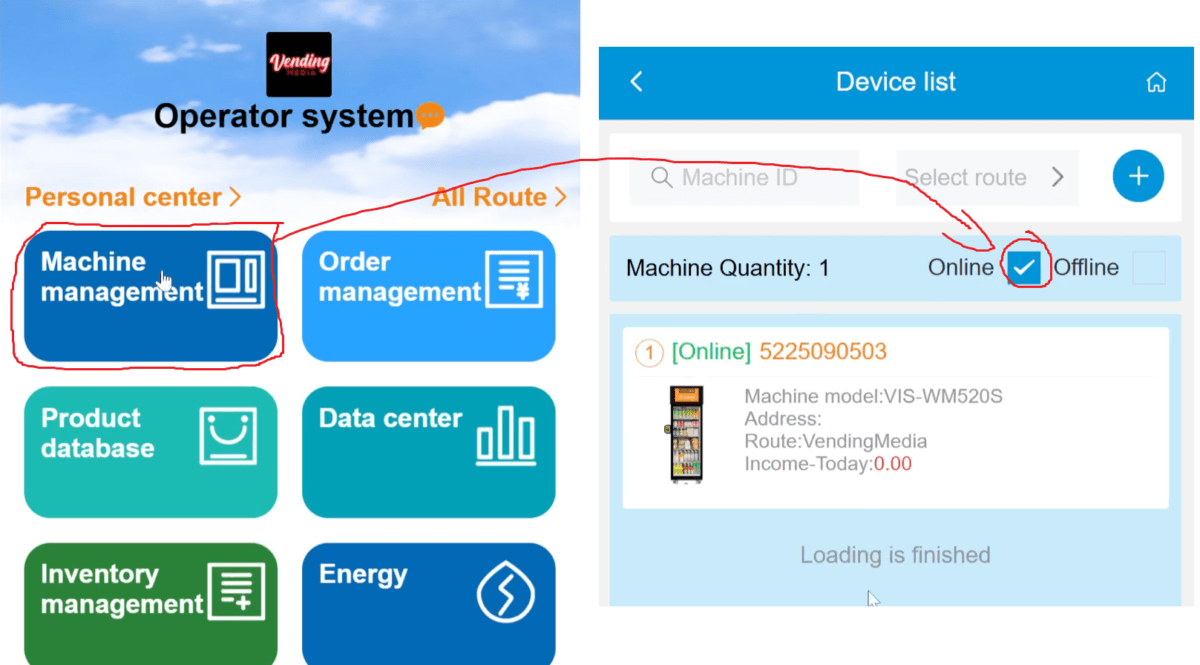
Log in to the mobile dashboard.
Go to Machine Management.
Click Online to view all connected machines.
Select the machine you want to access.
Click Unlock Door, then select Unlock Door A.
Within a few seconds, the door will unlock, allowing you to:
Load or unload products
Access the payment terminal (if shipped separately inside machine)
Retrieve spare parts shipped inside the machine
Step 4
Adding New Products
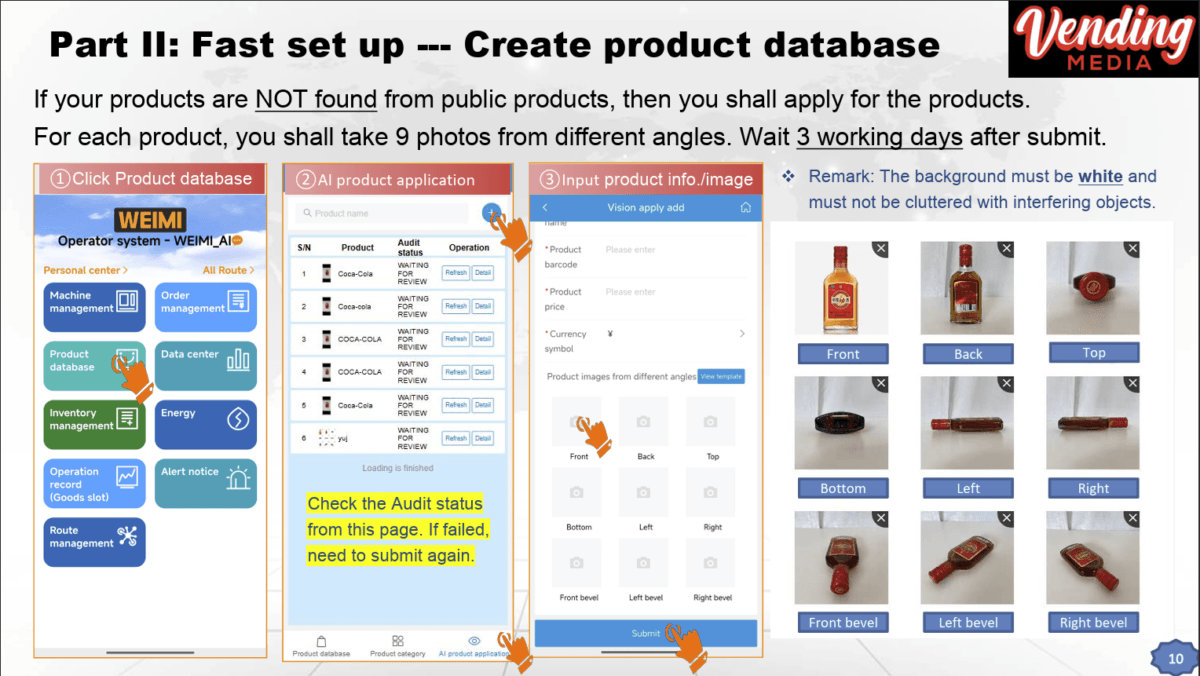
In this step, you will create your product database by either importing items from the public product database or submitting new products for AI recognition. Before uploading, confirm that each product meets size, packaging, and eligibility requirements. If a product is not available in the public database, submit a new product by entering accurate product details, uploading nine high-quality images on a plain white background, and ensuring the barcode is correct. Submitted products will take a few business days to be reviewed before they can be used in your AI Cooler.
Step 4.1
Review Best Practices in the Manual & Importing from Public Database
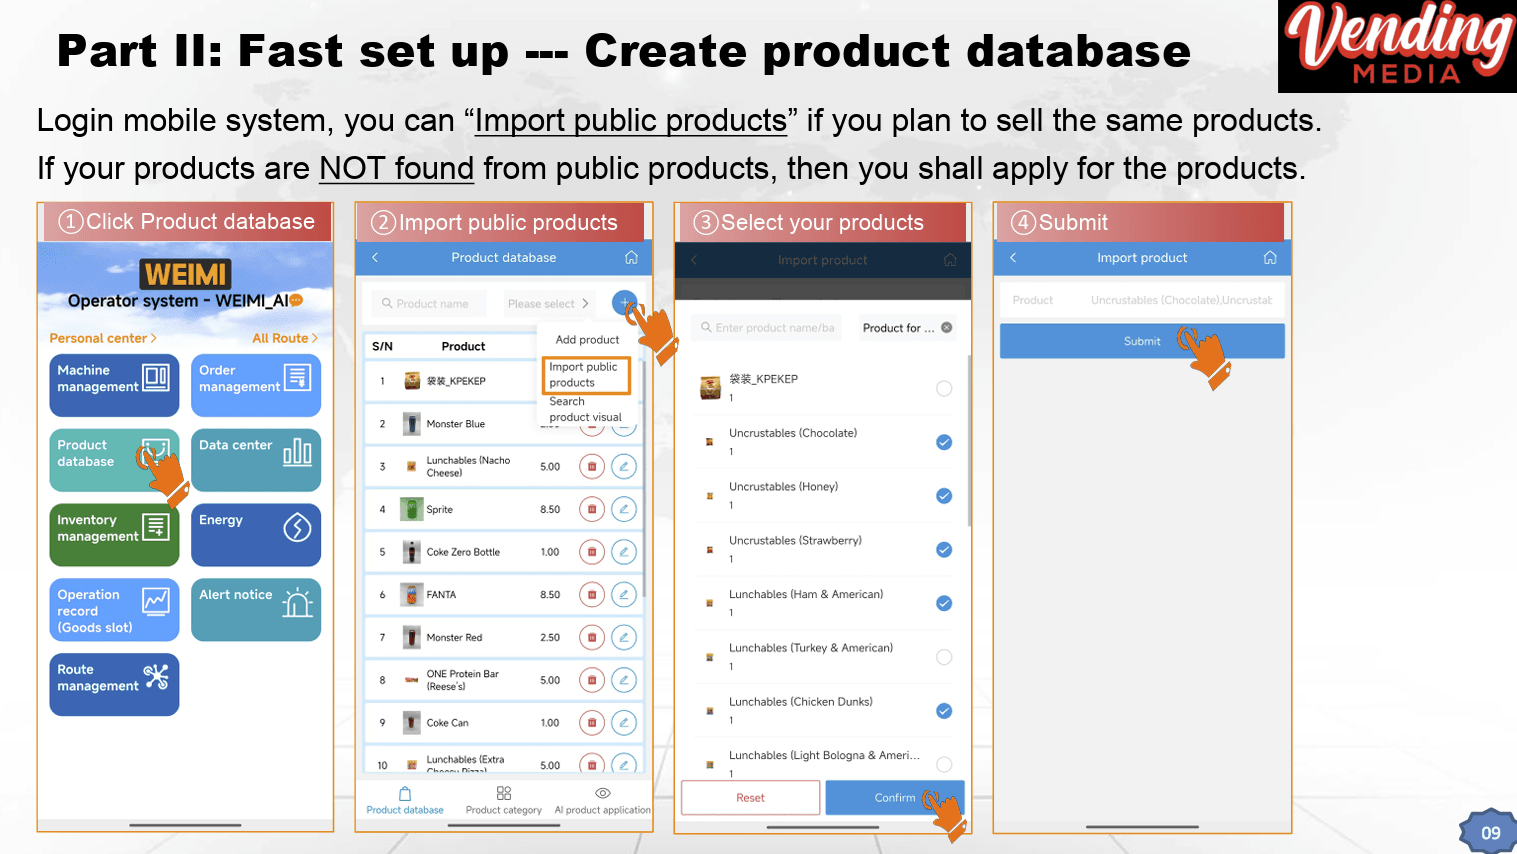
Before uploading products to the online dashboard, review the Best Practice Guides in the machine manual under the Fast Setup section. After installing the card reader in the previous step, the next task is to create your product database.
On page 9 of the manual, you’ll find instructions on importing products from the public product database, which is available on both the desktop (PC) and mobile platforms.
If the product you want to sell already exists in the public database, you can import it directly. If not, you will need to create a custom product, which is covered in the steps below.
Step 4.2
Confirm Custom Product Best Practies
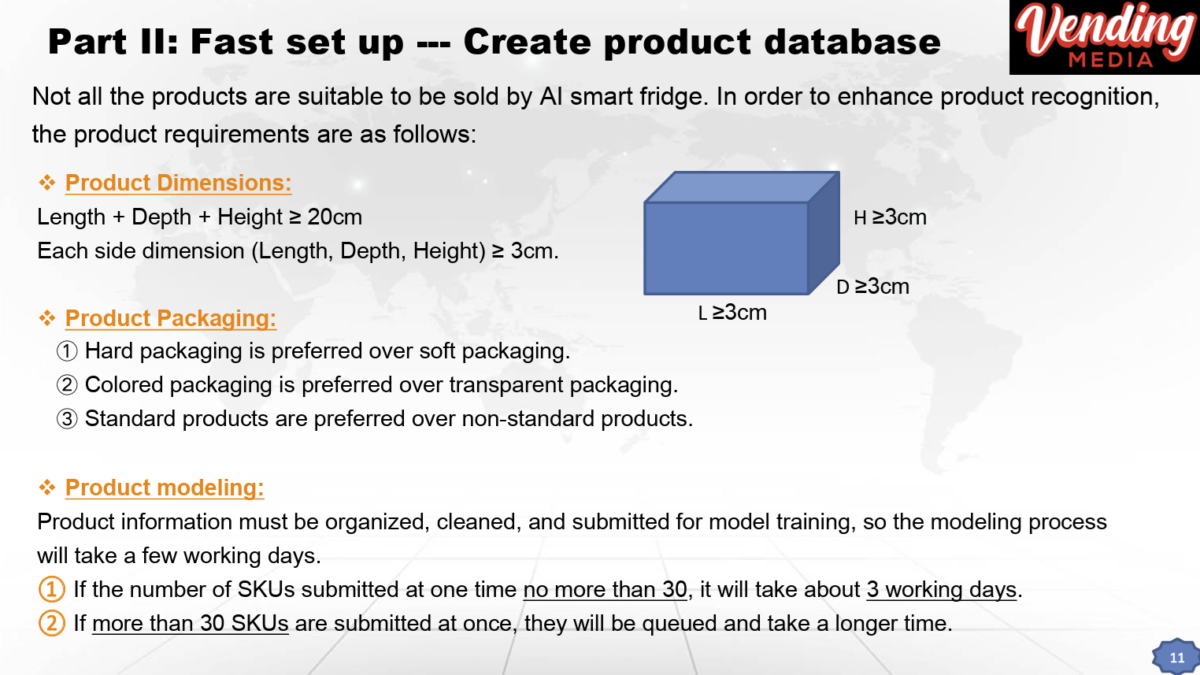
Not all products are suitable for use in the AI Cooler. Before uploading, make sure your product meets the following requirements as outlined on page 11 & 12 of the manual:
Size Requirements
The combined length + width + depth must be greater than 20 cm
Each individual side must be at least 3 cm (approximately 1.5 inches)
Packaging Guidelines
Hard packaging is preferred over soft packaging
Colored packaging is preferred over transparent packaging
Standard retail products are preferred over customized or irregular items
Product Submission Limits
Organize all product information before submission
Submit no more than 30 products at a time
Product approval may take a few business days
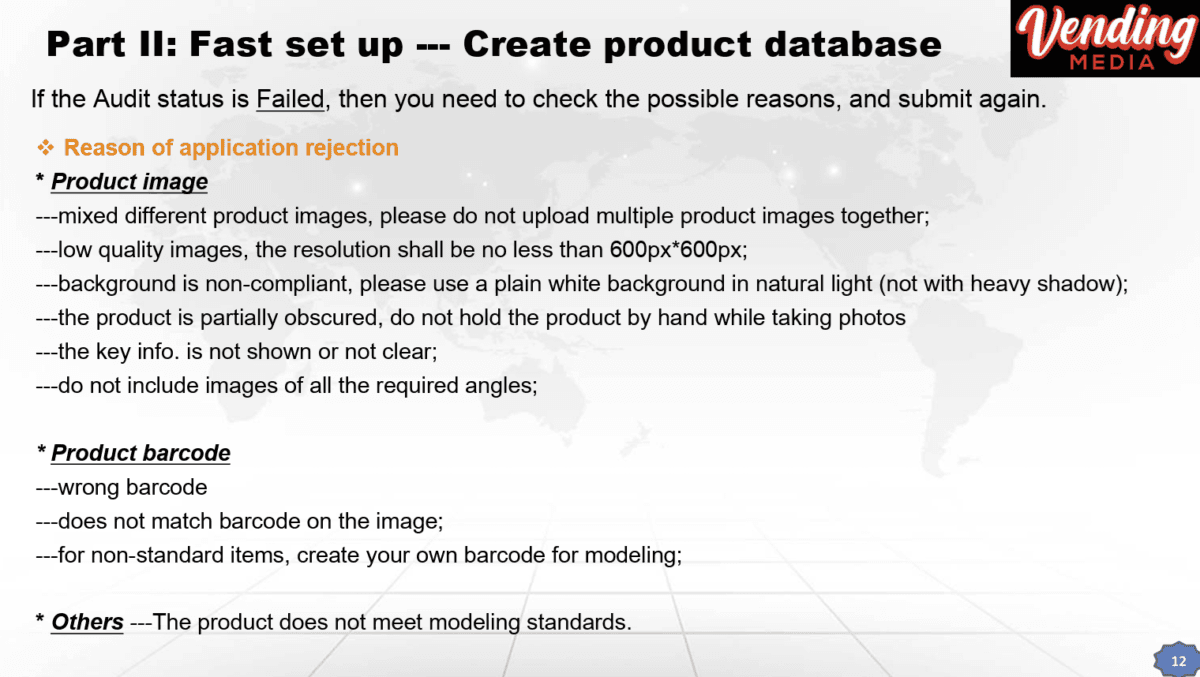
Image and Barcode Requirements
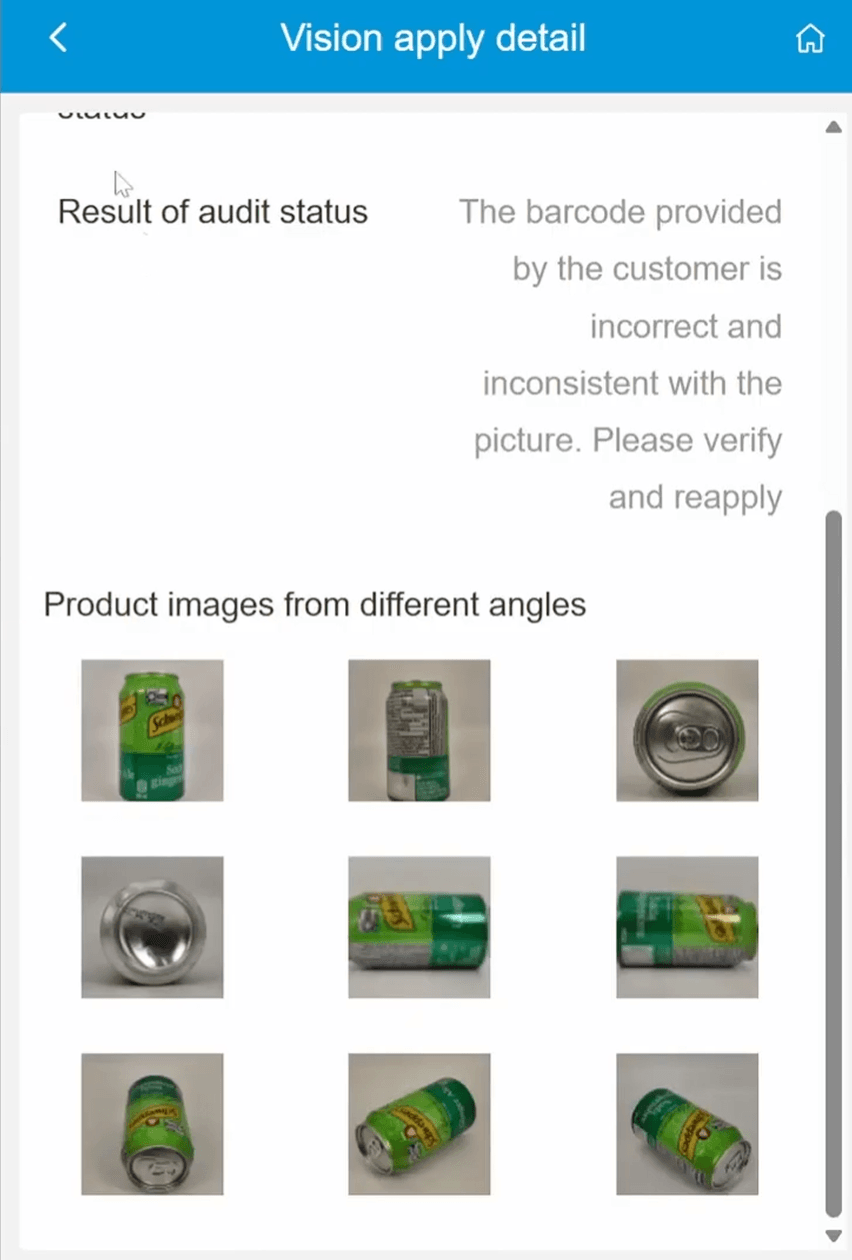
Each product submission must include nine images, all of the same product, following these rules:
Minimum image resolution: 600 × 600 pixels
Background must be pure white (no off-white, gray, gold, etc.)
Use natural lighting with minimal shadows
The product must not be held or obstructed in any image
The barcode must be clearly visible in at least one image
The barcode entered in the system must match the product exactly
If you are selling a non-standard or customized product, you must create and attach your own barcode to the product for AI training.
Step 4.3
Creating a New Product (Mobile Dashboard)
To submit a new product for AI recognition:
Open the mobile version of the dashboard.
Go to Product Database → AI Product Application.
Tap the plus (+) icon.
Enter the product name.
Enter the barcode exactly as shown on the product.
Set the product price and select the correct currency (e.g. USD).
You must upload nine images, each assigned to the correct angle.
Tap each label and upload the corresponding image. Make sure every image is assigned to the correct position.
Once all images are uploaded, tap Submit.
After submission:
The product status will show “Waiting for Review”
Review typically takes a few business days
Once approved, the product status will update and the product will then be available for use in your AI Cooler
Step 5
Loading Products and Inventory Setting
In this step, you confirm that your products have been approved and then add them to your machine through the online dashboard. After selecting a machine, assign products to the appropriate shelves, set pricing, and enter accurate inventory counts based on what is physically loaded. Adjust shelf heights as needed to accommodate different product sizes, re-securing shelves with zip ties after any changes. For best results, stock 30–40 products with clear visual differences, place fast-selling and smaller items closer to the top, and verify that all inventory settings match the machine before going live.
Step 5.1
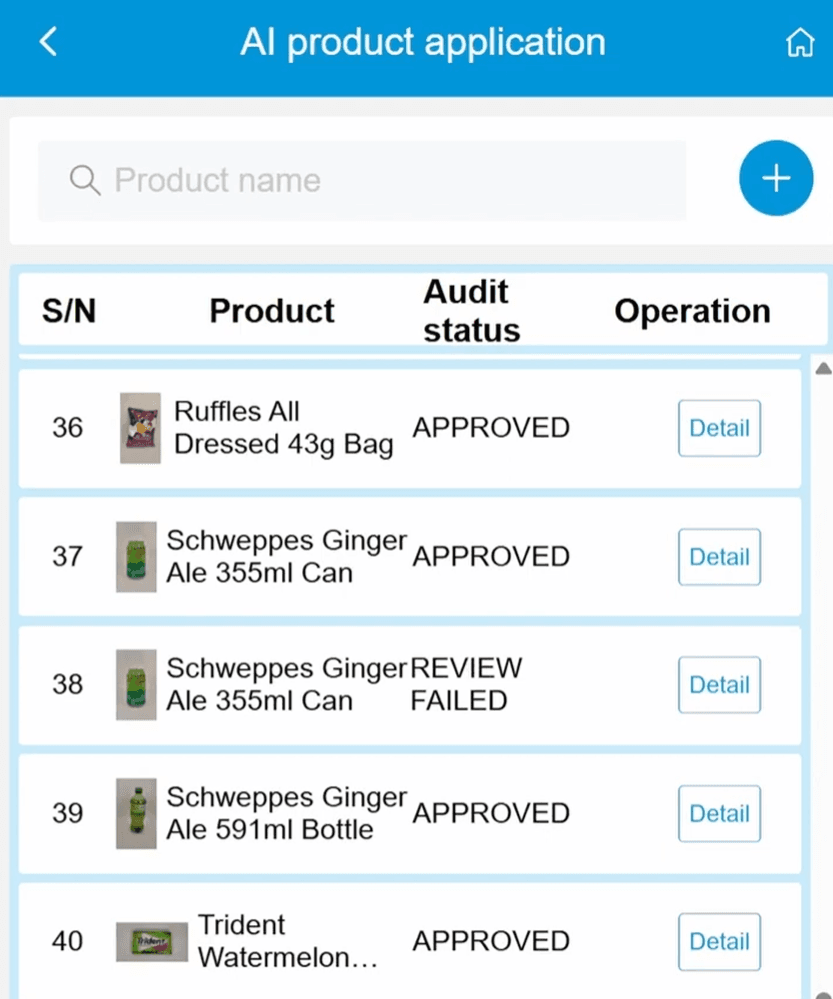
Confirm Product Approval Status
After submitting products for review, approval typically takes a few business days.
Once approved, the product’s audit status will change to Approved, meaning it can now be used in your AI Cooler.
If a product shows Review Failed, click Details to see the reason.
A common issue is an incorrect or mismatched barcode.
If this happens, verify the barcode and resubmit the product for review.
As long as images and barcode information are clear and correct, approval should proceed smoothly.
Step 5.2
Adding Approved Products to your AI Cooler
Once your products are approved:
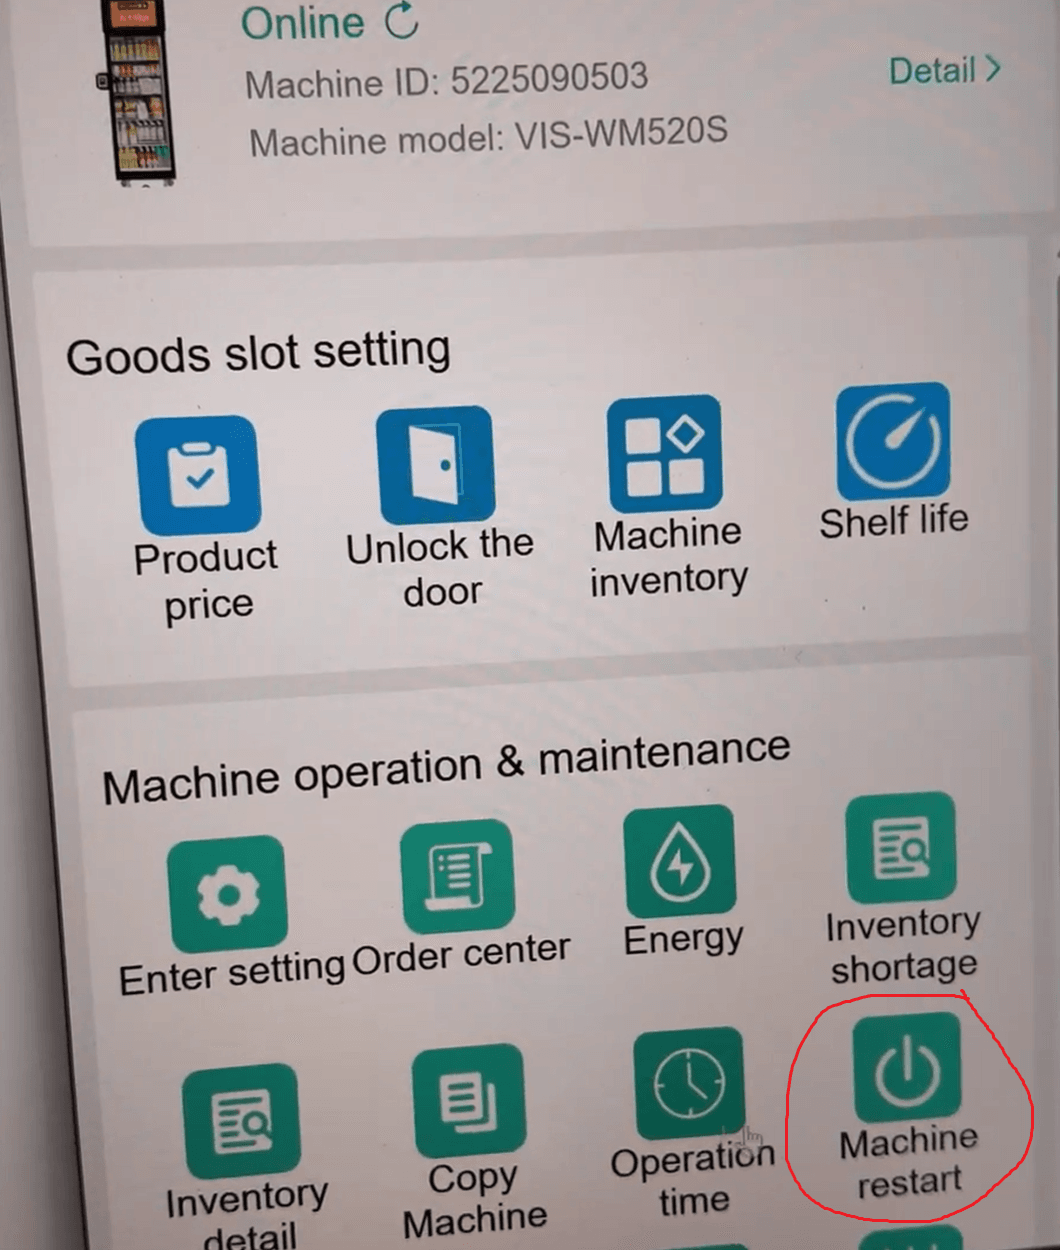
Go to Machine Management in the online dashboard.
Select the machine you want to configure.
From here, you can manage:
Product pricing
Door unlocking
Shelf life
Machine inventory
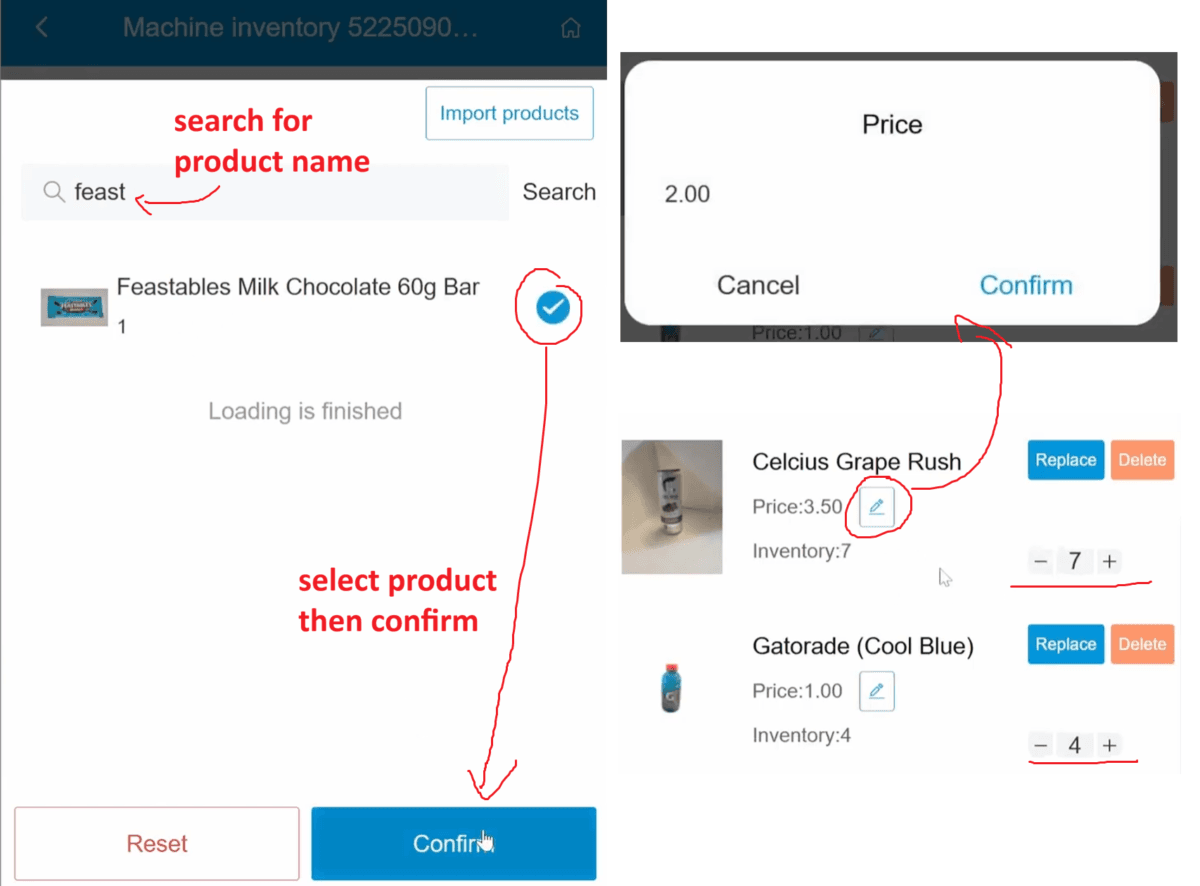
Select Machine Inventory to begin loading products:
Click Add Product to add a new product to your cooler
Click Replace to replace an existing product with a different one or Delete to remove an existing product
Click the plus or minus button to control the inventory of a product.
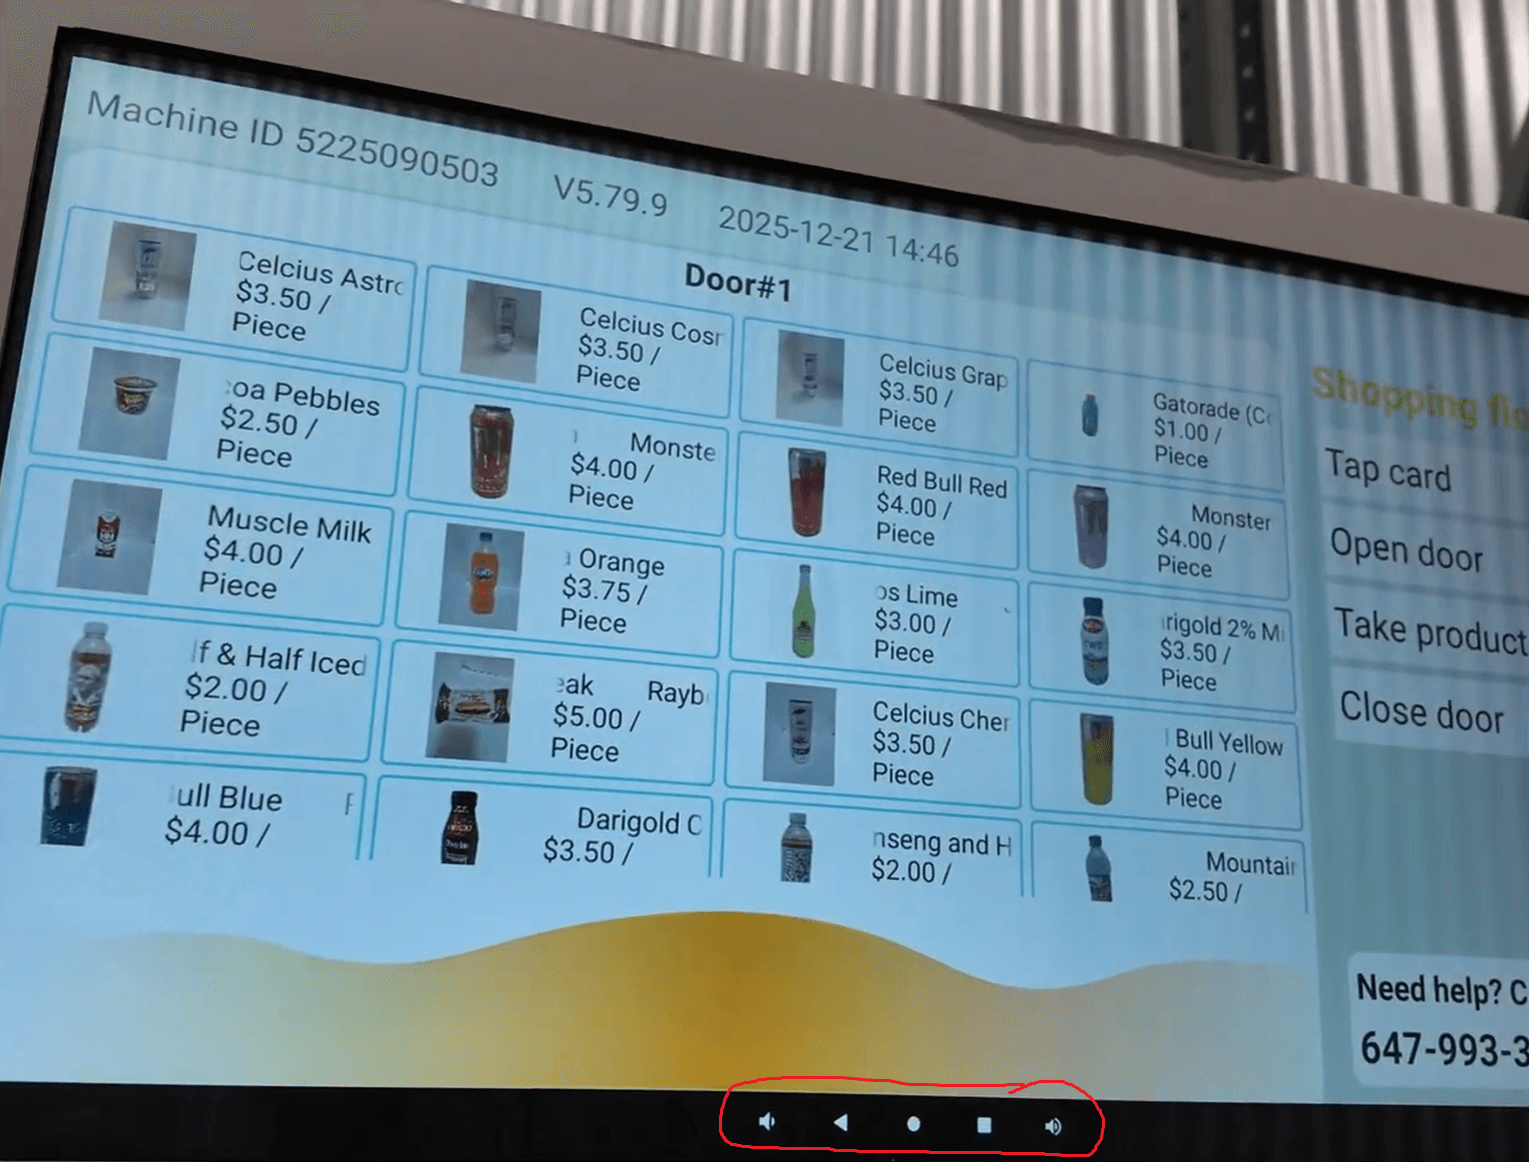
The product will be added to a specific floor (shelf) in the machine. Shelf numbering reference: Floor 1 is the closest to the camera.
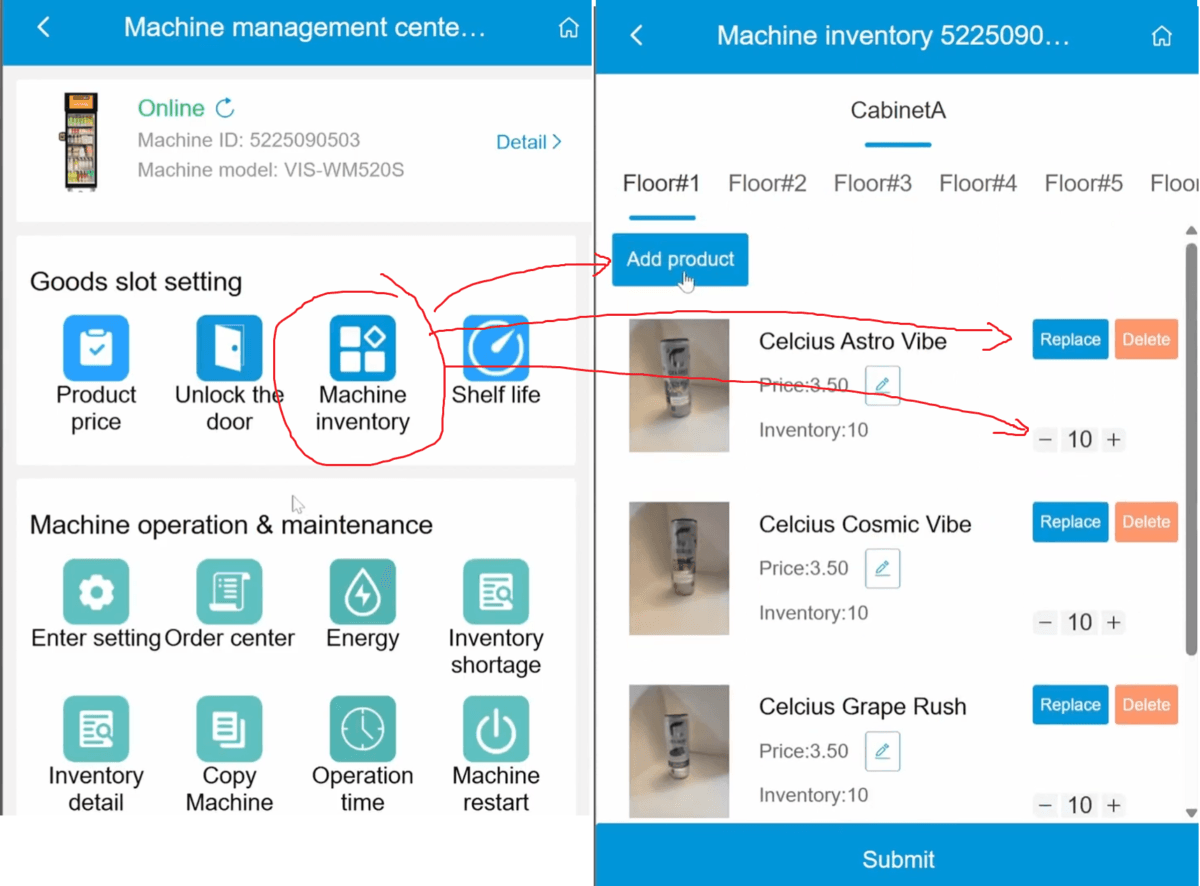
After clicking Add Product, you can:
Search for the approved product by name.
Select the product and click Confirm.
The product will be added to a specific floor (shelf) in the machine.
For each product added:
Set the price to your desired selling price.
Enter the inventory count, matching the number of units physically loaded into the machine.
Once complete, click Submit.
If the machine is online, product updates will sync almost immediately.
Step 6
Misc. Settings
In this step, you configure customer-facing contact information, hide the Android navigation bar to prevent tampering, and use a temporary password to access the settings menu. You verify card reader settings, check Android system settings, and confirm the machine is set to the correct local currency.
Step 6.1
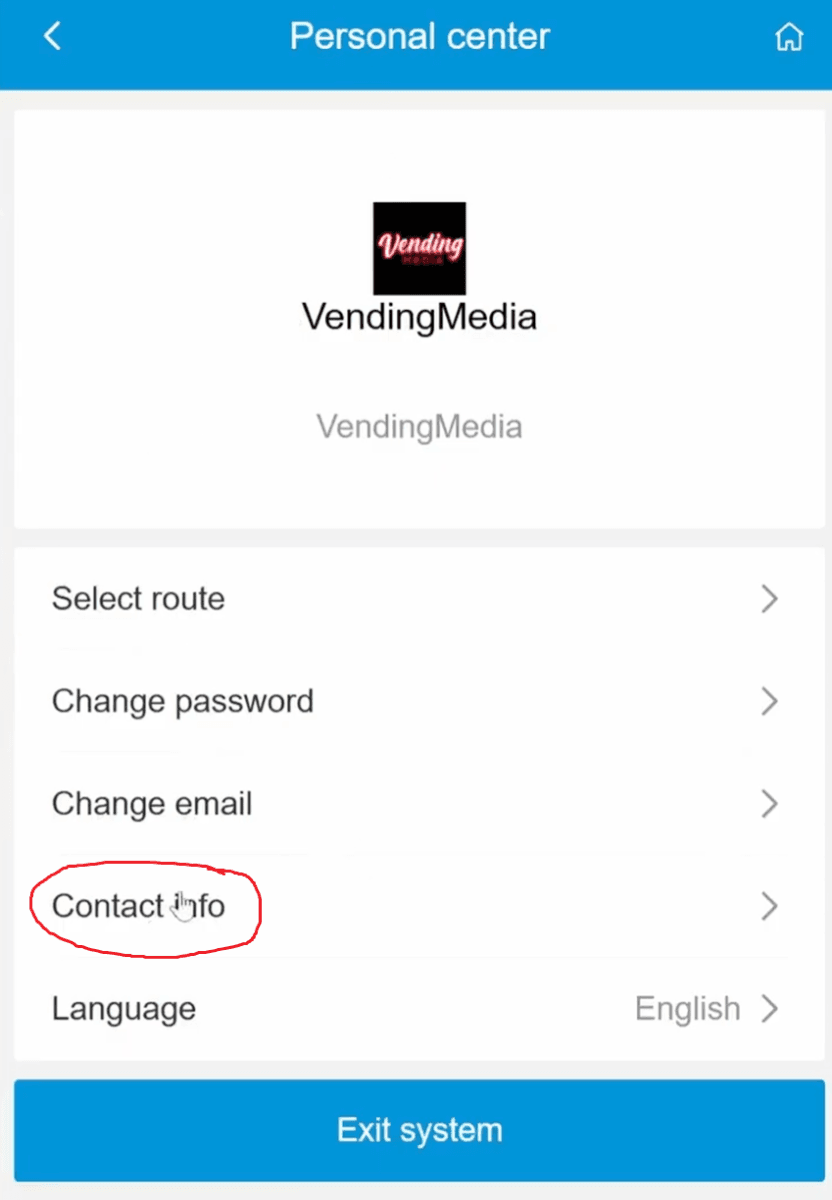
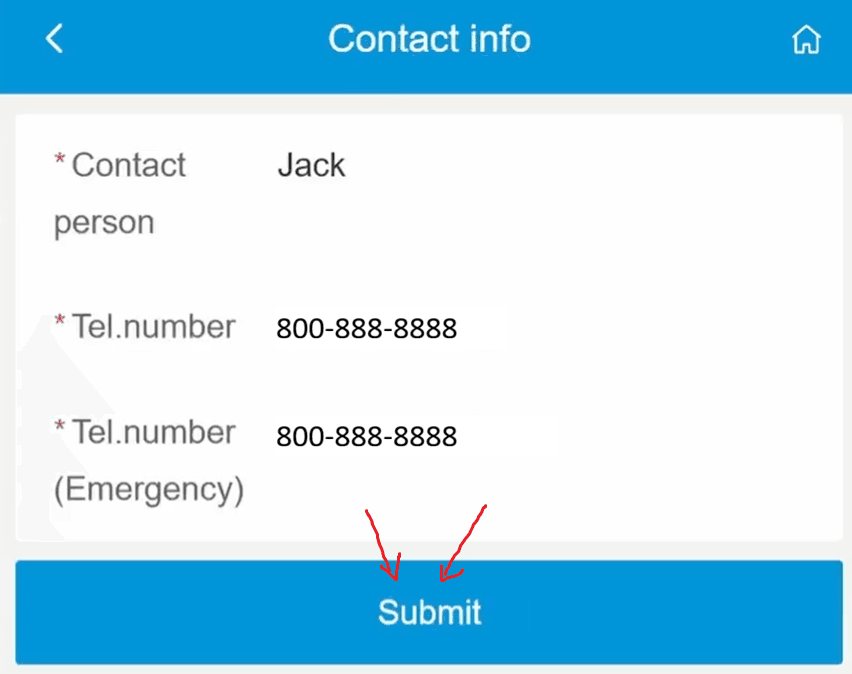
Set Contact Information
You can display contact information on the AI Cooler screen so customers know who to contact if issues arise:
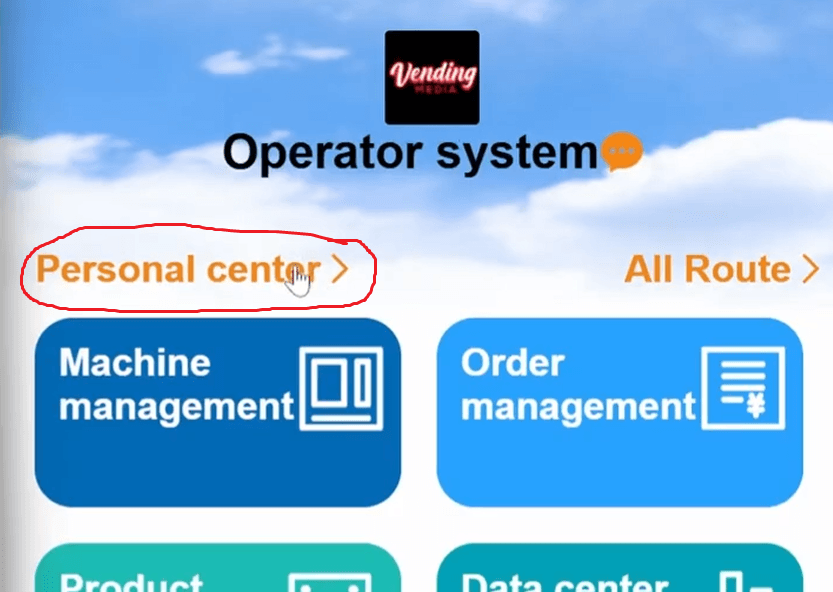
In the online dashboard, go to Personal Center → Contact Info.
Enter the responsible person’s name and contact number.
Click Submit to save.
This information will appear on the AI Cooler product screen.
Step 6.2
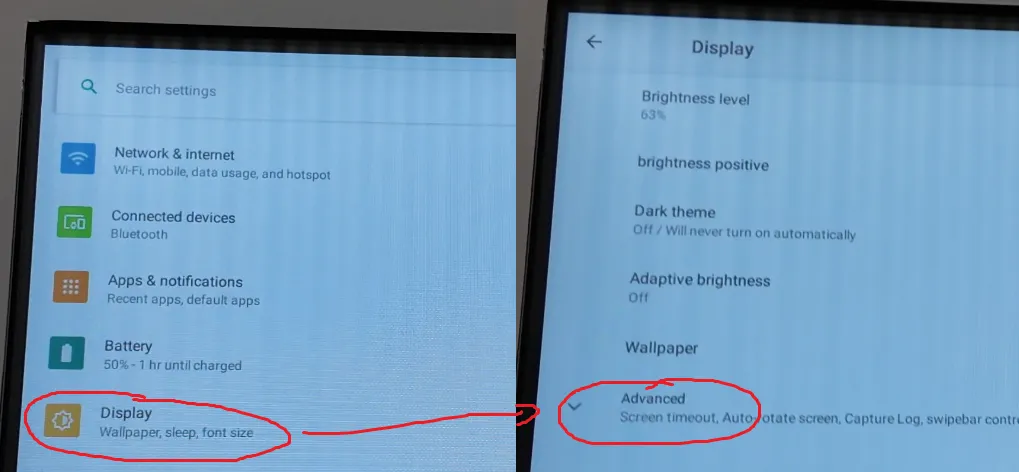
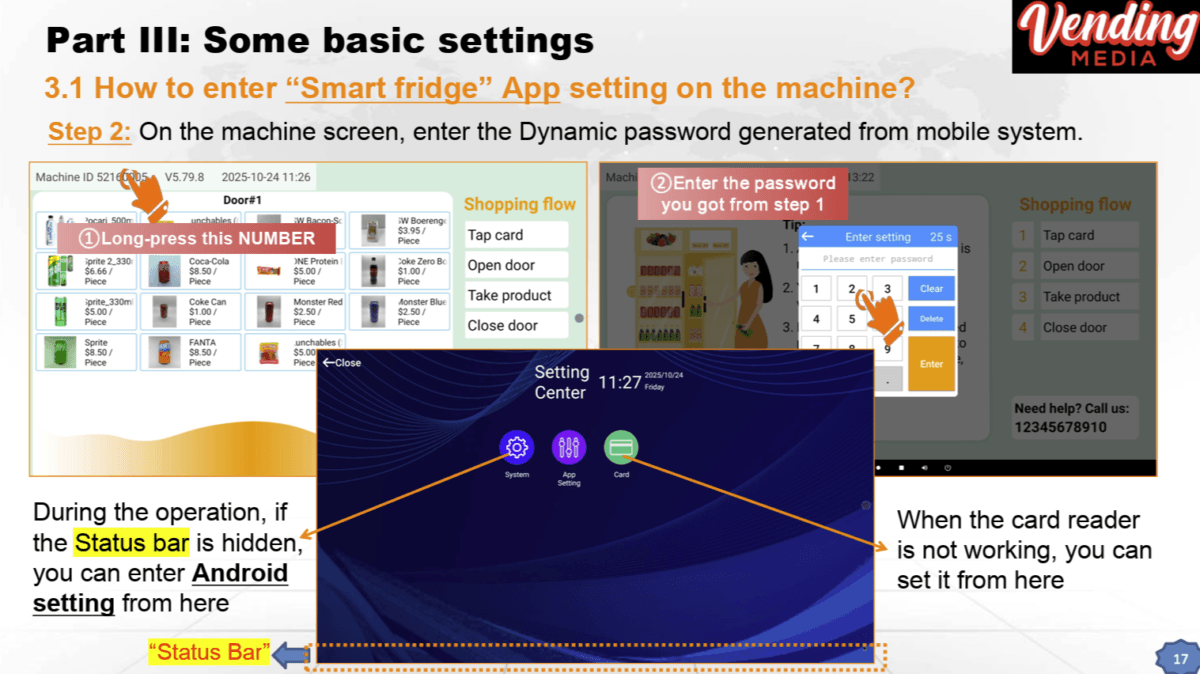
Hide the Android Navigation Bar
Hiding the navigation bar prevents customers from accessing settings:
On the machine, tap the circle icon.
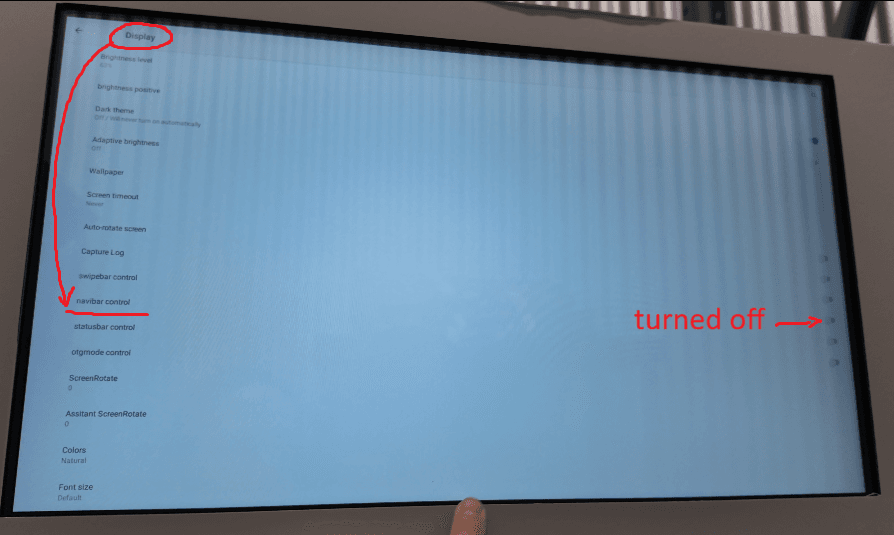
Scroll up and go to Settings → Display → Advanced → NaviBar Control.
Turn OFF to hide the Android navigation bar.
After hiding the navigation bar, restart the vending app to return to the product screen:
On the mobile dashboard, select the machine.
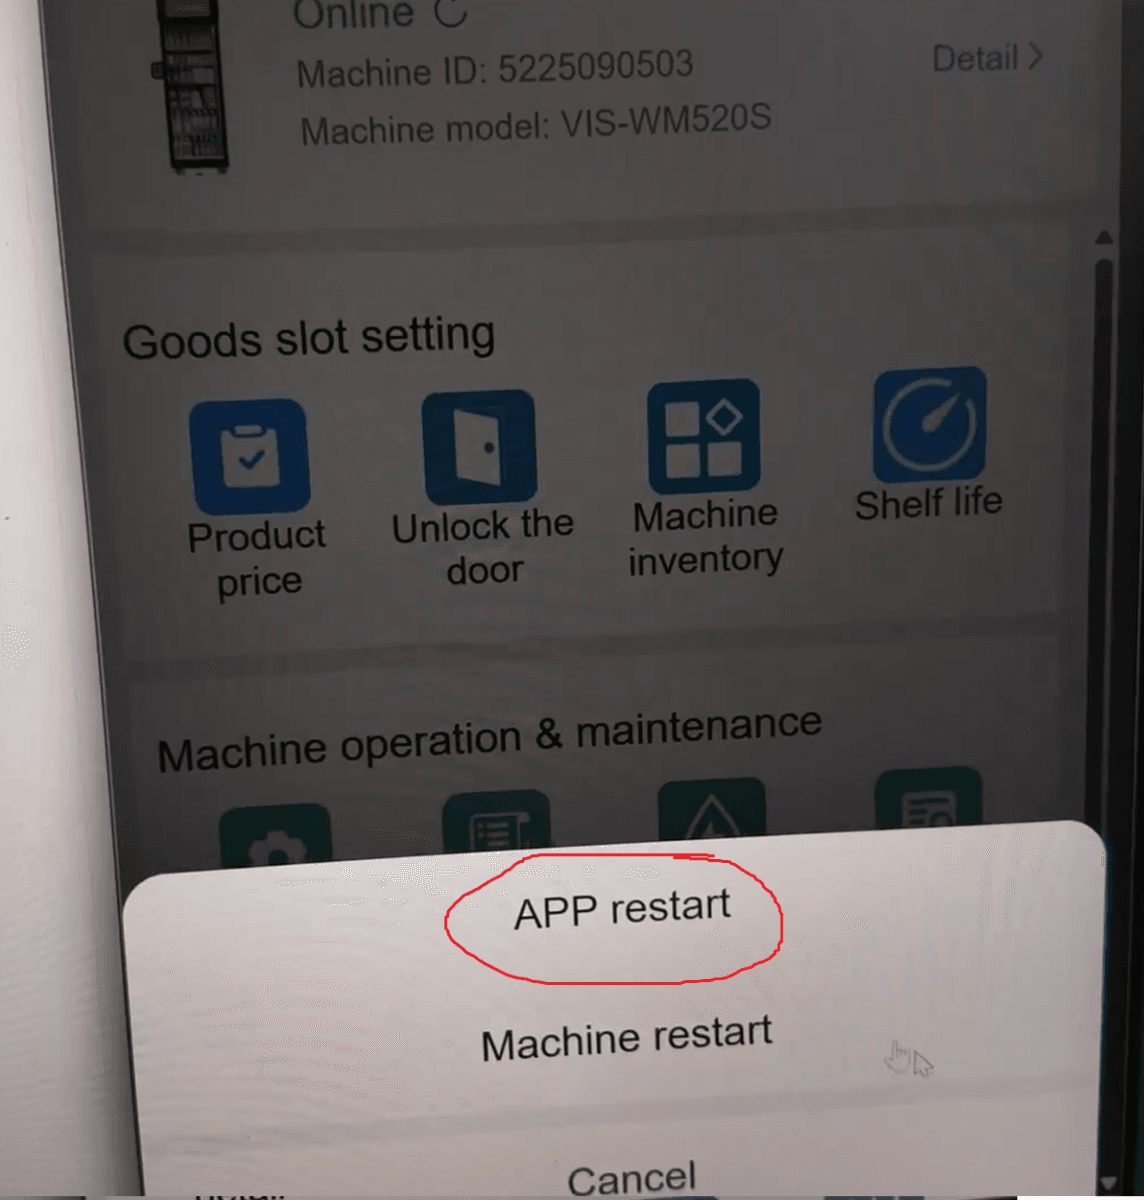
Click Machine Restart → App Restart.
The machine will restart and return to the vending screen, displaying products and your contact information.
You can see that the android navigation bar is now hidden.
Step 6.3
Re-Enter Settings with a Temporary Password
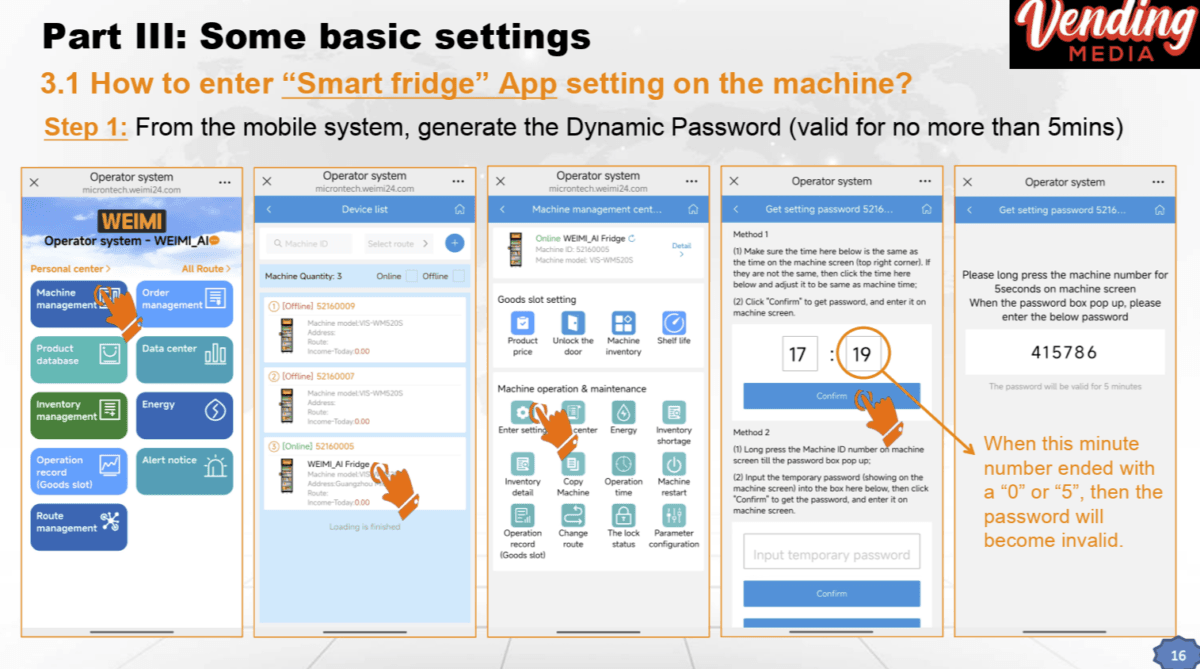
Once the navigation bar is hidden, you need a temporary password to access settings:
On the mobile dashboard, click Enter Setting.
Confirm the time and click Confirm to generate a 6-digit password (valid for 5 minutes).
On the machine, press and hold the machine ID and enter the password.
You are now back in the settings menu.
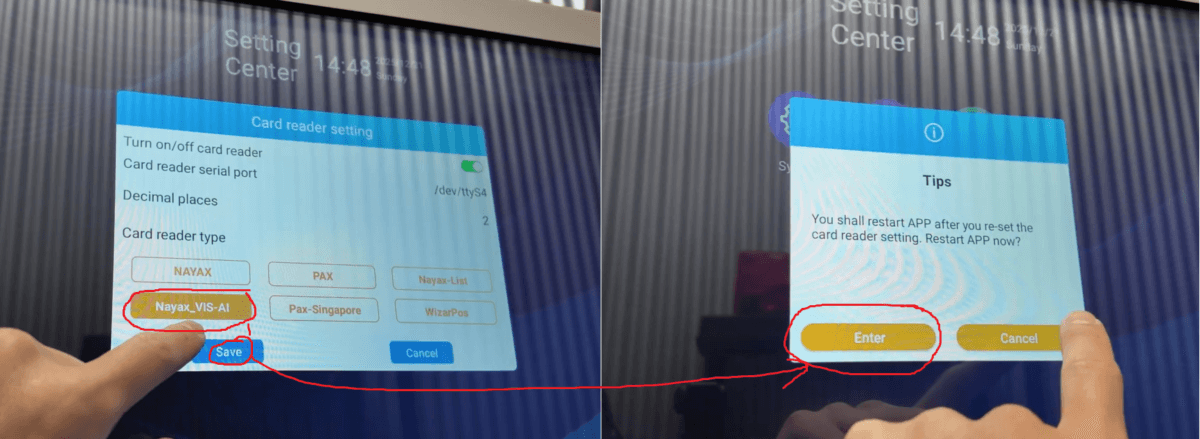
Step 6.4
Verify Card Reader Settings
Inside the settings menu:
Go to Card.
Ensure the card reader is enabled.
Confirm the card type is Nayax_VIS-AI (the type required for the machine).
Click Save (a restart prompt may appear, make sure you restart to save the settings).
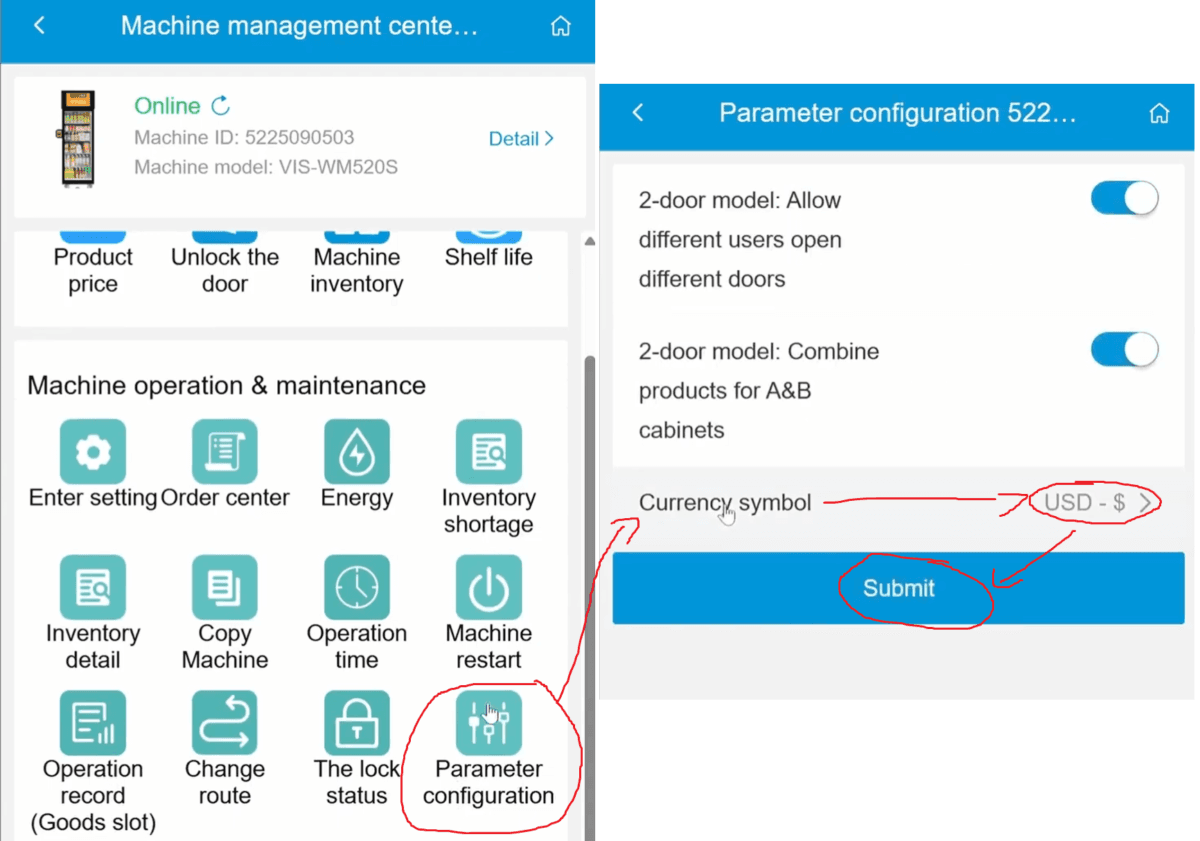
Step 6.5
Set the Correct Currency
Ensure your machine uses the correct local currency:
In Machine Management, select your machine.
Scroll to Parameter Configuration → Currency symbol.
Select the appropriate currency:
USD for the United States
CAD for Canada
Click Submit to save. The machine will restart with the updated currency.
Step 7
Test Transaction
⚠️ BEFORE MOVING YOUR MACHINE TO ITS LOCATION
You MUST test the functionality of your Nayax payment system before placing the machine on-site.
On the online dashboard, you can confirm successful transactions, identify “no purchase” events, and watch surveillance videos to understand how the AI recognized products. Reviewing these videos helps validate shelf placement and diagnose errors.
Step 7.1
Perform a Test Transaction
Once setup is complete, perform a test purchase using a real credit card.
Tap the screen, authorize payment, open the door, and remove a product.
Close the door to complete the transaction.
This confirms that payment, door sensors, and AI recognition are functioning correctly.
Step 7.2
Review Orders in the Dashboard
To review transactions:
Go to Order Management in the online dashboard.
Open 30-Day Orders to view recent activity.
You may see different order types:
No Purchase
The customer authorized payment and opened the door but did not take any items
Paid amount will show $0
Delivery Success
Displays the product sold and the amount charged
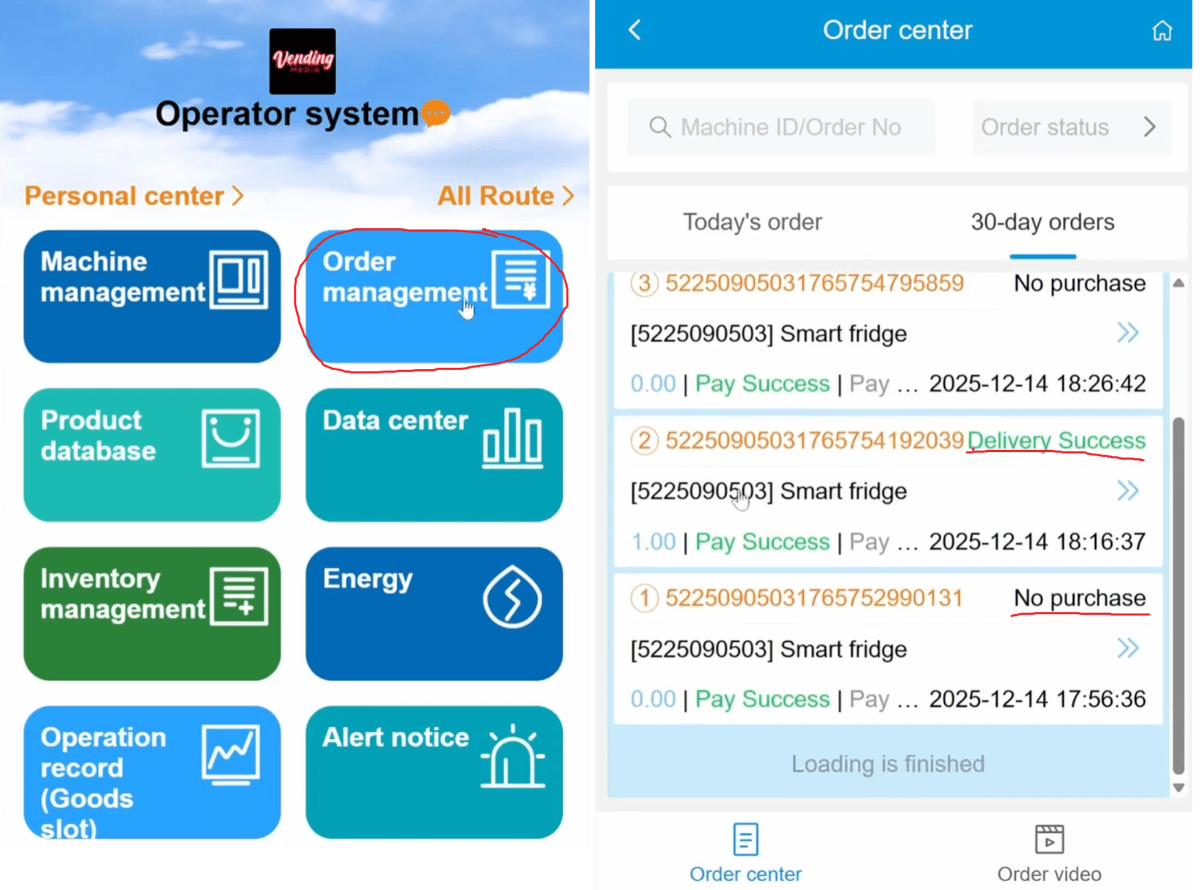
For each order, you can review what the machine recorded.
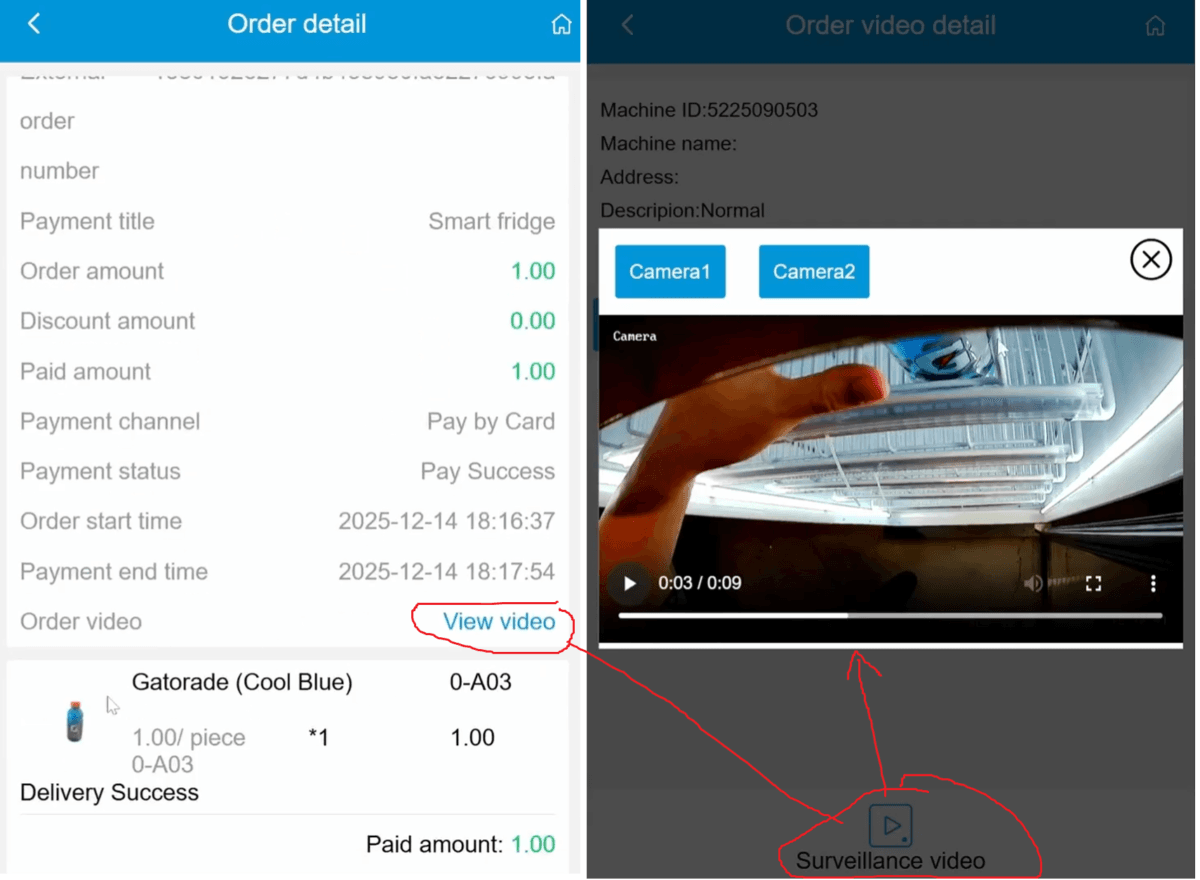
Select an order.
Click View Video.
Wait briefly for the video to load.
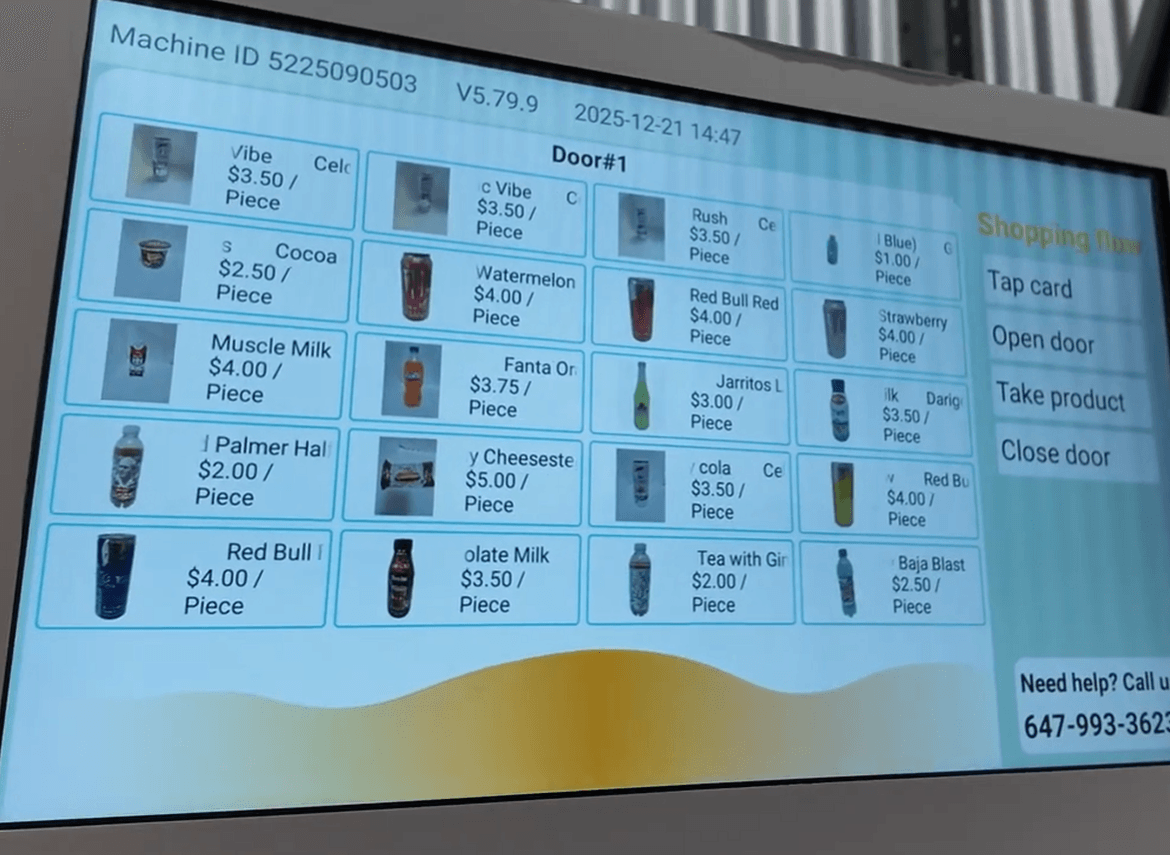
The video shows a top-down view of the shelves at the time of the transaction.
Products on the top shelves are easiest to identify, which is why smaller and fast-selling items are recommended for upper shelves.
The machine uses this footage to identify which product was removed and determine the correct charge.
Step 7.3
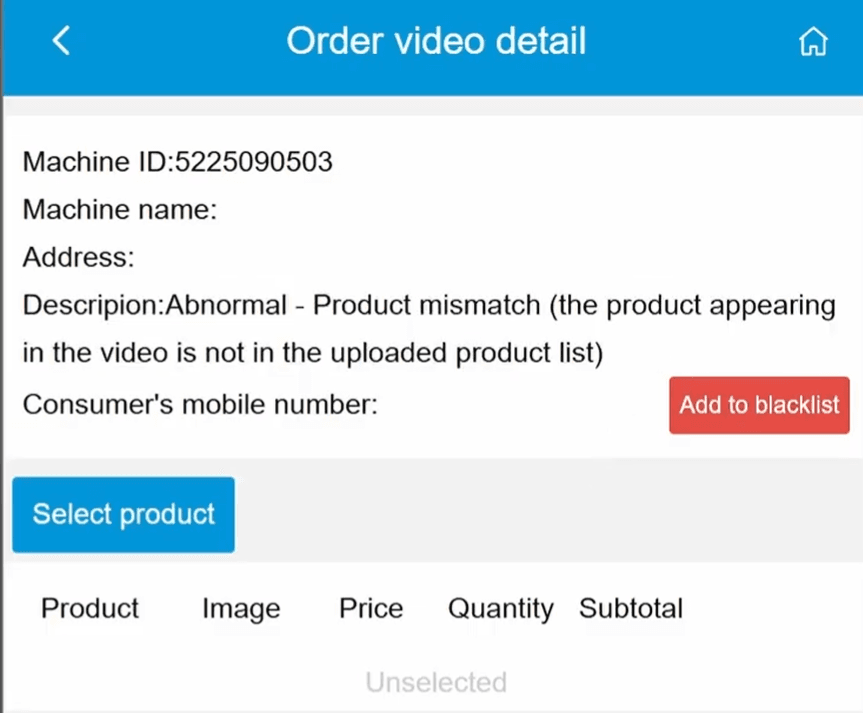
Understand and Troubleshoot Errors
Occasionally, you may see orders with errors.
A common issue occurs when:
Products are physically placed in the machine
But not added to the machine inventory in the online dashboard
In this case:
The video may clearly show the customer removing products
However, because the products were not set up in the inventory, the machine cannot recognize them
As a result, the customer may not be charged
This is why it is critical to always update the machine inventory in the dashboard whenever you load new products.
Step 7.4
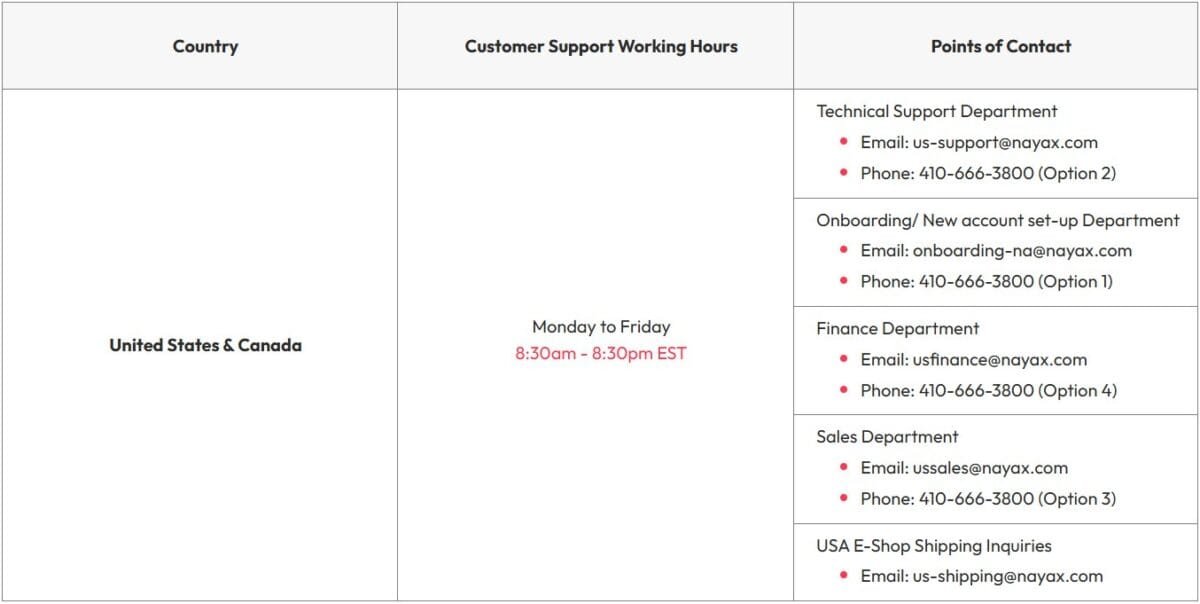
Contact Nayax to Resolve Issues
If you encounter any issues or error codes on your Nayax terminal, please contact Nayax tech support directly via phone, email, or by submitting a ticket on their website to resolve the problem.